Everything curl
Everything curl is an extensive guide for all things curl. The project itself, the command-line tool, the library, how everything started and how it came to be the useful tool it is today. It explains how we work on developing it further, what it takes to use it, how you can contribute with code or bug reports and why millions of existing users use it.
This book is meant to be interesting and useful to both casual readers and somewhat more experienced developers. It offers something for everyone to pick and choose from.
Do not read this book from front to back. Read the chapters or content you are curious about and flip back and forth as you see fit.
This book is an open source project in itself: open, completely free to download and read. Free for anyone to comment on, and available for everyone to contribute to and help out with. Send your bug reports, ideas, pull requests or critiques to us and I or someone else is going to work on improving the book accordingly.
This book is never finished. I intend to keep working on it. While I may at some point consider it fairly complete, covering most aspects of the project (even if only that seems like an insurmountable goal), the curl project continues to move so there are always things to update in the book as well.
This book project started at the end of September 2015.
Site
https://everything.curl.dev is the home of this book. It features the book online in a web version.
This book is also provided as a PDF and an ePUB.
The book website is hosted by Fastly. The book content is rendered by mdBook since March 18th, 2024.
Content
All book content is hosted on GitHub in the https://github.com/curl/everything-curl repository.
Author
With the hope of becoming a co-author of this material, I am Daniel Stenberg. I founded the curl project and I am a developer at heart—for fun and profit. I live and work in Stockholm, Sweden.
All there is to know about Daniel can be found on daniel.haxx.se.
Contribute
If you find mistakes, omissions, errors or blatant lies in this document, please send us a refreshed version of the affected paragraph and we amend and update. We give credit to and recognize everyone who helps out.
Preferably, you could submit errors or pull requests on the book's GitHub page.
Contributors
Lots of people have reported bugs, improved sections or otherwise helped make this book the success it is. These friends include the following:
AaronChen0 on github, alawvt on github, Amin Khoshnood, amnkh on github, Anders Roxell, Angad Gill, Aris (Karim) Merchant, auktis on github, Ben Bodenmiller Ben Peachey, bookofportals on github, Bruno Baguette, Carlton Gibson, Chris DeLuca, Citizen Esosa, Dan Fandrich, Daniel Brown, Daniel Sabsay, David Piano, DrDoom74 at GitHub, Emil Hessman, enachos71 on github, ethomag on github, Fabian Keil, faterer on github, Frank Dana, Frank Hassanabad, Gautham B A, Geir Hauge, Harry Wright, Helena Udd, Hubert Lin, i-ky on github, infinnovation-dev on GitHub, Jay Ottinger, Jay Satiro, Jeroen Ooms, Johan Wigert, John Simpson, JohnCoconut on github, Jonas Forsberg, Josh Vanderhook, JoyIfBam5, KJM on github, knorr3 on github, lowttl on github, Luca Niccoli, Manuel on github, Marius Žilėnas, Mark Koester, Martin van den Nieuwelaar, mehandes on github, Michael Kaufmann, Ms2ger, Mohammadreza Hendiani, Nick Travers, Nicolas Brassard, Oscar on github, Oskar Köök, Patrik Lundin, RekGRpth on github, Ryan McQuen, Saravanan Musuwathi Kesavan, Senthil Kumaran, Shusen Liu, Sonia Hamilton, Spiros Georgaras, Stephen, Steve Holme, Stian Hvatum, strupo on github, Viktor Szakats, Vitaliy T, Wayne Lai, Wieland Hoffmann, 谭九鼎
License
This document is licensed under the Creative Commons Attribution 4.0 license.
The cURL project
![]()
A funny detail about Open Source projects is that they are called projects, as if they were somehow limited in time or ever can get done. The cURL project is a number of loosely coupled individual volunteers working on writing software together with a common mission: to do reliable data transfers with Internet protocols, as Open Source.
- How it started
- The name
- What does curl do?
- Project communication
- Mailing list etiquette
- Mailing lists
- Reporting bugs
- Commercial support
- Releases
- Security
- Trust
- Code of Conduct
- Development
- The development team
- Users of curl
- Future
How it started
Back in 1996, Daniel Stenberg was writing an IRC bot in his spare time, an automated program that would offer services for the participants in a chatroom dedicated to the Amiga computer (#amiga on the IRC network EFnet). He came to think that it would be fun to get some updated currency rates and have his bot offer a service online for the chat room users to get current exchange rates, to ask the bot "please exchange 200 USD into SEK" or similar.
In order to have the provided exchange rates as accurate as possible, the bot would download the rates daily from a website that was hosting them. A small tool to download data over HTTP was needed for this task. A quick look-around at the time had Daniel find a tiny tool named httpget (written by the Brazilian developer Rafael Sagula). It did the job, almost, it only needed a few little tweaks.
Rafael released HttpGet 0.1 on November 11, 1996 and already in the next release, called 0.2 released in December that year, Daniel had his first changes included. Soon after that, Daniel had taken over maintenance of the few hundred lines of code it was.
HttpGet 1.0 was released on April 8 1997 with brand new HTTP proxy support.
We soon found and fixed support for getting currencies over GOPHER. Once FTP download support was added, the name of the project was changed and urlget 2.0 was released in August 1997. The HTTP-only days were already past.
The project slowly grew bigger. When upload capabilities were added and the name once again was misleading, a second name change was made and on March 20, 1998 curl 4 was released. (The version numbering from the previous names was kept.)
We consider March 20 1998 to be curl's birthday.
The name
Naming things is hard.
The tool was about uploading and downloading data specified with a URL. It was a client-side program (the 'c'), a URL client, and would show the data (by default). 'c' stands for Client and URL: cURL. The fact that it could also be read as see URL helped.
Nothing more was needed so the name was selected and we never looked back again.
Later on, someone suggested that curl could actually be a clever recursive acronym (where the first letter in the acronym refers back to the same word): curl URL Request Library.
While that is awesome, it was actually not the original thought. We wish we were that clever…
There are and were other projects using the name curl in various ways, but we were not aware of them by the time our curl came to be.
Uppercase or lowercase
The project can be spelled with mixed case like cURL, even if we often write
it in all lowercase: curl. You are free to use the version you like. We tend
to write about the command line tool and the library with all lowercase: curl
and libcurl.
Pronunciation
Most of us pronounce curl with an initial k sound, like the English word curl. It rhymes with words like girl and earl. Merriam Webster has a short WAV file to help.
Confusions and mix-ups
Soon after our curl was created another curl appeared that created a programming language. That curl still exists.
Several libcurl bindings for various programming languages use the term curl or CURL in part or completely to describe their bindings. Sometimes you find users talking about curl but referring to neither the command-line tool nor the library that is made by this project.
As a verb
'To curl something' is sometimes used as a reference to use a non-browser tool to download a file or resource from a URL.
What does curl do?
curl is a project and its primary purpose and focus is to make Internet transfer related Open Source products:
-
curl, the command-line tool
-
libcurl the transfer library with a C API
-
trurl, the URL parser and manipulation tool
-
wcurl, the simple downloader tool
Everything and anything that is related to client-side Internet protocol transfers can be considered curl's business. Things that are not related to that should be avoided and be left for other projects and products.
It could be important to also consider that curl and libcurl try to avoid handling the actual data that is transferred. It has, for example, no knowledge about HTML or anything else of the content that is popular to transfer over HTTP, but it knows all about how to transfer such data over HTTP.
curl products are frequently used not only to drive thousands or millions of scripts and applications for an Internet connected world, but they are also widely used for server testing, protocol fiddling and trying out new things.
curl, the command line tool
Running curl from the command line was natural and Daniel never considered anything else than that it would output data on stdout, to the terminal, by default. The "everything is a pipe" mantra of standard Unix philosophy was something Daniel believed in. curl is like 'cat' or one of the other Unix tools; it sends data to stdout to make it easy to chain together with other tools to do what you want. That is also why virtually all curl options that allow reading from a file or writing to a file, also have the ability to select doing it to stdout or from stdin.
Following the Unix style of how command-line tools work, there was also never any question about whether curl should support multiple URLs on the command line.
The command-line tool is designed to work perfectly from scripts or other automatic means. It does not feature any other GUI or UI than mere text in and text out.
libcurl, the library
While the command-line tool came first, the network engine was ripped out and converted into a library during the year 2000 and the concepts we still have today were introduced with libcurl 7.1 in August 2000. Since then, the command line tool has been a thin layer of logic to make a tool around the library that does all the heavy lifting.
libcurl is designed and meant to be available for anyone who wants to add client-side file transfer capabilities to their software, on any platform, any architecture and for any purpose. libcurl is also extremely liberally licensed to avoid that becoming an obstacle.
libcurl is written in traditional and conservative C. Where other languages are preferred, people have created libcurl bindings for them.
The library is used in every imaginable sort of embedded device where Internet transfers are needed: car infotainment, televisions, Blu-Ray players, set-top boxes, printers, routers, game systems, etc.
trurl, a URL tool
Managing, parsing and handling URLs is tricky. Not only because URLs are insufficiently standardized so that different parsers tend to parse the same URL differently, but also because the syntax of them are hard to get right.
trurl is a command line tool to help users parse, generate and manipulate URLs in scripts and on command lines. By using trurl, scripts can get extract details from URLs safely, update URLs or create URLs without having to figure out the intricacies of the URL standards.
An extra reason for using trurl in combination with curl, is that trurl is built using libcurl, meaning that both tools use the same URL parser and therefore understand and treat URLs exactly the same way. This is important because using mixed URL parsers on the same URL is a common reason for security vulnerabilities.
wcurl, a URL downloader
For many years it has been said and people have reported that using curl to download URLs is difficult because they can never remember the exact command line options to make curl do that: download a single URL or two into a local file. People would cite that as the primary reason they still use alternative command line tools for that use case.
wcurl is the command line tool that downloads URLs without the user having to remember any parameter at all.
Project communication
curl is an Open Source project consisting of voluntary members from all over the world, living and working in a large number of the world's time zones. To make such a setup actually work, communication and openness is key. We keep all communication public and we use open communication channels. Most discussions are held on mailing lists, we use bug trackers where all issues are discussed and handled with full insight for everyone who cares to look.
It is important to realize that we are all jointly taking care of the project, we fix problems and we add features. Sometimes a regular contributor grows bored and fades away, sometimes a new eager contributor steps out from the shadows and starts helping out more. To keep this ship going forward as well as possible, it is important that we maintain open discussions and that is one of the reasons why we frown upon users who take discussions privately or try to email individual team members about development issues, questions, debugging or whatever.
In this day, mailing lists may be considered the old style of communication — no fancy web forums or similar. Using a mailing list is therefore becoming an art that is not practiced everywhere and may be a bit strange and unusual to you. It is about sending emails to an address that then sends that email out to all the subscribers. Our mailing lists have at most a few thousand subscribers. If you are mailing for the first time, it might be good to read a few old mails first to get to learn the culture and what's considered good practice.
The mailing lists and the bug tracker have changed hosting providers a few times and there are reasons to suspect it might happen again in the future. It is the kind of thing that happens to a project that lives for a long time.
A few users also hang out on IRC in the #curl channel on libera.chat.
Mailing list etiquette
Like many communities and subcultures, we have developed guidelines and rules of what we think is the right way to behave and how to communicate on the mailing lists. The curl mailing list etiquette follows the style of traditional Open Source projects.
Do not mail a single individual
Many people send one question directly to one person. One person gets many mails, and there is only one person who can give you a reply. The question may be something that other people also want to ask. These other people have no way to read the reply but to ask the one person the question. The one person consequently gets overloaded with mail.
If you really want to contact an individual and perhaps pay for his or her services, by all means go ahead, but if it is another curl question, take it to a suitable list instead.
Reply or new mail
Please do not reply to an existing message as a shortcut to post a message to the lists.
Many mail programs and web archivers use information within mails to keep them together as threads, as collections of posts that discuss a certain subject. If you do not intend to reply on the same or similar subject, do not hit reply on an existing mail and change the subject; create a new mail.
Reply to the list
When replying to a message from the list, make sure that you do group reply or reply to all, and not reply to the author of the single mail you reply to.
We are actively discouraging replying back to a single person privately. Keep follow-ups on discussions on the list.
Use a sensible subject
Please use a subject of the mail that makes sense and that is related to the contents of your mail. It makes it a lot easier to find your mail afterwards and it makes it easier to track mail threads and topics.
Do not top-post
If you reply to a message, do not use top-posting. Top-posting is when you write the new text at the top of a mail and you insert the previous quoted mail conversation below. It forces users to read the mail in a backwards order to properly understand it.
This is why top posting is so bad:
A: Because it messes up the order in which people normally read text.
Q: Why is top-posting such a bad thing?
A: Top-posting.
Q: What is the most annoying thing in email?
Apart from the screwed-up read order (especially when mixed together in a thread when someone responds using the mandated bottom-posting style), it also makes it impossible to quote only parts of the original mail.
When you reply to a mail you let the mail client insert the previous mail quoted. Then you put the cursor on the first line of the mail and you move down through the mail, deleting all parts of the quotes that do not add context for your comments. When you want to add a comment you do so, inline, right after the quotes that relate to your comment. Then you continue downwards again.
When most of the quotes have been removed and you have added your own words, you are done.
HTML is not for mails
Please switch off those HTML encoded messages. You can mail all those funny mails to your friends. We speak plain text mails.
Quoting
Quote as little as possible. Enough to provide the context you cannot leave out. A lengthy description can be found here.
Digest
We allow subscribers to subscribe to the digest version of the mailing lists. A digest is a collection of mails lumped together in one single mail.
Should you decide to reply to a mail sent out as a digest, there are two things you MUST consider if you really cannot subscribe normally instead:
Cut off all mails and chatter that is not related to the mail you want to reply to.
Change the subject name to something sensible and related to the subject, preferably even the actual subject of the single mail you wanted to reply to.
Please tell us how you solved the problem
Many people mail questions to the list, people spend some of their time and make an effort in providing good answers to these questions.
If you are the one who asks, please consider responding once more in case one of the hints was what solved your problems. Those who write answers feel good to know that they provided a good answer and that you fixed the problem. Far too often, the person who asked the question is never heard of again, and we never get to know if he/she is gone because the problem was solved or perhaps because the problem was unsolvable.
Getting the solution posted also helps other users that experience the same problem(s). They get to see (possibly in the web archives) that the suggested fixes actually helped at least one person.
Mailing lists
Some of the most important mailing lists are…
curl-users
The main mailing list for users and developers of the curl command-line tool, for questions and help around curl concepts, command-line options, the protocols curl can speak or even related tools. We tend to move development issues or more advanced bug fixes discussions over to curl-library instead, since libcurl is the engine that drives most of curl.
See curl-users
curl-library
The main development list, and also for users of libcurl. We discuss how to use libcurl in applications as well as development of libcurl itself. Questions on libcurl behavior, debugging and documentation issues etc.
See curl-library
curl-announce
This mailing list only gets announcements about new releases and security problems—nothing else. This one is for those who want a more casual feed of information from the project.
See curl-announce
Reporting bugs
The development team does a lot of testing. We have a whole test suite that is run frequently every day on numerous platforms in order to exercise all code and make sure everything works as expected.
Still, there are times when things do not work the way they should, and we depend on people reporting it to us.
A bug is a problem
Any problem can be considered a bug. A weirdly phrased wording in the manual that prevents you from understanding something is a bug. A surprising side effect of combining multiple options can be a bug—or perhaps it should be better documented? Perhaps the option does not do at all what you expected it to? That is a problem and we should fix it.
Problems must be known to get fixed
This may sound easy and uncomplicated but is a fundamental truth in our and other projects. Even if it is an old project that has thousands of users does not mean the development team knows about the exact problem you stumbled over. Maybe users have not paid attention to details as much as you have, or perhaps it never triggered for anyone else.
We rely on users experiencing problems to report them. We need to know of their existence in order to fix them.
Fixing the problems
Software engineering is, to a large degree, about fixing problems. To fix a problem a developer needs to understand how to repeat it, and to do that they need to be told what set of circumstances triggered the problem.
A good bug report
A good report explains what happened and what you thought was going to happen. Tell us exactly what versions of the different components you used and take us step by step through what you did to arrive at the problem.
After you submit a bug report, you can expect there to be follow-up questions or perhaps requests that you try out various things so the developer can narrow down the suspects and make sure your problem is properly located.
A bug report that is submitted then abandoned by the submitter risks getting closed if the developer fails to understand it, fails to reproduce it or faces other problems when working on it. Do not abandon your report.
Report curl bugs in the curl bug tracker on GitHub.
Testing
Testing software thoroughly and properly is a lot of work. Testing software that runs on dozens of operating systems and CPU architectures, with server implementations which have their own sets of bugs and interpretations of the specs, is even more work.
The curl project has a test suite that iterates over all existing test cases, runs each test and verifies that the outcome is correct and that no other problem happened, such as a memory leak or something fishy in the protocol layer.
The test suite is meant to be run after you have built curl yourself. There are a number of volunteers who also help out by running the test suite automatically a few times per day to make sure the latest commits are tested. This way we discover the worst flaws not long after their introduction.
We do not test everything, and even when we try to test things there are always subtle bugs that get through, some that are only discovered years later.
Due to the nature of different systems and funny use cases on the Internet, eventually some of the best testing is done by users when they run the code to perform their own use cases.
Another limiting factor with the test suite is that the test setup itself is less portable than curl and libcurl, so there are in fact platforms where curl runs fine but the test suite cannot execute at all.
Commercial support
Commercial support for curl and libcurl is offered and provided by Daniel Stenberg (the curl founder) through the company wolfSSL.
wolfSSL offers world-wide commercial support on curl done by the masters of curl. wolfSSL handles curl customization, ports to new operating systems, feature development, patch maintenance, bug fixing, upstreaming, training, code reviews of libcurl API use, security scanning your curl use and more - with several different support options from basic up to full 24/7 support. With guaranteed response times.
See the support page for contact details.
Releases
A release in the curl project means packaging up all the source code that is in the master branch of the code repository, signing the package, tagging the point in the code repository, and then putting it up on the website for the world to download.
It is one single source code archive for all platforms curl can run on. It is the one and only package for both curl and libcurl.
We never ship any curl or libcurl binaries from the project with one exception: we host official curl binaries built for Windows users. All the other packaged binaries that are provided with operating systems or on other download sites are done by gracious volunteers outside of the project.
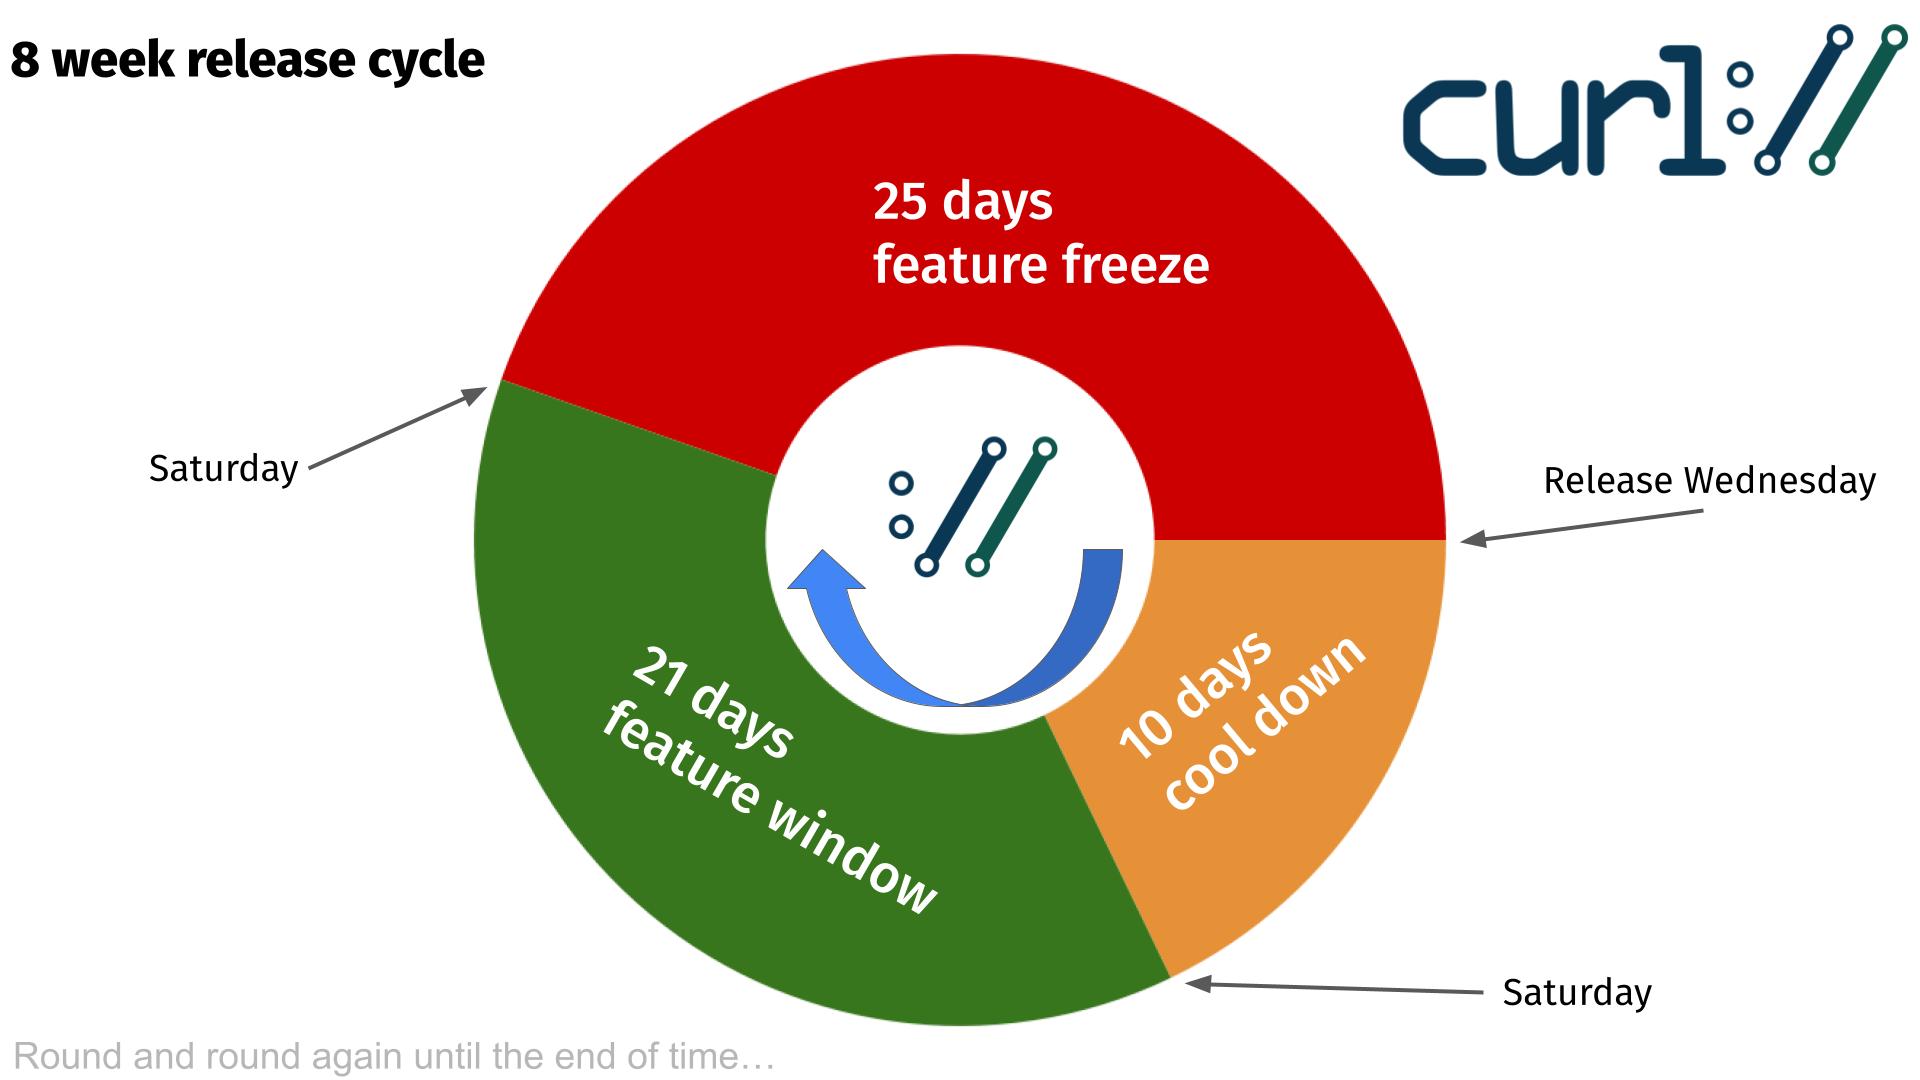
As of several years back, we make an effort to do our releases on an eight week cycle and unless some really serious and urgent problem shows up we stick to this schedule. We release on a Wednesday, and then again a Wednesday eight weeks later and so it continues. Non-stop.
For every release we tag the source code in the repository with the curl version number and we update the changelog.
We had done a total of 265 releases by February 2025. The entire release history and changelog is available in our curl release log.
Release candidates
Since March 2025, we have been shipping release candidates for upcoming releases.
Release candidates are tagged with the version number followed by -rc and a number.
Before every release, we ship three release candidates to allow for testing and
verification by the community and distributions.
The release candidates are available for download from curl.se/rc. Do not use release candidates in production, as they are intended for testing and verification only.
Release cycle
Daily snapshots
Every single change to the source code is committed and pushed to the source code repository. This repository is hosted on github.com and is using git these days (but has not always been this way). When building curl off the repository, there are a few things you need to generate and set up that sometimes cause people problems or friction. To help with that, we provide daily snapshots.
The daily snapshots are generated daily (clever naming, right?) as if a release had been made at that point. It produces a package of all source code and all files that are normally part of a release and puts it in a package and uploads it to this special place to allow interested people to get the latest code to test, to experiment or whatever.
The snapshots are kept for around 20 days until deleted.
Security
Security is a primary concern for us in the curl project. We take it seriously and we work hard on providing secure and safe implementations of all protocols and related code. As soon as we get knowledge about a security related problem or a suspected problem, we deal with it and we attempt to provide a fix and security notice no later than in the next pending release.
We use a responsible disclosure policy, meaning that we prefer to discuss and work on security fixes out of the public eye and we alert the vendors on the openwall.org list a few days before we announce the problem and fix to the world. This, in an attempt to shorten the time span the bad guys can take advantage of a problem until a fixed version has been deployed.
Past security problems
During the years we have had our fair share of security related problems. We work hard on documenting every problem thoroughly with all details listed and clearly stated to aid users. Users of curl should be able to figure out what problems their particular curl versions and use cases are vulnerable to.
To help with this, we present this waterfall chart showing how all vulnerabilities affect which curl versions and we have this complete list of all known security problems since the birth of this project.
Backdoors and supply chain risks
With libcurl being installed and running in billions of installations all over the world and in countless different environments, we recognize that it is an ideal target for someone who wants a backdoor somewhere.
A new or old maintainer might at any point propose a change that sounds innocent and well-meaning but has a disguised malicious intent.
To mitigate such risks, we apply established procedures and techniques:
- GitHub. The curl project uses https://github.com/curl/curl as its main source code git repository since 2010. We rely on their hosting to secure access as per our configuration.
- 2FA required. We require all maintainers with push access to git to have two-factor authentication enabled, to reduce the risk that attackers can impersonate them and use their credentials to push source code changes. We rely on GitHub's 2FA setup.
- Reviews. Every contribution that are proposed for inclusion in the project is reviewed by a maintainer. All changes are always done publicly in the open to allow all interested parties to participate. No invitation needed. All changes are also automatically checked, tested and scanned by numerous tools before accepted.
- Readable code. We believe in readable code that follows our code style. Easy to read makes it easy to debug. If code is hard to read it should be improved until it gets easy to read. With easy to read code, smuggling malicious payloads or hiding nefarious functionality is excruciatingly hard.
- Tests. We have a large test suite that is always growing and we do not accept changes that break existing tests and new functionality need to bring new tests for the new functionality. We run several hundred thousand tests on each proposed change to make sure existing functionality remains unaffected. This includes fuzzers, static code analyzers, fault injectors and more.
- No binary blobs. All files stored in version control, in the git repository is readable or is otherwise small and documented. There is no place anywhere for any hidden encrypted payload. We run a scanner on all files on every change to detect binary files and the few files that need to remain looking binary are manually vetted and verified against a checksum.
- Reproducible builds. curl releases are shipped as tarballs that are hosted on the curl website (https://curl.se). We provide documentation, docker setups and configurations etc to allow anyone wanting to easily reproduce our release builds to generate identical images - proving that what we ship is only contents taken from the git repository plus other correct and properly generated contents.
- Signed commits. Over 90% - not all - of recent commits were signed to help prove provenance. Signing commits is not yet a mandatory requirement for committers but we hope to gradually increase the share over time and make it mandatory soon.
- Signed releases. Every release, every uploaded tarball, is signed by Daniel. This helps to prove that the files have not been tampered with since they were produced. We have opted to not sign them by multiple persons only because of the added complexity for the relatively small extra protection.
- Signed tags. Every release is generated from the exact state of the git tree where a corresponding signed tag is set. The name of the release tag is the same as the release version.
- Fix all vulnerabilities quickly. Whenever we receive a security vulnerability report, we create and ship a fix in the next pending release. Sometimes sooner than previously planned. Only in extremely rare cases does it take longer than a release cycle, but in the name of accuracy and correctness we do reserve the right to spend time on research to get it right. With every fixed security vulnerability we release a detailed description of the flaw including exact commit that introduced the problem, recommendations for users and more. Further, the security advisories get announced to the world.
Trust
For a software to conquer the world, it needs to be trusted. It takes trust to build more trust and it can all be broken down really fast if the foundation is proven to have cracks.
In the curl project we build trust for our users in a few different ways:
-
We are completely transparent about everything. Every decision, every discussion as well as every line of code and every considered code change are always public and done in the open.
-
We work hard to write reliable code. We write test cases, we review code, we document best practices and we have a style guide that helps us keep code consistent.
-
We stick to promises and guarantees as much as possible. We do not break APIs and we do not abandon support for old systems.
-
Security is of utmost importance and we take every reported incident seriously and realize that we must fix all known problems and we need to do it responsibly. We do our best to not endanger our users.
-
We act like adults. We can be silly and we can joke around, but we do it responsibly and we follow our Code of Conduct. Everyone should be able to even trust us to behave.
Code of Conduct
As contributors and maintainers of this project, we pledge to respect all people who contribute through reporting issues, posting feature requests, updating documentation, submitting pull requests or patches, and other activities.
We are committed to making participation in this project a harassment-free experience for everyone, regardless of level of experience, gender, gender identity and expression, sexual orientation, disability, personal appearance, body size, race, ethnicity, age, or religion.
Examples of unacceptable behavior by participants include the use of sexual language or imagery, derogatory comments or personal attacks, trolling, public or private harassment, insults, or other unprofessional conduct.
Project maintainers have the right and responsibility to remove, edit, or reject comments, commits, code, wiki edits, issues, and other contributions that are not aligned to this Code of Conduct. Project maintainers who do not follow the Code of Conduct may be removed from the project team.
This code of conduct applies both within project spaces and in public spaces when an individual is representing the project or its community.
Instances of abusive, harassing, or otherwise unacceptable behavior may be reported by opening an issue or contacting one or more of the project maintainers.
Development
We encourage everyone to participate in the development of curl and libcurl. We appreciate all the help we can get and while the main portion of this project is source code, there is a lot more than coding and debugging help that is needed and useful.
We develop and discuss everything in the open, preferably on the mailing lists.
Source code on GitHub
The source code to curl and libcurl have also been provided and published publicly and it continues to be uploaded to the main web site for every release.
Since March 2010, the curl source code repository has been hosted on github.com. By being up to date with the changes there, you can follow our day to day development closely.
The development team
Daniel Stenberg is the founder and self-proclaimed leader of the project. Everybody else that participates or contributes in the project has thus arrived at a later point. Some contributors worked for a while and then left again. Most contributors hang around only for a short while to get their bug fixed or feature merged or similar. Counting all contributors we know the names of, we have received help from more than 3,600 individuals.

More than 1,450 individuals have authored commits that have been merged into the source code repository. Of course, many of those authors only ever contributed a single commit so far.

There is no formal membership or anything that needs to be done to join the project. If you participate in communication or development, you are part of the project. Every contributor decides for themselves exactly how much and in what ways to participate.
The full list of people who ever did ten commits or more within a single year in the project are in alphabetical order:
Alessandro Ghedini, Ben Greear, Benoit Neil, Bill Hoffman, Bill Nagel, Björn Stenberg, Brad Hards, Christian Schmitz, Dan Fandrich, Daniel Gustafsson, Daniel Stenberg, Dominick Meglio, Emanuele Torre, Emil Engler, Evgeny Grin, Fabian Frank, Fabian Keil, Gergely Nagy, Gisle Vanem, Guenter Knauf, Harry Sintonen, Isaac Boukris, Jacob Hoffman-Andrews, Jakub Zakrzewski, James Housley, Jan Venekamp, Jay Satiro, Jiri Hruska, Joe Mason, Johannes Schindelin, Josh Soref, Julien Chaffraix, Kamil Dudka, Marc Hoersken, Marcel Raad, Mark Salisbury, Marty Kuhrt, Max Dymond, Michael Kaufmann, Michael Osipov, Michal Marek, Michał Antoniak, Nicholas Nethercote, Nick Zitzmann, Nikos Mavrogiannopoulos, Orgad Shaneh, Patrick Monnerat, Peter Wu, Philip Heiduck, Rikard Falkeborn, Ruslan Baratov, Ryan Schmidt, Simon Warta, Stefan Eissing, Steinar H. Gunderson, Sterling Hughes, Steve Holme, Svyatoslav Mishyn, Tal Regev, Tatsuhiro Tsujikawa, Tor Arntsen, Viktor Szakats, Yang Tse
Users of curl

We estimate that there are more than twenty billion curl installations in the world. It makes a good line to say but in reality we, of course, do not have any numbers that exact. We estimate and guess based on observations and trends. It also depends on exactly what we consider "an installation". Let's elaborate.
Open Source
The project being Open Source and liberally licensed means that anyone can redistribute curl in source format or built into binary form.
Counting downloads
The curl command-line tool and the libcurl library are available for download for most operating systems via the curl website, they are provided via third party installers to a bunch and they come installed by default with even more operating systems. This makes counting downloads from the curl website completely inappropriate as a means of measurement.
Finding users
Thus, we cannot count downloads and anyone may redistribute it and nobody is forced to tell us they use curl. How can we figure out the numbers? How can we figure out the users? The answer is that we really cannot with any decent level of accuracy.
Instead we rely on witness reports, circumstantial evidence, on findings on the Internet, the occasional "about box" or license agreement mentioning curl or that authors ask for help and tell us about their use.
The curl license says users need to repeat it somewhere, like in the documentation, but that is not easy for us to find in many cases and it is also not easy for us to do anything about should they decide not to follow the small license requirement.
Command-line tool users
The command-line tool curl is widely used by programmers around the world in shell and batch scripts, to debug servers and to test out things. There is no doubt it is used by millions every day.
Embedded library
libcurl is what makes our project reach a really large volume of users. The ability to quickly and easily get client side file transfer abilities into your application is desirable for a lot of users, and then libcurl's great portability also helps: you can write more or less the same application on a wide variety of platforms and you can still keep using libcurl for transfers.
libcurl being written in C with no or a few required dependencies also help to get it used in embedded systems.
libcurl is popularly used in smartphone operating systems, in car infotainment setups, in television sets, in set-top boxes, in audio and video equipment such as Blu-Ray players and higher-end receivers. It is often used in home routers and printers.
A fair number of best-selling games are also using libcurl, on Windows and game consoles.

In website backends
The libcurl binding for PHP was one of, if not the, first bindings for libcurl to really catch on and get used widely. It quickly got adopted as a default way for PHP users to transfer data. PHP has now been in that position for over a decade and it has turned out to be a fairly popular technology on the Internet (recent numbers indicated that something like a quarter of all sites on the Internet uses PHP).
A few really high-demand sites are using PHP and are using libcurl in the backend. Facebook and Yahoo are two such sites.
Famous users
Nothing forces users to tell us they use curl or libcurl in their services or in their products. We usually only find out they do by accident, by reading about dialogues, documentation and license agreements. Of course some companies actually tell us.
We used to collect names of companies and products on our website of users that use the project's products "in commercial environments". We did this mostly to show-off to other big brands that if these other guys can build products that depend on us, maybe you can, too?
The list of companies contains hundreds of names, but extracting some of the larger or more well-known brands, here's a pretty good list that, of course, is only a small selection:
Adobe, Altera, AOL, Apple, AT&T, BBC, Blackberry, BMW, Bosch, Broadcom, Chevrolet, Cisco, Comcast, Facebook, Google, Hitachi, Honeywell, HP, Huawei, HTC, IBM, Intel, LG, Mazda, Mercedes-Benz, Microsoft, Motorola, NASA, Netflix, Nintendo, Oracle, Panasonic, Philips, Pioneer, RBS, Samsung, SanDisk, SAP, SAS Institute, SEB, Sharp, Siemens, Sony, Spotify, Sun, Swisscom, Tomtom, Toshiba, VMware, Xilinx, Yahoo, Yamaha.
Famous high volume apps using curl
The Google YouTube app, the Google Photos app, Spotify, Instagram, Skype (on Android), bundled with iOS, Grand Theft Auto V, Fortnite.
Future

There is no slowdown in sight in curl's future, bugs reported, development pace or how Internet protocols are being developed or updated.
We are looking forward to support for more protocols, support for more features within the already supported protocols, and more and better APIs for libcurl to allow users to do transfers even better and faster.
The project casually maintains a TODO file holding a bunch of ideas that we could work on in the future. It also keeps a KNOWN_BUGS document with a list of known problems we would like to fix.
There is a ROADMAP document that describes some plans for the short-term that some of the active developers thought they would work on next. Of course, we can not promise that we always follow it.
We are highly dependent on developers to join in and work on what they want to get done, be it bug fixes or new features.
Network and protocols
Before diving in and talking about how to use curl to get things done, let's take a look at what all this networking is and how it works, using simplifications and some minor shortcuts to give an easy overview.
The basics are in the networking simplified chapter that tries to just draw a simple picture of what networking is from a curl perspective, and the protocols section which explains what exactly a "protocol" is and how that works.
Networking simplified
Networking means communicating between two endpoints on the Internet. The Internet is a bunch of interconnected machines (computers really), each using its own individual addresses (called IP addresses). The addresses each machine has can be of different types and machines can even have temporary addresses. These computers are also called hosts.
Client and server
The computer, tablet or phone you sit in front of is usually called the client and the machine out there somewhere that you want to exchange data with is called the server. The main difference between the client and the server is in the roles they play. There is nothing that prevents the roles from being reversed in a subsequent operation.
A transfer initiative is always taken by the client, as the server cannot contact the client but the client can contact the server.
Which machine
When we as a client want to initiate a transfer from or to one of the machines out there (a server), we usually do not know its IP addresses but instead we usually know its name. The name of the machine to communicate with is typically embedded in the URL that we work with when we use tools like curl or a browser.
We might use a URL like http://example.com/index.html, which means the
client connects to and communicates with the host named example.com.
Hostname resolving
Once the client knows the hostname, it needs to figure out which IP addresses the host with that name has so that it can contact it.
Converting the name to an IP address is called 'name resolving'. The name is resolved to one or a set of addresses. This is usually done by a DNS server, DNS being like a big lookup table that can convert names to addresses—all the names on the Internet, really. The computer normally already knows the address of a computer that runs the DNS server as that is part of setting up the network.
The network client therefore asks the DNS server, Hello, please give me all
the addresses for example.com. The DNS server responds with a list of
addresses back. Or in case of spelling errors, it can answer back that the
name does not exist.
Establish a connection
With one or more IP addresses for the host the client wants to contact, it sends a connect request. The connection it wants to establish is called a TCP (Transmission Control Protocol) or QUIC connection, which is like connecting an invisible string between two computers. Once established, the string can be used to send a stream of data in both directions.
If the client has received more than one address for the host, it traverses that list of addresses when connecting, and if one address fails it tries to connect to the next one, repeating until either one address works or they have all failed.
Connect to port numbers
When connecting with TCP or QUIC to a remote server, a client selects which port number to do that on. A port number is a dedicated place for a particular service, which allows that same server to listen to other services on other port numbers at the same time.
Most common protocols have default port numbers that clients and servers
use. For example, when using the http://example.com/index.html URL, that URL
specifies a scheme called HTTP which tells the client that it should try
TCP port number 80 on the server by default. If the URL uses HTTPS instead,
the default port number is 443.
The URL can include a custom port number. If a port number is not specified, the client uses the default port for the scheme used in the URL.
Security
After a TCP connection has been established, many transfers require that both
sides negotiate a better security level before continuing (if for example
HTTPS is used), which is done with TLS (Transport Layer
Security). If so, the
client and server do a TLS handshake first, and continue further only if that
succeeds.
If the connection is done using QUIC, the TLS handshake is done automatically in the connect phase.
Transfer data
When the connected metaphorical string is attached to the remote computer, there is a connection established between the two machines. This connection can then be used to exchange data. This exchange is done using a protocol, as discussed in the following chapter.
Traditionally, a download is when data is transferred from a server to a client; conversely, an upload is when data is sent from the client to the server. The client is down here; the server is up there.
Disconnect
When a single transfer is completed, the connection may have served its purpose. It can then either be reused for further transfers, or it can be disconnected and closed.
Protocols
The language used to ask for data to get sent—in either direction—is called the protocol. The protocol describes exactly how to ask the server for data, or to tell the server that there is data coming.
Protocols are typically defined by the IETF (Internet Engineering Task Force), which hosts RFC documents that describe exactly how each protocol works: how clients and servers are supposed to act and what to send and so on.
What protocols does curl support?
curl supports protocols that allow data transfers in either or both directions. We usually also restrict ourselves to protocols which have a URI format described in an RFC or at least is somewhat widely used, as curl works primarily with URLs (URIs really) as the input key that specifies the transfer.
The latest curl (as of this writing) supports these protocols:
DICT, FILE, FTP, FTPS, GOPHER, GOPHERS, HTTP, HTTPS, IMAP, IMAPS, LDAP, LDAPS, MQTT, POP3, POP3S, RTSP, SCP, SFTP, SMB, SMBS, SMTP, SMTPS, TELNET, TFTP, WS, WSS
To complicate matters further, the protocols often exist in different versions or flavors as well.
What other protocols are there?
The world is full of protocols, both old and new. Old protocols get abandoned and dropped and new ones get introduced. There is never a state of stability but the situation changes from day to day and year to year. You can rest assured that there are new protocols added in the list above in the future and that there are going to be new versions of the protocols already listed.
There are, of course, already other protocols in existence that curl does not yet support. We are open to supporting more protocols that suit the general curl paradigms, we need developers to write the necessary code adjustments for them.
How are protocols developed?
Both new versions of existing protocols and entirely new protocols are usually developed by persons or teams that feel that the existing ones are not good enough. Something about them makes them not suitable for a particular use case or perhaps some new idea has popped up that could be applied to improve things.
Of course, nothing prevents anyone from developing a protocol entirely on their own at their own pleasure in their own backyard, but the major protocols are usually brought to the IETF at a fairly early stage where they are then discussed, refined, debated and polished and then eventually, ideally, turned into a published RFC document.
Software developers then read the RFC specifications and deploy their code in the world based on their interpretations of the words in those documents. It sometimes turns out that some of the specifications are subject to vastly different interpretations or sometimes the engineers are lazy and ignore sound advice in the specs and deploy something that does not adhere. Writing software that interoperates with other implementations of the specifications can therefore end up being hard work.
How much do protocols change?
Like software, protocol specifications are frequently updated and new protocol versions are created.
Most protocols allow some level of extensibility which makes new extensions show up over time, extensions that make sense to support.
The interpretation of a protocol sometimes changes even if the spec remains the same.
The protocols mentioned in this chapter are all Application Protocols, which means they are transferred over more lower level protocols, like TCP, UDP and TLS. They are also themselves protocols that change over time, get new features and get attacked so that new ways of handling security, etc., forces curl to adapt and change.
About adhering to standards and who is right
Generally, there are protocol specs that tell us how to send and receive data for specific protocols. The protocol specs we follow are RFCs put together and published by IETF.
Some protocols are not properly documented in a final RFC, like, for example, SFTP for which our implementation is based on an Internet-draft that is not even the last available one.
Protocols are, however, spoken by two parties and like in any given conversation, there are then two sides of understanding something or interpreting the given instructions in a spec. Also, lots of network software is written without the authors paying close attention to the spec so they end up taking some shortcuts, or perhaps they interpreted the text differently. Sometimes even mistakes and bugs make software behave in ways that are not mandated by the spec and sometimes even downright forbidden in the specs.
In the curl project we use the published specs as rules on how to act until we learn anything else. If popular alternative implementations act differently than what we think the spec says and that alternative behavior is what works widely on the big Internet, then chances are we change foot and instead decide to act like those others. If a server refuses to talk with us when we think we follow the spec but works fine when we bend the rules ever so slightly, then we probably end up bending them exactly that way—if we can still work successfully with other implementations.
Ultimately, it is a personal decision and up for discussion in every case where we think a spec and the real world do not align.
In the worst cases we introduce options to let application developers and curl users have the final say on what curl should do. I say worst because it is often really tough to ask users to make these decisions as it usually involves tricky details and weirdness going on and it is a lot to ask of users. We should always do our best to avoid pushing such protocol decisions to users.
curl protocols
curl supports about 28 protocols. We say about because it depends on how you count and what you consider to be distinctly different protocols.
DICT
DICT is a dictionary network protocol, it allows clients to ask dictionary servers about a meaning or explanation for words. See RFC 2229. Dict servers and clients use TCP port 2628.
FILE
FILE is not actually a network protocol. It is a URL scheme that allows you to tell curl to get a file from the local file system instead of getting it over the network from a remote server. See RFC 1738.
FTP
FTP stands for File Transfer Protocol and is an old (originates in the early 1970s) way to transfer files back and forth between a client and a server. See RFC 959. It has been extended greatly over the years. FTP servers and clients use TCP port 21 plus one more port, though the second one is usually dynamically established during communication.
See the external page FTP vs HTTP for how it differs from HTTP.
FTPS
FTPS stands for Secure File Transfer Protocol. It follows the tradition of appending an 'S' to the protocol name to signify that the protocol is done like normal FTP but with an added SSL/TLS security layer. See RFC 4217.
This protocol is problematic to use through firewalls and other network equipment.
GOPHER
Designed for "distributing, searching, and retrieving documents over the Internet", Gopher is somewhat of the grandfather to HTTP as HTTP has mostly taken over completely for the same use cases. See RFC 1436. Gopher servers and clients use TCP port 70.
GOPHERS
Gopher over TLS. A recent extension to the old protocol.
HTTP
The Hypertext Transfer Protocol, HTTP, is the most widely used protocol for transferring data on the web and over the Internet. See RFC 9110 for general HTTP Semantics, RFC 9112 for HTTP/1.1, RFC 9113 for HTTP/2 and RFC 9114 for HTTP/3. HTTP servers and clients use TCP port 80.
HTTPS
Secure HTTP is HTTP done over an SSL/TLS connection. See RFC 2818. HTTPS servers and clients use TCP port 443, unless they speak HTTP/3 which then uses QUIC (RFC 8999) and is done over UDP.
IMAP
The Internet Message Access Protocol, IMAP, is a protocol for accessing,
controlling and "reading" email. See RFC 3501. IMAP servers and clients use
TCP port 143. Whilst connections to the server start out as cleartext, SSL/TLS
communication may be supported by the client explicitly requesting to upgrade
the connection using the STARTTLS command. See RFC 2595.
IMAPS
Secure IMAP is IMAP done over an SSL/TLS connection. Such connections implicitly start out using SSL/TLS and as such servers and clients use TCP port 993 to communicate with each other. See RFC 8314.
LDAP
The Lightweight Directory Access Protocol, LDAP, is a protocol for accessing and maintaining distributed directory information. A database lookup. See RFC 4511. LDAP servers and clients use TCP port 389.
LDAPS
Secure LDAP is LDAP done over an SSL/TLS connection.
MQTT
Message Queuing Telemetry Transport, MQTT, is a protocol commonly used in IoT systems for interchanging data mostly involving smaller devices. It is a so-called "publish-subscribe" protocol.
POP3
The Post Office Protocol version 3 (POP3) is a protocol for retrieving email
from a server. See RFC 1939. POP3 servers and clients use TCP port 110. Whilst
connections to the server start out as cleartext, SSL/TLS communication may be
supported by the client explicitly requesting to upgrade the connection using
the STLS command. See RFC 2595.
POP3S
Secure POP3 is POP3 done over an SSL/TLS connection. Such connections implicitly start out using SSL/TLS and as such servers and clients use TCP port 995 to communicate with each other. See RFC 8314.
RTSP
The Real Time Streaming Protocol (RTSP) is a network control protocol to control streaming media servers. See RFC 2326. RTSP servers and clients use TCP and UDP port 554.
SCP
The Secure Copy (SCP) protocol is designed to copy files to and from a remote SSH server. SCP servers and clients use TCP port 22.
SFTP
The SSH File Transfer Protocol (SFTP) that provides file access, file transfer, and file management over a reliable data stream. SFTP servers and clients use TCP port 22.
SMB
The Server Message Block (SMB) protocol is also known as CIFS. It is an application-layer network protocol mainly used for providing shared access to files, printers, and serial ports and miscellaneous communications between nodes on a network. SMB servers and clients use TCP port 445.
SMBS
SMB done over TLS.
SMTP
The Simple Mail Transfer Protocol (SMTP) is a protocol for email
transmission. See RFC 5321. SMTP servers and clients use TCP port 25. Whilst
connections to the server start out as cleartext, SSL/TLS communication may be
supported by the client explicitly requesting to upgrade the connection using
the STARTTLS command. See RFC 3207.
SMTPS
Secure SMTP, is SMTP done over an SSL/TLS connection. Such connections implicitly start out using SSL/TLS and as such servers and clients use TCP port 465 to communicate with each other. See RFC 8314.
TELNET
TELNET is an application layer protocol used over networks to provide a bidirectional interactive text-oriented communication facility using a virtual terminal connection. See RFC 854. TELNET servers and clients use TCP port 23.
TFTP
The Trivial File Transfer Protocol (TFTP) is a protocol for doing simple file transfers over UDP to get a file from or put a file onto a remote host. TFTP servers and clients use UDP port 69.
WS
WebSocket is a bidirectional TCP-like protocol, setup over an HTTP(S) request. WS is the scheme for the clear text version done over plain HTTP.
WSS
WebSocket is a bidirectional TCP-like protocol, setup over an HTTP(S) request. WSS is the scheme for the secure version done over HTTPS.
HTTP basics
HTTP is a protocol that is easy to learn the basics of. A client connects to a server—and it is always the client that takes the initiative—sends a request and receives a response. Both the request and the response consist of headers and a body. There can be little or a lot of information going in both directions.
An HTTP request sent by a client starts with a request line, followed by headers and then optionally a body. The most common HTTP request is probably the GET request which asks the server to return a specific resource, and this request does not contain a body.
When a client connects to 'example.com' and asks for the '/' resource, it sends a GET without a request body:
GET / HTTP/1.1
User-agent: curl/2000
Host: example.com
…the server could respond with something like below, with response headers and a response body ('hello'). The first line in the response also contains the response code and the specific version the server supports:
HTTP/1.1 200 OK
Server: example-server/1.1
Content-Length: 5
Content-Type: plain/text

hello
If the client would instead send a request with a small request body ('hello'), it could look like this:
POST / HTTP/1.1
Host: example.com
User-agent: curl/2000
Content-Length: 5

hello
A server always responds to an HTTP request unless something is wrong.
The URL converted to a request
When an HTTP client is given a URL to operate on, that URL is then used, picked apart and those parts are used in various places in the outgoing request to the server. Let's take an example URL:
https://www.example.com/path/to/file
-
https means that curl uses TLS to the remote port 443 (which is the default port number when no specified is used in the URL).
-
www.example.com is the hostname that curl resolves to one or more IP addresses to connect to. This hostname is also used in the HTTP request in the
Host:header. -
/path/to/file is used in the HTTP request to tell the server which exact document/resources curl wants to fetch
Install curl and libcurl
curl is totally free, open and available. There are numerous ways to get it and install it for most operating systems and architecture. This section gives you some answers to start with, but is not a complete reference.
Some operating systems ship curl by default. Some do not.
In addition, You can always download the source from curl.se or find binary packages to download from there.
Commonly, libcurl is installed at the same time as curl.
Linux
Linux distributions come with packager managers that let you install software that they offer. Most Linux distributions offer curl and libcurl to be installed if they are not installed by default.
Ubuntu and Debian
apt is a tool to install prebuilt packages on Debian Linux and Ubuntu Linux
distributions and derivatives.
To install the curl command-line tool, you usually invoke
apt install curl
…and that then makes sure the dependencies are installed and usually libcurl is then also installed as an individual package.
If you want to build applications against libcurl, you need a development package installed to get the include headers and some additional documentation, etc. You can then select a libcurl with the TLS backend you prefer:
apt install libcurl4-openssl-dev
or
apt install libcurl4-gnutls-dev
Redhat and CentOS
With Redhat Linux and CentOS Linux derivatives, you use yum to install
packages. Install the command-line tool with:
yum install curl
You install the libcurl development package (with include files and some docs, etc.) with this:
yum install libcurl-devel
Fedora
Fedora Workstation and other Fedora based distributions use dnf to install packages.
Install the command-line tool with:
dnf install curl
To install the libcurl development package you run:
dnf install libcurl-devel
Immutable Fedora distributions
Distributions such as Silverblue, Kinoite, Sericea, Onyx, ...
use rpm-ostree to install packages.
Remember to restart the system after install.
rpm-ostree install curl
To install the libcurl development package you run:
rpm-ostree install libcurl-devel
nix
Nix is a package manager default to the NixOS distribution, but it can also be used on any Linux distribution.
In order to install command-line tool:
nix-env -i curl
Arch Linux
curl is located in the core repository of Arch Linux. This means it should be installed automatically if you follow the normal installation procedure.
If curl is not installed, Arch Linux uses pacman to install packages:
pacman -S curl
SUSE and openSUSE
With SUSE Linux and openSUSE Linux you use zypper to install
packages. To install the curl command-line utility:
zypper install curl
In order to install the libcurl development package you run:
zypper install libcurl-devel
SUSE SLE Micro and openSUSE MicroOS
These versions of SUSE/openSUSE Linux are immutable OSes and have a read
only root file system, to install packages you would use transactional-update
instead of zypper. To install the curl command-line utility:
transactional-update pkg install curl
To install the libcurl development package:
transactional-update pkg install libcurl-devel
Gentoo
This package installs the tool, libcurl, headers and pkg-config files etc
emerge net-misc/curl
Void Linux
With Void Linux you use xbps-install to install packages.
To install the curl command-line utility:
xbps-install curl
In order to install the libcurl development package:
xbps-install libcurl-devel
Windows
Windows 10 comes with the curl tool bundled with the operating system since version 1804. If you have an older Windows version or just want to upgrade to the latest version shipped by the curl project, download the latest official curl release for Windows from curl.se/windows and install that.
There are several different ways to get curl and libcurl onto your Windows systems:
MSYS2
MSYS2 is a popular build system for Windows based on mingw-w64 and includes both gcc and clang compilers. MSYS2 uses a package manager named pacman (a port from arch-linux) and has about 2000 precompiled mingw-packages. MSYS2 is designed to build standalone software: the binaries built with mingw-w64 compilers do not depend on MSYS2 itself[^1].
Get curl and libcurl on MSYS2
Current information about the mingw-w64-curl package can be found on the msys2 website: https://packages.msys2.org/base/mingw-w64-curl. Here we can also find installation instructions for the various available flavors. For example to install the default x64 binary for curl we run:
pacman -Sy mingw-w64-x86_64-curl
This package contains both the curl command line tool as well as libcurl headers and shared libraries. The default curl packages are built with the OpenSSL backend and hence depend on mingw-w64-x86_64-openssl. There are also mingw-w64-x86_64-curl-gnutls and mingw-w64-x86_64-curl-gnutls packages, refer to the msys2 website for more details.
Like on Linux, we can use pkg-config to query the flags needed to build
against libcurl. Start msys2 using the mingw64 shell (which automatically sets
the path to include /mingw64) and run:
pkg-config --cflags libcurl
# -IC:/msys64/mingw64/include

pkg-config --libs libcurl
# -LC:/msys64/mingw64/lib -lcurl
The pacman package manager installs precompiled binaries. Next up we explain how to use pacman to build curl locally, for example to customize the configuration.
Building libcurl on MSYS2
Building packages with pacman is almost as simple as installing. The entire
process is contained in the
PKGBUILD
file from the mingw-w64-curl package. We can easily modify the file to
rebuild the package ourselves.
If we start with a clean msys2 installation, we first want to install some build tools, like autoconf, patch and git. Start the msys2 shell and run:
# Sync the repositories
pacman -Syu

# Install git, autoconf, patch, etc
pacman -S git base-devel

# Install GCC for x86_64
pacman -S mingw-w64-x86_64-toolchain
Now clone the mingw-packages repository and go to the mingw-w64-curl package:
git clone https://github.com/msys2/MINGW-packages
cd MINGW-packages/mingw-w64-curl
This directory contains the PKGBUILD file and patches that are used for building curl. Have a look at the PKGBUILD file to see what is going on. Now to compile it, we can do:
makepkg-mingw --syncdeps --skippgpcheck
That is it. The --syncdeps parameter automatically checks and prompts to
install dependencies of mingw-w64-curl if these are not yet installed. Once
the process is complete you have 3 new files in the current directory, for
example:
pacman -U mingw-w64-x86_64-curl-7.80.0-1-any.pkg.tar.zstpacman -U mingw-w64-x86_64-curl-gnutls-7.80.0-1-any.pkg.tar.zstpacman -U mingw-w64-x86_64-curl-winssl-7.80.0-1-any.pkg.tar.zst
Use the pacman -u command to install such a local package file:
pacman -U mingw-w64-x86_64-curl-winssl-7.80.0-1-any.pkg.tar.zst
Have a look at the msys2 docs or join the gitter to learn more about building with pacman and msys2.
[^1]: Be careful not to confuse the mingw-package mingw-w64-curl with the msys-packages curl and curl-devel. The latter are part of msys2 environment itself (e.g. to support pacman downloads), but not suitable for redistribution. To build redistributable software that does not depend on MSYS2 itself, you always need mingw-w64-… packages and toolchains.
vcpkg
Vcpkg helps you manage C and C++ libraries on Windows, Linux and MacOS.
There is no curl package on vcpkg, only libcurl.
Install libcurl
vcpkg.exe install curl:x64-windows
macOS
macOS comes with the curl tool bundled with the operating system for many years. If you want to upgrade to the latest version shipped by the curl project, we recommend installing homebrew (a macOS software package manager) and then install the curl package from them:
brew install curl
Note that when installing curl, brew does not create a curl symlink
in the default homebrew folder, to avoid clashes with the macOS version of curl.
Run the following to make brew curl the default one in your shell:
echo 'export PATH="$(brew --prefix)/opt/curl/bin:$PATH"' >> ~/.zshrc
source ~/.zshrc
Get libcurl for macOS
When you install curl the tool with homebrew as described above, it also
installs libcurl together with its associated headers.
libcurl is also installed with macOS itself and always present, and if you
install the development environment XCode from Apple, you can use libcurl
directly without having to install anything extra as the curl include files
are bundled there.
Container
Both docker and podman are containerization tools. The docker image is
hosted at
https://hub.docker.com/r/curlimages/curl
You can run the latest version of curl with the following command:
Command for docker:
docker run -it --rm docker.io/curlimages/curl www.example.com
Command for podman:
podman run -it --rm docker.io/curlimages/curl www.example.com
Running curl seamlessly in container
It is possible to make an alias to seamlessly run curl inside a container as if it is a native application installed on the host OS.
Command to define curl as an alias for your containerization tool in the Bash, ZSH, Fish shell:
Bash or zsh
Invoke curl with docker:
alias curl='docker run -it --rm docker.io/curlimages/curl'
Invoke curl with podman:
alias curl='podman run -it --rm docker.io/curlimages/curl'
Fish
Invoke curl with docker:
alias -s curl='docker run -it --rm docker.io/curlimages/curl'
Invoke curl with podman:
alias -s curl='podman run -it --rm docker.io/curlimages/curl'
Then invoke curl www.example.com to make a request
Running curl in kubernetes
Sometimes it can be useful to troubleshoot k8s networking with curl, like:
kubectl run -i --tty curl --image=curlimages/curl --restart=Never \
  -- "-m 5" www.example.com
Source code
The source code is, of course, the actual engine parts of this project. After all, it is a software project.
curl and libcurl are written in C.
Hosting and download
You can always find the source code for the latest curl and libcurl release on the official curl website curl.se. There are also checksums and digital signatures provided to help you verify that what ends up on your local system when you download the files, are the same bytes in the same order as were originally uploaded there by the curl team.
If you would rather work directly with the curl source code off the source code repository, you find all details in the curl GitHub repository.
Clone the code
git clone https://github.com/curl/curl.git
This gets the latest curl code downloaded and unpacked in a directory on your local system.
- Open Source
- Code layout
- Handling build options
- Code style
- Contributing
- Reporting vulnerabilities
- Website
Open Source
What is Open Source
Generally, Open Source software is software that can be freely accessed, used, changed, and shared (in modified or unmodified form) by anyone. Open Source software is typically made by many people, and distributed under licenses that comply with the definition.
Free Software is an older and related term that mostly says the same thing for all our intents and purposes, but we stick to the term Open Source in this document for simplicity.
License
curl and libcurl are distributed under an Open Source license known as a MIT license derivative. It is short, simple and easy to grasp. It follows here in full:
COPYRIGHT AND PERMISSION NOTICE

Copyright © 1996 - 2025, Daniel Stenberg, <daniel@haxx.se>, and many
contributors, see the THANKS file.

All rights reserved.

Permission to use, copy, modify, and distribute this software for any
purpose with or without fee is hereby granted, provided that the above
copyright notice and this permission notice appear in all copies.

THE SOFTWARE IS PROVIDED "AS IS", WITHOUT WARRANTY OF ANY KIND, EXPRESS
OR IMPLIED, INCLUDING BUT NOT LIMITED TO THE WARRANTIES OF
MERCHANTABILITY, FITNESS FOR A PARTICULAR PURPOSE AND NONINFRINGEMENT OF
THIRD PARTY RIGHTS. IN NO EVENT SHALL THE AUTHORS OR COPYRIGHT HOLDERS
BE LIABLE FOR ANY CLAIM, DAMAGES OR OTHER LIABILITY, WHETHER IN AN
ACTION OF CONTRACT, TORT OR OTHERWISE, ARISING FROM, OUT OF OR IN
CONNECTION WITH THE SOFTWARE OR THE USE OR OTHER DEALINGS IN THE
SOFTWARE.

Except as contained in this notice, the name of a copyright holder shall
not be used in advertising or otherwise to promote the sale, use or
other dealings in this Software without prior written authorization of
the copyright holder.
This is legalese that says you are allowed to change the code, redistribute the code, redistribute binaries built from the code and build proprietary code with it, without anyone requiring you to give any changes back to the project—but you may not claim that you wrote it.
Early on in the project we iterated over a few different other licenses before we settled on this. We started out GPL, then tried MPL and landed on this MIT derivative. We do not intend to ever change the license again.
Copyright
Copyright is a legal right granted by the law of a country that gives the creator of an original work exclusive rights for its use and distribution.
The copyright owner(s) can agree to allow others to use their work by licensing it. That is what we do in the curl project. The copyright is the foundation on which the licensing works.
Daniel Stenberg is the owner of most copyrights in the curl project.
Independent
A lot of Open Source projects are run within umbrella organizations. Such organizations include the GNU project, the Apache Software Foundation, a larger company that funds the project or similar. The curl project is not part of any such larger organization but is completely independent and free.
No company controls curl's destiny and the curl project does not need to follow any umbrella organization's guidelines.
curl is not a formal company, organization or a legal entity of any kind. curl is an informal collection of humans, distributed across the globe, who work together on a software project.
Legal
The curl project obeys national laws of the countries in which it works. However, it is a highly visible international project, downloadable and usable in effectively every country on earth, so some local laws could be broken when using curl. That is the nature of it and if uncertain, you should check your own local situation.
There have been lawsuits involving technology that curl provides. One such case known to the author of this was a patent case in the US that insisted they had the rights to resumed file transfers.
As a generic software component that is usable everywhere to everyone, there are times when libcurl—in particular—is used in nefarious or downright malicious ways. Examples include being used in virus and malware software. That is unfortunate but nothing we can prevent.
Code layout
The curl source code tree is neither large nor complicated. A key thing to remember is that libcurl is the library and that this library is the biggest component of the curl command-line tool.
root
We try to keep the number of files in the source tree root to a minimum. You might see a slight difference in files if you check a release archive compared to what is stored in the git repository as several files are generated by the release scripts.
Some of the more notable ones include:
buildconf: (deprecated) script used to build configure and more when building curl from source out of the git repository.buildconf.bat: the Windows version of buildconf. Run this after having checked out the full source code from git.CHANGES: generated at release and put into the release archive. It contains the 1000 latest changes to the source repository.configure: a generated script that is used on Unix-like systems to generate a setup when building curl.COPYING: the license detailing the rules for your using the code.GIT-INFO: only present in git and contains information about how to build curl after having checked out the code from git.maketgz: the script used to produce release archives and daily snapshotsREADME: a short summary of what curl and libcurl are.RELEASE-NOTES: contains the changes done for the latest release; when found in git it contains the changes done since the previous release that are destined to end up in the coming release.
lib
This directory contains the full source code for libcurl. It is the same source code for all platforms—over one hundred C source files and a few more private header files. The header files used when building applications against libcurl are not stored in this directory; see include/curl for those.
Depending on what features are enabled in your own build and what functions your platform provides, some of the source files or portions of the source files may contain code that is not used in your particular build.
lib/vtls
The VTLS sub section within libcurl is the home of all the TLS backends libcurl can be built to support. The "virtual" TLS internal API is a backend agnostic API used internally to access TLS and crypto functions without the main code knowing which specific TLS library is used. This allows the person who builds libcurl to select from a wide variety of TLS libraries to build with.
We also maintain a SSL comparison table on the website to aid users.
- AmiSSL: an OpenSSL fork made for AmigaOS (uses
openssl.c) - BearSSL
- BoringSSL: an OpenSSL fork maintained by Google. (uses
openssl.c) - GnuTLS
- LibreSSL: an OpenSSL fork maintained by the OpenBSD team. (uses
openssl.c) - mbedTLS
- OpenSSL
- rustls: a TLS library written in rust
- Schannel: the native TLS library on Windows.
- wolfSSL
src
This directory holds the source code for the curl command-line tool. It is the same source code for all platforms that run the tool.
Most of what the command-line tool does is to convert given command line options into the corresponding libcurl options or set of options and then makes sure to issue them correctly to drive the network transfer according to the user's wishes.
This code uses libcurl as any other application would.
include/curl
Here are the public header files that are provided for libcurl-using applications. Some of them are generated at configure or release time so they do not look identical in the git repository as they do in a release archive.
With modern libcurl, all an application is expected to include in its C source code
is #include <curl/curl.h>
docs
The main documentation location. Text files in this directory are typically
plain text files. We have slowly started to move towards Markdown format so a
few (but growing number of) files use the .md extension to signify that.
Most of these documents are also shown on the curl website automatically converted from text to a web friendly format/look.
BINDINGS: lists all known libcurl language bindings and where to find themBUGS: how to report bugs and whereCODE_OF_CONDUCT.md: how we expect people to behave in this projectCONTRIBUTE: what to think about when contributing to the projectcurl.1: the curl command-line tool man page, in nroff formatcurl-config.1: the curl-config man page, in nroff formatFAQ: frequently asked questions about various curl-related subjectsFEATURES: an incomplete list of curl featuresHISTORY: describes how the project started and has evolved over the yearsHTTP2.md: how to use HTTP/2 with curl and libcurlHTTP-COOKIES: how curl supports and works with HTTP cookiesindex.html: a basic HTML page as a documentation index pageINSTALL: how to build and install curl and libcurl from sourceINSTALL.cmake: how to build curl and libcurl with CMakeINSTALL.devcpp: how to build curl and libcurl with devcppINTERNALS: details curl and libcurl internal structuresKNOWN_BUGS: list of known bugs and problemsLICENSE-MIXING: describes how to combine different third party modules and their individual licensesMAIL-ETIQUETTE: this is how to communicate on our mailing listsMANUAL: a tutorial-like guide on how to use curlmk-ca-bundle.1: the mk-ca-bundle tool man page, in nroff formatREADME.cmake: CMake detailsREADME.netware: Netware detailsREADME.win32: win32 detailsRELEASE-PROCEDURE: how to do a curl and libcurl releaseRESOURCES: further resources for further reading on what, why and how curl does thingsROADMAP.md: what we want to work on in the futureSECURITY: how we work on security vulnerabilitiesSSLCERTS: TLS certificate handling documentedSSL-PROBLEMS: common SSL problems and their causesTHANKS: thanks to this extensive list of friendly people, curl exists today.TheArtOfHttpScripting: a tutorial into HTTP scripting with curlTODO: things we or you can work on implementingVERSIONS: how the version numbering of libcurl works
docs/libcurl
All libcurl functions have their own man pages in individual files with .3 extensions, using nroff format, in this directory. There are also a few other files that are described below.
ABIindex.htmllibcurl.3libcurl-easy.3libcurl-errors.3libcurl.m4libcurl-multi.3libcurl-share.3libcurl-thread.3libcurl-tutorial.3symbols-in-versions
docs/libcurl/opts
This directory contains the man pages for the individual options for three different libcurl functions.
curl_easy_setopt() options start with CURLOPT_,
curl_multi_setopt() options start with CURLMOPT_ and
curl_easy_getinfo() options start with CURLINFO_.
docs/examples
Contains around 100 stand-alone examples that are meant to help readers understand how libcurl can be used.
See also the libcurl examples section of this book.
scripts
Handy scripts.
contributors.sh: extracts all contributors from the git repository since a given hash/tag. The purpose is to generate a list for the RELEASE-NOTES file and to allow manually added names to remain in there even on updates. The script uses theTHANKS-filterfile to rewrite some names.contrithanks.sh: extracts contributors from the git repository since a given hash/tag, filters out all the names that are already mentioned inTHANKS, and then outputsTHANKSto stdout with the list of new contributors appended at the end; it is meant to allow easier updates of the THANKS document. The script uses theTHANKS-filterfile to rewrite some names.log2changes.pl: generates theCHANGESfile for releases, as used by the release script. It converts git log output.zsh.pl: helper script to provide curl command-line completions to users of the zsh shell.
Handling build options
The curl and libcurl source code has been carefully written to build and run on virtually every computer platform in existence. This can only be done through hard work and by adhering to a few guidelines (and, of course, a fair amount of testing).
A golden rule is to always add #ifdefs that checks for specific features, and then have the setup scripts (configure or CMake or hard-coded) check for the presence of said features in a user's computer setup before the program is compiled there. Additionally and as a bonus, thanks to this way of writing the code, some features can be explicitly turned off even if they are present in the system and could be used. Examples of that would be when users want to, for example, build a version of the library with a smaller footprint or with support for certain protocols disabled, etc.
The project sometimes uses #ifdef protection around entire source files when, for example, a single file is provided for a specific operating system or perhaps for a specific feature that is not always present. This is to make it possible for all platforms to always build all files—it simplifies the build scripts and makefiles a lot. A file entirely #ifdefed out hardly adds anything to the build time, anyway.
Rather than sprinkling the code with #ifdefs, to the extent where it is possible, we provide functions and macros that make the code look and work the same, independent of present features. Some of those are then empty macros for the builds that lack the features.
Both TLS handling and name resolving are handled with an internal API that hides the specific implementation and choice of 3rd party software library. That way, most of the internals work the same independent of which TLS library or name resolving system libcurl is told to use.
Code style
Source code that has a common style is easier to read than code that uses different styles in different places. It helps make the code feel like one continuous code base. Being easy-to-read is an important property of code and helps make it easier to review when new things are added and it helps debugging code when developers are trying to figure out why things go wrong. A unified style is more important than individual contributors having their own personal tastes satisfied.
Our C code has a few style rules. Most of them are verified and upheld by the
checksrc.pl script. Invoked with make checksrc or even by default by the
build system when built after ./configure --enable-debug has been used.
It is normally not a problem for anyone to follow the guidelines as you need to mimic the style already used in the source code, and there are no particularly unusual rules in our set of rules.
We also work hard on writing code that is warning-free on all the major platforms and in general on as many platforms as possible. Code that obviously causes warnings is not accepted as-is.
Naming
Try using a non-confusing naming scheme for your new functions and variable names. It does not necessarily have to mean that you should use the same as in other places of the code, only that the names should be logical, understandable and be named according to what they are used for. File-local functions should be made static. We like lower case names.
All symbols meant for public use must start with curl. Global internal
symbols start with Curl.
Indentation
We use only spaces for indentation, never TABs. We use two spaces for each new open brace.
if(something_is_true) {
  while(second_statement == fine) {
    moo();
  }
}
Comments
Since we write C89 code, // comments are not allowed. They were not
introduced in the C standard until C99. We use only /* comments */.
/* this is a comment */
Long lines
Source code in curl may never be wider than 79 columns. There are two reasons for maintaining this even in the modern era of large and high resolution screens:
-
Narrower columns are easier to read than wide ones. There is a reason newspapers have used columns for decades or centuries.
-
Narrower columns allow developers to more easily view multiple pieces of code next to each other in different windows. I often have two or three source code windows next to each other on the same screen, as well as multiple terminal and debugging windows.
Braces
In if/while/do/for expressions, we write the open brace on the same line as the keyword and we then set the closing brace on the same indentation level as the initial keyword. Like this:
if(age < 40) {
  /* clearly a youngster */
}
You may omit the braces if they would contain only a one-line statement:
if(!x)
  continue;
For functions the opening brace should be on a separate line:
int main(int argc, char **argv)
{
  return 1;
}
else on the following line
When adding an else clause to a conditional expression using braces, we add
it on a new line after the closing brace. Like this:
if(age < 40) {
  /* clearly a youngster */
}
else {
  /* probably intelligent */
}
No space before parentheses
When writing expressions using if/while/do/for, there shall be no space between the keyword and the open parenthesis. Like this:
while(1) {
  /* loop forever */
}
Use boolean conditions
Rather than test a conditional value such as a bool against TRUE or FALSE, a pointer against NULL or != NULL and an int against zero or not zero in if/while conditions we prefer:
result = do_something();
if(!result) {
  /* something went wrong */
  return result;
}
No assignments in conditions
To increase readability and reduce complexity of conditionals, we avoid assigning variables within if/while conditions. We frown upon this style:
if((ptr = malloc(100)) == NULL)
  return NULL;
Instead we encourage the above version to be spelled out more clearly:
ptr = malloc(100);
if(!ptr)
  return NULL;
New block on a new line
We never write multiple statements on the same source line, even for short if() conditions.
if(a)
  return TRUE;
else if(b)
  return FALSE;
Never:
if(a) return TRUE;
else if(b) return FALSE;
Space around operators
Please use spaces on both sides of operators in C expressions. Postfix (), [], ->, ., ++, -- and Unary +, -, !, ~, & operators excluded they should have no space.
Examples:
bla = func();
who = name[0];
age += 1;
true = !false;
size += -2 + 3 * (a + b);
ptr->member = a++;
struct.field = b--;
ptr = &address;
contents = *pointer;
complement = ~bits;
empty = (!*string) ? TRUE : FALSE;
No parentheses for return values
We use the 'return' statement without extra parentheses around the value:
int works(void)
{
  return TRUE;
}
Parentheses for sizeof arguments
When using the sizeof operator in code, we prefer it to be written with parentheses around its argument:
int size = sizeof(int);
Column alignment
Some statements cannot be completed on a single line because the line would be too long, the statement too hard to read, or due to other style guidelines above. In such a case the statement spans multiple lines.
If a continuation line is part of an expression or sub-expression then you should align on the appropriate column so that it is easy to tell what part of the statement it is. Operators should not start continuation lines. In other cases follow the 2-space indent guideline. Here are some examples from libcurl:
if(Curl_pipeline_wanted(handle->multi, CURLPIPE_HTTP1) &&
   (handle->set.httpversion != CURL_HTTP_VERSION_1_0) &&
   (handle->set.httpreq == HTTPREQ_GET ||
    handle->set.httpreq == HTTPREQ_HEAD))
  /* did not ask for HTTP/1.0 and a GET or HEAD */
  return TRUE;
If no parenthesis, use the default indent:
data->set.http_disable_hostname_check_before_authentication =
  (0 != va_arg(param, long)) ? TRUE : FALSE;
Function invoke with an open parenthesis:
if(option) {
  result = parse_login_details(option, strlen(option),
                               (userp ? &user : NULL),
                               (passwdp ? &passwd : NULL),
                               NULL);
}
Align with the "current open" parenthesis:
DEBUGF(infof(data, "Curl_pp_readresp_ %d bytes of trailing "
             "server response left\n",
             (int)clipamount));
Platform dependent code
Use #ifdef HAVE_FEATURE to do conditional code. We avoid checking for
particular operating systems or hardware in the #ifdef lines. The HAVE_FEATURE
shall be generated by the configure script for unix-like systems and they are
hard-coded in the config-[system].h files for the others.
We also encourage use of macros/functions that possibly are empty or defined to constants when libcurl is built without that feature, to make the code seamless. Like this example where the magic() function works differently depending on a build-time conditional:
#ifdef HAVE_MAGIC
void magic(int a)
{
  return a + 2;
}
#else
#define magic(x) 1
#endif

int content = magic(3);
No typedefed structs
Use structs by all means, but do not typedef them. Use the struct name way
of identifying them:
struct something {
   void *valid;
   size_t way_to_write;
};
struct something instance;
Not okay:
typedef struct {
   void *wrong;
   size_t way_to_write;
} something;
something instance;
Contributing
Contributing means helping out.
When you contribute anything to the project - code, documentation, bug fixes, suggestions or good advice - we assume you do this with permission and you are not breaking any contracts or laws by providing that to us. If you do not have permission, do not contribute it to us.
Contributing to a project like curl could be many different things. While source code is the stuff that is needed to build the products, we are also depending on good documentation, testing (both test code and test infrastructure), web content, user support and more.
Send your changes or suggestions to the team and by working together we can fix problems, improve functionality, clarify documentation, add features or make anything else you help out with land in the proper place. We make sure improved code and docs get merged into the source tree properly and other sorts of contributions are suitable received.
Send your contributions on a mailing list, file an issue or submit a pull request.
Suggestions
Ideas are easy, implementations are hard. Yes, we do appreciate good ideas and suggestions of what to do and how to do it, but the chances that the ideas actually turn into real features grow substantially if you also volunteer to participate in converting the idea into reality.
We already gather ideas in the TODO document and we are generally aware of
the current trends in the popular networking protocols so there is usually no
need to remind us about those.
What to add
The best approach to add anything to curl or libcurl is, of course, to first bring the idea and suggestion to the curl project team members and then discuss with them if the idea is feasible for inclusion and then how an implementation is best done—and done in the best possible way to get merged into the source code repository, assuming that is what you want.
The project generally approves functions that improve the support for the current protocols, especially features that popular clients or browsers have but that curl still lacks.
Of course, you can also add contents to the project that are not code, like documentation, graphics or website contents, but the general rules apply equally to that.
If you are fixing a problem you have or a problem that others are reporting, we are thrilled to receive your fixes and merge them as soon as possible,
What not to add
There are no good rules that say what features you can or cannot add or that we never accept, but let me instead try to mention a few things you should avoid to get less friction and to be successful, faster:
-
Do not write up a huge patch first and then send it to the list for discussion. Always start out by discussing on the list, and send your initial review requests early to get feedback on your design and approach. It saves you from wasting time going down a route that might need rewriting in the end anyway.
-
When introducing things in the code, you need to follow the style and architecture that already exists. When you add code to the ordinary transfer code path, it must, for example, work asynchronously in a non-blocking manner. We do not accept new code that introduces blocking behaviors—we already have too many of those that we have not managed to remove yet.
-
Quick hacks or dirty solutions that have a high risk of not working on platforms you do not run or on architectures you do not know. We do not care if you are in a hurry or that it works for you. We do not accept high risk code or code that is hard to read or understand.
-
Code that breaks the build. Sure, we accept that we sometimes have to add code to certain areas that makes the new functionality perhaps depend on a specific 3rd party library or a specific operating system and similar, but we can never do that at the expense of all other systems. We do not break the build, and we make sure all tests keep running successfully.
git
Our preferred source control tool is git.
While git is sometimes not the easiest tool to learn and master, all the basic steps a casual developer and contributor needs to know are straight-forward and do not take much time or effort to learn.
This book does not help you learn git. All software developers in this day and age should learn git anyway.
The curl git tree can be browsed with a web browser on our GitHub page at https://github.com/curl/curl.
To check out the curl source code from git, you can clone it like this:
git clone https://github.com/curl/curl.git
Pull request
A popular and convenient way to make your own changes and contribute them back to the project is by doing a so-called pull request on GitHub.
First, you create your own version of the source tree, called a fork, on the Github website. That way you get your own version of the curl git tree that you can clone to a local copy.
You edit your own local copy, commit the changes, push them to the git repository on Github and then on the Github website you can select to create a pull request based on your changes done to your local repository clone of the original curl repository.
We recommend doing your work meant for a pull request in a dedicated separate branch and not in master, to make it easier for you to update a pull request, like after review, for example, or if you realize it was a dead end and you decide to throw it away.
Make a patch for the mailing list
Even if you opt to not make a pull request but prefer the old fashioned and trusted method of sending a patch to the curl-library mailing list, it is still a good practice to work in a local git branch and commit your changes there.
A branch makes it easy to edit and rebase when you need to change things and it makes it easy to keep syncing to the master branch when things are updated upstream.
Once your commits are fine enough to get sent to the mailing list, you create
patches with git format-patch and send them away. Even more fancy users go
directly to git send-email and have git send the email itself.
git commit style
When you commit a patch to git, you give it a commit message that describes the change you are committing. We have a certain style in the project that we ask you to use:
[area]: [short line describing the main effect]

[separate the above single line from the rest with an empty line]

[full description, no wider than 72 columns that describes as much as
possible as to why this change is made, and possibly what things
it fixes and everything else that is related]

[Bug: link to source of the report or more related discussion]
[Reported-by: John Doe—credit the reporter]
[whatever-else-by: credit all helpers, finders, doers]
Do not forget to use git commit --author="Jane Doe <jane@example.com>" if
you commit someone else's work, and make sure that you have your own Github
username and email setup correctly in git before you commit via commands
below:
git config --global user.name "johndoe"
git config --global user.email "johndoe@example.com"
The author and the *-by: lines are, of course, there to make sure we give the proper credit in the project. We do not want to take someone else's work without clearly attributing where it comes from. Giving correct credit is of utmost importance.
Who decides what goes in?
First, it might not be obvious to everyone but there is, of course, only a limited set of people that can actually merge commits into the actual official git repository. Let's call them the core team.
Everyone else can fork off their own curl repository to which they can commit and push changes and host them online and build their own curl versions from and so on, but in order to get changes into the official repository they need to be pushed by a trusted person.
The core team is a small set of curl developers who have been around for several years and have shown they are skilled developers and that they fully comprehend the values and the style of development we do in this project. They are some of the people listed in the The development team section.
You can always bring a discussion to the mailing list and argue why you think your changes should get accepted, or perhaps even object to other changes that are getting in and so forth. You can even suggest yourself or someone else to be given "push rights" and become one of the selected few in that team.
Daniel remains the project leader and while it is rarely needed, he has the final say in debates that do not seem to sway in either direction or fail to reach consensus.
Reporting vulnerabilities
All known and public curl or libcurl related vulnerabilities are listed on the curl website security page.
Security vulnerabilities should not be entered in the project's public bug tracker unless the necessary configuration is in place to limit access to the issue to only the reporter and the project's security team.
Vulnerability handling
The typical process for handling a new security vulnerability is as follows.
No information should be made public about a vulnerability until it is formally announced at the end of this process. That means, for example, that a bug tracker entry must NOT be created to track the issue since that makes the issue public and it should not be discussed on any of the project's public mailing lists. Also messages associated with any commits should not make any reference to the security nature of the commit if done prior to the public announcement.
-
The person discovering the issue, the reporter, reports the vulnerability on https://hackerone.com/curl. Issues filed there reach a handful of selected and trusted people.
-
Messages that do not relate to the reporting or managing of an undisclosed security vulnerability in curl or libcurl are ignored and no further action is required.
-
A person in the security team sends an email to the original reporter to acknowledge the report.
-
The security team investigates the report and either rejects it or accepts it.
-
If the report is rejected, the team writes to the reporter to explain why.
-
If the report is accepted, the team writes to the reporter to let him/her know it is accepted and that they are working on a fix.
-
The security team discusses the problem, works out a fix, considers the impact of the problem and suggests a release schedule. This discussion should involve the reporter as much as possible.
-
The release of the information should be as soon as possible and is most often synced with an upcoming release that contains the fix. If the reporter, or anyone else, thinks the next planned release is too far away then a separate earlier release for security reasons should be considered.
-
Write a security advisory draft about the problem that explains what the problem is, its impact, which versions it affects, any solutions or workarounds and when the fix was released, making sure to credit all contributors properly.
-
Request a CVE number (Common Vulnerabilities and Exposures) using HackerOne's form for this purpose.
-
Update the security advisory with the CVE number.
-
Consider informing distros@openwall to prepare them about the upcoming public security vulnerability announcement - attach the advisory draft for information. Note that 'distros' do not accept an embargo longer than 14 days and they do not care for Windows-specific flaws.
-
The security team commits the fix in a private branch. The commit message should ideally contain the CVE number. This fix is usually also distributed to the 'distros' mailing list to allow them to use the fix prior to the public announcement.
-
At the day of the next release, the private branch is merged into the master branch and pushed. Once pushed, the information is accessible to the public and the actual release should follow suit immediately afterwards.
-
The project team creates a release that includes the fix.
-
The project team announces the release and the vulnerability to the world in the same manner we always announce releases—it gets sent to the curl-announce, curl-library and curl-users mailing lists.
-
The security webpage on the website should get the new vulnerability mentioned.
curl-security@haxx.se
Who is on this list? There are a couple of criteria you must meet, and then we might ask you to join the list or you can ask to join it. It really is not formal. We only require that you have a long-term presence in the curl project and you have shown an understanding for the project and its way of working. You must have been around for a good while and you should have no plans on vanishing in the near future.
We do not make the list of participants public mostly because it tends to vary somewhat over time and a list somewhere only risks getting outdated.
Website
Most of the curl website is also available in a public git repository, although separate from the source code repository since it generally is not interesting to the same people and we can maintain a different list of people that have push rights, etc.
The website git repository is available on GitHub at this URL: https://github.com/curl/curl-www and you can clone a copy of the web code like this:
git clone https://github.com/curl/curl-www.git
Building the web
The website is a custom-made setup that mostly builds static HTML files from a set of source files. The source files are preprocessed with what is a souped-up C preprocessor called fcpp and a set of perl scripts. The man pages get converted to HTML with roffit. Make sure fcpp, perl, roffit, make and curl are all in your $PATH.
Once you have cloned the git repository the first time, invoke sh bootstrap.sh once to get a symlink and some initial local files setup,
and then you can build the website locally by invoking make in the source
root tree.
Note that this does not make you a complete website mirror, as some scripts and files are only available on the real actual site, but should give you enough to let you view most HTML pages locally.
Run a local clone
The website is built in a way that makes it easy and convenient to host a
local copy for browsing and testing changes before we push them to the
official site in production. We then recommend you call the site curl.local
and add that as an entry in your local /etc/hosts file. Then point the
document root of your HTTP server to the curl-www source code root.
Website infrastructure
- The public curl website is hosted at curl.se.
- The domain name is owned by Daniel Stenberg
- The main origin machine is sponsored by Haxx
- The curl.se domain is served by anycast distributed DNS servers sponsored by Kirei
- The site is delivered to the world via a CDN run by Fastly
- The website updates itself from GitHub every N minutes. The CDN front-ends cache content for Y minutes (different types cache content different times)
Build curl and libcurl
The source code for this project is written in a way that allows it to be compiled and built on just about any operating system and platform, with as few restraints and requirements as possible.
If you have a 32-bit (or larger) CPU architecture, if you have a C89 compliant compiler and if you have roughly a POSIX supporting sockets API, then you can most likely build curl and libcurl for your target system.
For the most popular platforms, the curl project comes with build systems already done and prepared to allow you to easily build it yourself.
There are also friendly people and organizations who put together binary packages of curl and libcurl and make them available for download. The different options are explored below.
The latest version?
Looking at the curl website, you can see the latest curl and libcurl version released from the project. That is the latest source code release package you can get.
When you opt for a prebuilt and prepackaged version for your operating system or distribution of choice, you may not always find the latest version but you might have to either be satisfied with the latest version someone has packaged for your environment, or you need to build it yourself from source.
The curl project also provides info about the latest version in a somewhat
more machine-readable format on this URL: https://curl.se/info.
Releases source code
The curl project creates source code that can be built to produce the two products curl and libcurl. The conversion from source code to binaries is often referred to as "building". You build curl and libcurl from source.
The curl project does not provide any built binaries at all — it only ships the source code. The binaries which can be found on the download page of the curl web and installed from other places on the Internet are all built and provided to the world by other friendly people and organizations.
The source code consists of a large number of files containing C code. Generally speaking, the same set of files are used to build binaries for all platforms and computer architectures that curl supports. curl can be built and run on a vast number of platforms. If you use a rare operating system yourself, chances are that building curl from source is the easiest or perhaps the only way to get curl.
Making it easy to build curl is a priority to the curl project, although we do not always necessarily succeed.
git vs release tarballs
When release tarballs are created, a few files are generated and included in the final release bundle. Those generated files are not present in the git repository, because they are generated and there is no need to store them in git.
Of course, you can also opt to build the latest version that exists in the git repository. It could however be a bit more fragile and probably requires slightly more attention to detail.
If you build curl from a git checkout, you need to generate some files
yourself before you can build. On Linux and Unix-like systems, do this by
running autoreconf -fi and on Windows, run buildconf.bat.
On Linux and Unix-like systems
There are two distinctly different ways to build curl on Linux and other Unix-like systems; there is the one using the configure script and there is the CMake approach.
There are two different build environments to cater to people's different opinions and tastes. The configure-based build is arguably the more mature and more encompassing build system and should probably be considered the default one.
On Windows
On Windows there are at least four different ways to build. The above
mentioned ways, the CMake approach and using
configure with msys work, but the more popular and
common methods are probably building with Microsoft's Visual Studio compiler
using either nmake or project files. See the build on
Windows section.
Learn more
- Autotools - build with configure
- CMake
- Separate install
- On Windows - Windows-specific ways to build
- Dependencies
- TLS libraries
Autotools
The Autotools are a collection of different tools that are used together to
generate the configure script. The configure script is run by the user who
wants to build curl and it does a whole bunch of things:
-
It checks for features and functions present in your system.
-
It offers command-line options so that you as a builder can decide what to enable and disable in the build. Features and protocols, etc., can be toggled on/off, even compiler warning levels and more.
-
It offers command-line options to let the builder point to specific installation paths for various third-party dependencies that curl can be built to use.
-
It specifies on which file path the generated installation should be placed when ultimately the build is made and
make installis invoked.
In the most basic usage, running ./configure in the source directory is
enough. When the script completes, it outputs a summary of what options it has
detected/enabled and what features that are still disabled, some of which
possibly because it failed to detect the presence of necessary third-party
dependencies that are needed for those functions to work. If the summary is
not what you expected it to be, invoke configure again with new options or
with the previously used options adjusted.
After configure has completed, you invoke make to build the entire thing and
then finally make install to install curl, libcurl and associated
things. make install requires that you have the correct rights in your
system to create and write files in the installation directory or you get an
error displayed.
Cross-compiling
Cross-compiling means that you build the source on one architecture but the output is created to be run on a different one. For example, you could build the source on a Linux machine but have the output work on a Windows machine.
For cross-compiling to work, you need a dedicated compiler and build system setup for the particular target system for which you want to build. How to get and install that system is not covered in this book.
Once you have a cross compiler, you can instruct configure to use that compiler instead of the native compiler when it builds curl so that the end result then can be moved over and used on the other machine.
Static linking
By default, configure setups the build files so that the following 'make'
command creates both shared and static versions of libcurl. You can change
that with the --disable-static or --disable-shared options to configure.
If you instead want to build with static versions of third party libraries instead of shared libraries, you need to prepare yourself for an uphill battle. curl's configure script is focused on setting up and building with shared libraries.
One of the differences between linking with a static library compared to
linking with a shared one is in how shared libraries handle their own
dependencies while static ones do not. In order to link with library xyz as
a shared library, it is a matter of adding -lxyz to the linker command line
no matter which other libraries xyz itself was built to use. However, if
that xyz is instead a static library we also need to specify each dependency
of xyz on the linker command line. curl's configure cannot keep up with or
know all possible dependencies for all the libraries it can be made to build
with, so users wanting to build with static libs mostly need to provide that
list of libraries to link with.
Select TLS backend
The configure-based build offers the user to select from a wide variety of different TLS libraries when building. You select them by using the correct command line options. Before curl 7.77.0, the configure script would automatically check for OpenSSL, but modern versions do not.
- AmiSSL:
--with-amissl - AWS-LC:
--with-openssl - BearSSL:
--with-bearssl - BoringSSL:
--with-openssl - GnuTLS:
--with-gnutls - LibreSSL:
--with-openssl - mbedTLS:
--with-mbedtls - OpenSSL:
--with-openssl - Rustls:
--with-rustls(point to the rustls-ffi install path) - Schannel:
--with-schannel - wolfSSL:
--with-wolfssl
If you do not specify which TLS library to use, the configure script fails. If
you want to build without TLS support, you must explicitly ask for that with
--without-ssl.
These --with-* options also allow you to provide the install prefix so that
configure searches for the specific library where you tell it to. Like this:
./configure --with-gnutls=/home/user/custom-gnutls
You can opt to build with support for multiple TLS libraries by specifying
multiple --with-* options on the configure command line. Pick which one to
make the default TLS backend with --with-default-ssl-backend=[NAME]. For
example, build with support for both GnuTLS and OpenSSL and default to
OpenSSL:
./configure --with-openssl --with-gnutls \
  --with-default-ssl-backend=openssl
Select SSH backend
The configure-based build offers the user to select from a variety of different SSH libraries when building. You select them by using the correct command-line options.
- libssh2:
--with-libssh2 - libssh:
--with-libssh
These --with-* options also allow you to provide the install prefix so that
configure searches for the specific library where you tell it to. Like this:
./configure --with-libssh2=/home/user/custom-libssh2
Select HTTP/3 backend
The configure-based build offers the user to select different HTTP/3 libraries when building. You select them by using the correct command-line options.
- quiche:
--with-quiche - ngtcp2:
--with-ngtcp2 --with-nghttp3 - msh3:
--with-msh3
CMake
CMake is an alternative build method that works on most modern platforms,
including Windows. Using this method you first need to have cmake installed on
your build machine, invoke cmake to generate the build files and then
build. With cmake's -G flag, you select which build system to generate files
for. See cmake --help for the list of "generators" your cmake installation
supports.
On the cmake command line, the first argument specifies where to find the cmake
source files, which is . (a single dot) if in the same directory.
To build on Linux using plain make with CMakeLists.txt in the same directory, you can do:
cmake -G "Unix Makefiles" .
make
Or rely on the fact that unix makefiles are the default there:
cmake .
make
To create a subdirectory for the build and run make in there:
mkdir build
cd build
cmake ..
make
Separate install
At times when you build curl and libcurl from source, you do this with the purpose of experimenting, testing or perhaps debugging. In these scenarios, you might not be ready to replace your system wide libcurl installation.
Many modern systems already have libcurl installed in the system, so when you build and install your test version, you need to make sure that your new build is used for your purposes.
We get a lot of reports from people who build and install their own version of curl and libcurl, but when they subsequently invoke their new curl build, the new tool finds an older libcurl in the system and instead uses that. This tends to confuse users.
Static linking
You can avoid the problem of curl finding an older dynamic libcurl library by instead linking with libcurl statically. This however instead triggers a slew of other challenges because linking modern libraries with several third party dependencies statically is hard work. When you link statically, you need to make sure you provide all the dependencies to the linker. This is not a method we recommend.
Dynamic linking
When you invoke curl on a modern system, there is a runtime linker (often
called ld.so) that loads the shared libraries the executable was built to
use. The shared libraries are searched for and loaded from a set of paths.
The problem is often that the system libcurl library exists in that path, while your newly built libcurl does not. Or they both exist in the path but the system one is found first.
The runtime linker path order is typically defined in /etc/ld.so.conf on
Linux systems. You can change the order and you can add new directories to the
list of directories to search. Remember to run ldconfig after an update.
Temporary installs
If you build a libcurl and install it somewhere and you want to use it for a single application or maybe to test something out for a bit, editing and changing the dynamic library path might be a bit too intrusive.
A normal unix offers a few other alternative takes that we recommend.
LD_LIBRARY_PATH
You can set this environment variable in your shell to make the runtime linker look in a particular directory. This affects all executables loaded where this variable is set.
It is convenient for quick checks, or even if you want to rotate around and
have your single curl executable use different libcurls in different
invokes.
It can look like this when you have installed your new curl build in
$HOME/install:
export LD_LIBRARY_PATH=$HOME/install/lib
$HOME/install/bin/curl https://example.com/
rpath
Often, a better way to forcibly load your separate libcurl instead of the
system one, is to set the rpath of the specific curl executable you
build. That gives the runtime linker a specific path to check for this
specific executable.
This is done at link time, and if you build your own libcurl using application, you can make that load your custom libcurl build like this:
gcc -g example.c -L$HOME/install/lib -lcurl -Wl,-rpath=$HOME/install/lib
With rpath set, the executable linked against $HOME/install/lib/libcurl.so
then makes the runtime linker use that specific path and library, while other
binaries in your system continue to use the system libcurl.
When you want to make your custom build of curl use its own libcurl and you
install them into $HOME/install, then a configure command line for this
looks something like this:
LDFLAGS="-Wl,-rpath,$HOME/install/lib" ./configure ...
If your system supports the runpath form of rpath it is often better to use
that instead because it can be overridden by the LD_LIBRARY_PATH environment
variable. It may also prevent libtool bugs when testing in-tree builds of curl,
since then libtool can use LD_LIBRARY_PATH. Newer linkers may use the runpath
form of rpath by default when rpath is specified but others need an additional
linker flag -Wl,--enable-new-dtags like this:
LDFLAGS="-Wl,-rpath,$HOME/install/lib -Wl,--enable-new-dtags" \
  ./configure ...
Windows
You can build curl on Windows in several different ways. We recommend using the MSVC compiler from Microsoft or the free and open source mingw compiler. The build process is, however, not limited to these.
If you use mingw, you might want to use the autotools build system.
Visual C++ project files
Using CMake, you can generate a set of Visual Studio project files:
cmake -B build -G 'Visual Studio 17 2022'
Once generated, you import them and build with Visual Studio like normally.
You can even generate them for 32-bit Windows with:
cmake -B build -G 'Visual Studio 17 2022' \
-DCMAKE_GENERATOR_PLATFORM=x86
Mingw
You can build curl with the mingw compiler suite. Use CMake to generate the set of Makefiles for you:
cmake -B build -G "MinGW Makefiles"
Dependencies
A key to making good software is to build on top of other great software. By using libraries that many others use, we reinvent the same things fewer times and we get more reliable software as there are more people using the same code.
A whole slew of features that curl provides require that it is built to use one or more external libraries. They are then dependencies of curl. None of them are required, but most users want to use at least some of them.
HTTP Compression
curl can do automatic decompression of data transferred over HTTP if built with the proper 3rd party libraries. You can build curl to use one or more of these libraries:
Getting compressed data over the wire uses less bandwidth, which might also result in shorter transfer times.
c-ares
curl can be built with c-ares to be able to do asynchronous name resolution. Another option to enable asynchronous name resolution is to build curl with the threaded name resolver backend, which then instead creates a separate helper thread for each name resolve. c-ares does it all within the same thread.
nghttp2
This is a library for handling HTTP/2 framing and is a prerequisite for curl to support HTTP version 2.
openldap
This library is one option to allow curl to get support for the LDAP and LDAPS URL schemes. On Windows, you can also opt to build curl to use the winldap library.
libpsl
https://rockdaboot.github.io/libpsl/
When you build curl with support for libpsl, the cookie parser knows about the Public Suffix List and thus handles such cookies appropriately.
libidn2
https://www.gnu.org/software/libidn/libidn2/manual/libidn2.html
curl handles International Domain Names (IDN) with the help of the libidn2 library.
SSH libraries
If you want curl to have SCP and SFTP support, build with one of these SSH libraries:
TLS libraries
There are many different TLS libraries to choose from, so they are covered in a separate section.
QUIC and HTTP/3
To build curl with HTTP/3 support, you need one of these sets:
TLS libraries
To make curl support TLS based protocols, such as HTTPS, FTPS, SMTPS, POP3S, IMAPS and more, you need to build with a third-party TLS library since curl does not implement the TLS protocol itself.
curl is written to work with a large number of TLS libraries:
- AmiSSL
- AWS-LC
- BearSSL
- BoringSSL
- GnuTLS
- libressl
- mbedTLS
- OpenSSL
- rustls
- Schannel (native Windows)
- WolfSSL
When you build curl and libcurl to use one of these libraries, it is important that you have the library and its include headers installed on your build machine.
configure
Below, you learn how to tell configure to use the different libraries. The
configure script does not select any TLS library by default. You must select
one, or instruct configure that you want to build without TLS support using
--without-ssl.
OpenSSL, BoringSSL, libressl
./configure --with-openssl
configure detects OpenSSL in its default path by default. You can optionally point configure to a custom install path prefix where it can find OpenSSL:
./configure --with-openssl=/home/user/installed/openssl
The alternatives BoringSSL and libressl look similar enough that configure detects them the same way as OpenSSL. It then uses additional measures to figure out which of the particular flavors it is using.
GnuTLS
./configure --with-gnutls
configure detects GnuTLS in its default path by default. You can optionally point configure to a custom install path prefix where it can find gnutls:
./configure --with-gnutls=/home/user/installed/gnutls
WolfSSL
./configure --with-wolfssl
configure detects WolfSSL in its default path by default. You can optionally point configure to a custom install path prefix where it can find WolfSSL:
./configure --with-wolfssl=/home/user/installed/wolfssl
mbedTLS
./configure --with-mbedtls
configure detects mbedTLS in its default path by default. You can optionally point configure to a custom install path prefix where it can find mbedTLS:
./configure --with-mbedtls=/home/user/installed/mbedtls
Schannel
./configure --with-schannel
configure detects Schannel in its default path by default.
(WinSSL was previously an alternative name for Schannel, and earlier curl
versions instead needed --with-winssl)
BearSSL
./configure --with-bearssl
configure detects BearSSL in its default path by default. You can optionally point configure to a custom install path prefix where it can find BearSSL:
./configure --with-bearssl=/home/user/installed/bearssl
Rustls
./configure --with-rustls
When told to use rustls, curl is actually trying to find and use the rustls-ffi library - the C API for the rustls library. configure detects rustls-ffi in its default path by default. You can optionally point configure to a custom install path prefix where it can find rustls-ffi:
./configure --with-rustls=/home/user/installed/rustls-ffi
BoringSSL
build boringssl
$HOME/src is where I put the code in this example. You can pick wherever you like.
$ cd $HOME/src
$ git clone https://boringssl.googlesource.com/boringssl
$ cd boringssl
$ mkdir build
$ cd build
$ cmake -DCMAKE_POSITION_INDEPENDENT_CODE=on ..
$ make
set up the build tree to get detected by curl's configure
In the boringssl source tree root, make sure there is a lib and an include
dir. The lib directory should contain the two libs (I made them symlinks
into the build dir). The include directory is already present by
default. Make and populate lib like this (commands issued in the source tree
root, not in the build/ subdirectory).
$ mkdir lib
$ cd lib
$ ln -s ../build/ssl/libssl.a
$ ln -s ../build/crypto/libcrypto.a
configure curl
LIBS=-lpthread ./configure --with-ssl=$HOME/src/boringssl (where I point out
the root of the boringssl tree)
Verify that at the end of the configuration, it says it detected BoringSSL to be used.
build curl
Run make in the curl source tree.
Now you can install curl normally with make install etc.
Command line concepts
curl started out as a command-line tool and it has been invoked from shell prompts and from within scripts by countless users over the years.
Garbage in gives garbage out
curl has little will of its own. It tries to please you and your wishes to a large extent. It also means that it tries to play with what you give it. If you misspell an option, it might do something unintended. If you pass in a slightly illegal URL, chances are curl still deals with it and proceeds. It means that you can pass in crazy data in some options and you can have curl pass on that crazy data in its transfer operation.
This is a design choice, as it allows you to really tweak how curl does its protocol communications and you can have curl massage your server implementations in the most creative ways.
- Differences
- Command line options
- Help
- Options depend on version
- URLs
- Config file
- Variables
- Passwords
- Progress meter
- Version
- Exit code
- Copy as curl
Differences
Binaries and different platforms
The command-line tool curl is a binary executable file. The curl project
does not by itself distribute or provide binaries. Binary files are highly
system specific and oftentimes also bound to specific system versions.
Different curl versions, built by different people on different platforms using different third party libraries with different build-time options makes the tool offer different features in different places. In addition, curl is continuously developed, so newer versions of the tool are likely to have more and better features than the older ones.
Command lines, quotes and aliases
There are many different command line environments, shells and prompts in which curl can be used. They all come with their own sets of limitations, rules and guidelines to follow. The curl tool is designed to work with any of them without causing troubles but there may be times when your specific command line system does not match what others use or what is otherwise documented.
One way that command-line systems differ, for example, is how you can put quotes around arguments such as to embed spaces or special symbols. In most Unix-like shells you use double quotes (") and single quotes (') depending if you want to allow variable expansions or not within the quoted string, but on Windows there is no support for the single quote version.
In some environments, like PowerShell on Windows, the authors of the command
line system decided they know better and "help" the user to use another tool
instead of curl when curl is typed, by providing an alias that takes
precedence when a command line is executed. In order to use curl properly with
PowerShell, you need to type in its full name including the extension:
curl.exe or remove the alias.
Different command-line environments have different maximum command line lengths and force users to limit how large an amount of data is put into a single line. curl adapts to this by offering a way to provide command-line options through a file or stdin using the -K option.
Command line options
When telling curl to do something, you invoke curl with zero, one or several command-line options to accompany the URL or set of URLs you want the transfer to be about. curl supports over two hundred different options.
Short options
Command line options pass on information to curl about how you want it to behave. Like you can ask curl to switch on verbose mode with the -v option:
curl -v http://example.com
-v is here used as a "short option". You write those with the minus symbol and a single letter immediately following it. Many options are just switches that switch something on or change something between two known states. They can be used with just that option name. You can then also combine several single-letter options after the minus. To ask for both verbose mode and that curl follows HTTP redirects:
curl -vL http://example.com
The command-line parser in curl always parses the entire line and you can put the options anywhere you like; they can also appear after the URL:
curl http://example.com -Lv
and the two separate short options can of course also be specified separately, like:
curl -v -L http://example.com
Long options
Single-letter options are convenient since they are quick to write and use, but as there are only a limited number of letters in the alphabet and there are many things to control, not all options are available like that. Long option names are therefore provided for those. Also, as a convenience and to allow scripts to become more readable, most short options have longer name aliases.
Long options are always written with two minuses (or dashes, whichever you prefer to call them) and then the name and you can only write one option name per double-minus. Asking for verbose mode using the long option format looks like:
curl --verbose http://example.com
and asking for HTTP redirects as well using the long format looks like:
curl --verbose --location http://example.com
Arguments to options
Not all options are just simple boolean flags that enable or disable features. For some of them you need to pass on data, like perhaps a username or a path to a file. You do this by writing first the option and then the argument, separated with a space. Like, for example, if you want to send an arbitrary string of data in an HTTP POST to a server:
curl -d arbitrary http://example.com
and it works the same way even if you use the long form of the option:
curl --data arbitrary http://example.com
When you use the short options with arguments, you can, in fact, also write the data without the space separator:
curl -darbitrary http://example.com
Arguments with spaces
At times you want to pass on an argument to an option, and that argument
contains one or more spaces. For example you want to set the user-agent field
curl uses to be exactly I am your father, including those three spaces. Then
you need to put quotes around the string when you pass it to curl on the
command line. The exact quotes to use varies depending on your shell/command
prompt, but generally it works with double quotes in most places:
curl -A "I am your father" http://example.com
Failing to use quotes, like if you would write the command line like this:
curl -A I am your father http://example.com
… makes curl only use 'I' as a user-agent string, and the following strings,
am, your and father are instead treated as separate URLs since they do
not start with - to indicate that they are options and curl only ever
handles options and URLs.
To make the string itself contain double quotes, which is common when you for
example want to send a string of JSON to the server, you may need to use
single quotes (except on Windows, where single quotes do not work the same
way). Send the JSON string { "name": "Darth" }:
curl -d '{ "name": "Darth" }' http://example.com
Or if you want to avoid the single quote thing, you may prefer to send the data to curl via a file, which then does not need the extra quoting. Assuming we call the file 'json' that contains the above mentioned data:
curl -d @json http://example.com
Negative options
For options that switch on something, there is also a way to switch it
off. You then use the long form of the option with an initial no- prefix
before the name. As an example, to switch off verbose mode:
curl --no-verbose http://example.com
Short options
Command line options pass on information to curl about how you want it to behave. Like you can ask curl to switch on verbose mode with the -v option:
curl -v http://example.com
-v is here used as a "short option". You write those with the minus symbol and a single letter immediately following it. Many options are switches that switch something on or change something between two known states. They can be used with that option name. You can then also combine several single-letter options after the minus. To ask for both verbose mode and that curl follows HTTP redirects:
curl -vL http://example.com
The command-line parser in curl always parses the entire line and you can put the options anywhere you like; they can also appear after the URL:
curl http://example.com -Lv
and the two separate short options can of course also be specified separately, like:
curl -v -L http://example.com
Long options
Single-letter options are convenient since they are quick to write and use, but as there are only a limited number of letters in the alphabet and there are many things to control, not all options are available like that. Long option names are therefore provided for those. Also, as a convenience and to allow scripts to become more readable, most short options have longer name aliases.
Long options are always written with two minuses (or dashes, whichever you prefer to call them) and then the name and you can only write one option name per double-minus. Asking for verbose mode using the long option format looks like:
curl --verbose http://example.com
and asking for HTTP redirects as well using the long format looks like:
curl --verbose --location http://example.com
Arguments to options
Not all options are simple boolean flags that enable or disable features. For some of them you need to pass on data, like perhaps a username or a path to a file. You do this by writing first the option and then the argument, separated with a space. Like, for example, if you want to send an arbitrary string of data in an HTTP POST to a server:
curl -d arbitrary http://example.com
and it works the same way even if you use the long form of the option:
curl --data arbitrary http://example.com
When you use the short options with arguments, you can, in fact, also write the data without the space separator:
curl -darbitrary http://example.com
Arguments with spaces
At times you want to pass on an argument to an option, and that argument
contains one or more spaces. For example you want to set the user-agent field
curl uses to be exactly I am your father, including those three spaces. Then
you need to put quotes around the string when you pass it to curl on the
command line. The exact quotes to use varies depending on your shell/command
prompt, but generally it works with double quotes in most places:
curl -A "I am your father" http://example.com
Failing to use quotes, like if you would write the command line like this:
curl -A I am your father http://example.com
… makes curl only use 'I' as a user-agent string, and the following strings,
am, your and father are instead treated as separate URLs since they do
not start with - to indicate that they are options and curl only ever
handles options and URLs.
To make the string itself contain double quotes, which is common when you for
example want to send a string of JSON to the server, you may need to use
single quotes (except on Windows, where single quotes do not work the same
way). Send the JSON string { "name": "Darth" }:
curl -d '{ "name": "Darth" }' http://example.com
Or if you want to avoid the single quote thing, you may prefer to send the data to curl via a file, which then does not need the extra quoting. Assuming we call the file 'json' that contains the above mentioned data:
curl -d @json http://example.com
Negative options
For options that switch on something, boolean options, there is also a way to
switch them off. You then use the long form of the option with an initial
no- prefix before the name. As an example, to switch off verbose mode:
curl --no-verbose http://example.com
Help
curl has more than two hundred and sixty command-line options and the number of options keep increasing over time. Chances are the number of options reaches or even surpasses three hundred in the coming years.
List options
To find out which options you need to perform a certain action, you can get
curl to list them. First, curl --help or curl -h get you a list of the
most important and frequently used options. You can then provide an additional
"category" to -h to get more options listed for that specific area. Use
curl -h category to list all existing categories or curl -h all to list
all available options.
Help with a specific option
To get curl to display the documentation about a single specific command line
option, add the option after -h. Use either the short name with a single
dash (-) or the long version using two dashes (--).
For example, learn what -U does by running
curl -h -U
Or get --insecure explained like this:
curl -h --insecure
Full manual
The curl --manual option outputs the entire man page for curl. That is a
thorough and complete document on how each option works amassing several
thousand lines of documentation. To wade through that is also a tedious work
and we encourage use of a search function through those text masses. Some
people might also appreciate the man page in its web
version.
Options depend on version
curl was first typed on a command line back in the glorious year of 1998. It
already then worked on the specified URL and none, one or more command-line
options given to it.
Since then we have added more options. We add options as we go along and almost every new release of curl has one or a few new options that allow users to modify certain aspects of its operation.
With the curl project's rather speedy release chain with a new release shipping every eight weeks, it is almost inevitable that you are at least not always using the latest released version of curl. Sometimes you may even use a curl version that is a few years old.
All command-line options described in this book were, of course, added to curl at some point and only a small portion of them were available that fine spring day in 1998 when curl first shipped. You may have reason to check your version of curl and crosscheck with the curl man page for when certain options were added. This is especially important if you want to take a curl command line using a modern curl version back to an older system that might be running an older installation.
The developers of curl are working hard to not change existing behavior. Command lines written to use curl in 1998, 2003 or 2010 should all be possible to run unmodified even today.
URLs
curl is called curl because a substring in its name is URL (Uniform Resource
Locator). It operates on URLs. URL is the name we casually use for the web
address strings, like the ones we usually see prefixed with HTTP:// or
starting with www.
URL is, strictly speaking, the former name for these. URI (Uniform Resource Identifier) is the more modern and correct name for them. The syntax is defined in RFC 3986.
Where curl accepts a “URL” as input, it is then really a “URI”. Most of the protocols curl understands also have a corresponding URI syntax document that describes how that particular URI format works.
- Scheme
- Name and password
- Host
- Port number
- Path
- Query
- FTP type
- Fragment
- Browsers
- Many options and URLs
- URL globbing
- Reading URLs from a file
- Connection reuse
- Parallel transfers
- trurl
Scheme
URLs start with the "scheme", which is the official name for the http://
part. That tells which protocol the URL uses. The scheme must be a known one
that this version of curl supports or it shows an error message and stops.
Additionally, the scheme must neither start with nor contain any whitespace.
The scheme separator
The scheme identifier is separated from the rest of the URL by the ://
sequence. That is a colon and two forward slashes. There exists URL formats
with only one slash, but curl does not support any of them. There are two
additional notes to be aware of, about the number of slashes:
curl allows some illegal syntax and tries to correct it internally; so it also understands and accepts URLs with one or three slashes, even though they are in fact not properly formed URLs. curl does this because the browsers started this practice so it has led to such URLs being used in the wild every now and then.
file:// URLs are written as file://<hostname>/<path> but the only
hostnames that are okay to use are localhost, 127.0.0.1 or a blank
(nothing at all):
file://localhost/path/to/file
file://127.0.0.1/path/to/file
file:///path/to/file
Inserting any other hostname in there makes recent versions of curl return an error.
Pay special attention to the third example above
(file:///path/to/file). That is three slashes before the path. That is
again an area with common mistakes and where browsers allow users to use the
wrong syntax so as a special exception, curl on Windows also allows this
incorrect format:
file://X:/path/to/file
… where X is a Windows-style drive letter.
Without scheme
As a convenience, curl also allows users to leave out the scheme part from URLs. Then it guesses which protocol to use based on the first part of the hostname. That guessing is basic, as it checks if the first part of the hostname matches one of a set of protocols, and assumes you meant to use that protocol. This heuristic is based on the fact that servers traditionally used to be named like that. The protocols that are detected this way are FTP, DICT, LDAP, IMAP, SMTP and POP3. Any other hostname in a scheme-less URL makes curl default to HTTP.
For example, this gets a file from an FTP site:
curl ftp.funet.fi/README
While this gets data from an HTTP server:
curl example.com
You can modify the default protocol to something other than HTTP with the
--proto-default option.
Supported schemes
curl supports or can be made to support (if built so) the following transfer schemes and protocols:
DICT, FILE, FTP, FTPS, GOPHER, GOPHERS, HTTP, HTTPS, IMAP, IMAPS, LDAP, LDAPS, MQTT, POP3, POP3S, RTSP, SCP, SFTP, SMB, SMBS, SMTP, SMTPS, TELNET, TFTP, WS and WSS
Name and password
Following the scheme in a URL, there can be a possible username and password field embedded. The use of this syntax is usually frowned upon these days since you easily leak this information in scripts or otherwise. For example, listing the directory of an FTP server using a given name and password:
curl ftp://user:password@example.com/
The presence of username and password in the URL is completely optional. curl also allows that information to be provided with normal command-line options, outside of the URL.
If you want a non-ASCII letter or maybe a : or @ as part of the username
and/or password, remember to URL encode that letter: write it as %HH where
HH is the hexadecimal byte value. : is %3a and @ is %40.
Host
The hostname part of the URL is, of course, a name that can be resolved to a numerical IP address, or the numerical address itself.
curl http://example.com
When specifying a numerical address, use the dotted version for IPv4 addresses:
curl http://127.0.0.1/
…and for IPv6 addresses the numerical version needs to be within square brackets:
curl http://[2a04:4e42::561]/
When a hostname is used, the conversion of the name to an IP address is
typically done using the system's resolver functions. That normally lets a
sysadmin provide local name lookups in the /etc/hosts file (or equivalent).
International Domain Names (IDN)
curl knows how to deal with IDN names and you pass them on like you would a normal name:
curl https://räksmörgås.se
Port number
Each protocol has a default port number that curl uses, unless a specified port number is given. The optional port number can be provided within the URL after the hostname part, as a colon and the port number written in decimal. For example, asking for an HTTP document on port 8080:
curl http://example.com:8080/
With the name specified as an IPv4 address:
curl http://127.0.0.1:8080/
With the name given as an IPv6 address:
curl http://[fdea::1]:8080/
The port number is an unsigned 16-bit number, so it has to be within the range 0 to 65535.
TCP vs UDP
The given port number is used when setting up the connection to the server specified in the URL. The port is either a TCP port number or a UDP port number depending on which actual underlying transport protocol that is used. TCP is the most common one, but TFTP and HTTP/3 use UDP.
URLs using the file:// scheme cannot have a port number.
Path
Every URL contains a path. If there is none given, / is implied. For example
when you use the hostname like in:
curl https://example.com
The path is sent to the specified server to identify exactly which resource that is requested or that is provided.
The exact use of the path is protocol dependent. For example, getting the file
README from the default anonymous user from an FTP server:
curl ftp://ftp.example.com/README
For the protocols that have a directory concept, ending the URL with a trailing slash means that it is a directory and not a file. Thus asking for a directory list from an FTP server is implied with such a slash:
curl ftp://ftp.example.com/tmp/
If you want a non-ASCII letter or maybe even space ( ) as part of the path
field, remember to "URL-encode" that letter: write it as %HH where HH is
the hexadecimal byte value. is %20.
Query
The query part of a URL is the data that is to the right of a question mark
(?) but to the left of the fragment, which begins with a hash
(#).
The query can be any string of characters as long as they are URL
encoded. It is a common practice to use a sequence of key/value pairs
separated by ampersands (&). Like in
https://example.com/?name=daniel&tool=curl.
To help users create such query sets, properly encoded, curl offers the
command line option --url-query [content]. This option adds content, usually
a name + value pair, to the end of the query part of the provided URL.
When adding query parts, curl adds ampersand separators.
The syntax is identical to that used by --data-urlencode with one extension:
the + prefix. See below.
-
content: URL encode the content and add that to the query. Be careful so that the content does not contain any=or@symbols, as that makes the syntax match one of the other cases below. -
=content: URL encode the content and add that to the query. The initial=symbol is not included in the data. -
name=content: URL encode the content part and add that to the query. Note that the name part is expected to be URL encoded already. -
@filename: load data from the given file (including any newlines), URL encode that data and add that to the query. -
name@filename: load data from the given file (including any newlines), URL encode that data and add that to the query. The name part gets an equal sign appended, resulting inname=urlencoded-file-content. Note that the name is expected to be URL encoded already. -
+content: Add the content to the query without doing any encoding.
FTP type
This is not a feature that is widely used.
URLs that identify files on FTP servers have a special feature that allows you to also tell the client (curl in this case) which file type the resource is. This is because FTP is a little special and can change mode for a transfer and thus handle the file differently than if it would use another mode.
You tell curl that the FTP resource is an ASCII type by appending ;type=A to
the URL. Getting the foo file from the root directory of example.com using
ASCII could then be made with:
curl "ftp://example.com/foo;type=A"
curl defaults to binary transfers for FTP, but the URL format allows you to
specify the binary type with type=I:
curl "ftp://example.com/foo;type=I"
Finally, you can tell curl that the identified resource is a directory if the type you pass is D:
curl "ftp://example.com/foo;type=D"
…this can then work as an alternative format, instead of ending the path with a trailing slash as mentioned above.
Fragment
URLs offer a fragment part. That is usually seen as a hash symbol (#) and a
name for a specific name within a webpage in browsers. An example of such a
URL might look like:
https://www.example.com/info.html#the-plot
curl supports fragments fine when a URL is passed to it, but the fragment part is never actually sent over the wire so it does not make a difference to curl's operations whether it is present or not.
If you want to make the # character as part of the path and not separating
the fragment, make sure to pass it URL-encoded, as %23:
curl https://www.example.com/info.html%23the-plot
A fragment trick
The fact that the fragment part is not actually used over the network can be taken advantage of when you craft command lines.
For example, if you want to request the same URL from a server 10 times, you can make a loop and put the loop instruction in the fragment part. Like this:
curl https://example.com/#[1-10]
Browsers
Browsers typically support and use a different URL standard than what curl uses. Where curl uses RFC 3986 for guidance, the browsers use the WHATWG URL Specification.
This is important because the two URL standards are not the same. They are not completely compatible, even though in most daily use those differences rarely show. Sometimes, a URL interpreted according to one of the specs are handled differently when interpreted by the other spec. As such, curl and browsers do not always treat URLs the same way.
The WHATWG spec is also changing over time.
Since curl is developed to be able to do the same operations a browser can, the curl URL parser has been slightly adjusted to cater to some of the differences. For example it accepts spaces in the URL when read from incoming HTTP headers and it accepts either one, two or three slashes as a separator between the scheme and the hostname. That is why we sometimes say that curl's parser is RFC 3986+ compliant.
curl strives hard to not break existing behavior, which makes it still support the URLs and the URL format it supported back in 1998. The browsers do not.
Browsers' address bar
When you use a modern web browser, the address bar they tend to feature at the top of their main Windows are not using URLs or even URIs. They are in fact mostly using IRIs, which is a superset of URIs to allow internationalization like non-Latin symbols and more, but it usually goes beyond that, too, as they tend to, for example, handle spaces and do magic things on percent encoding in ways none of these mentioned specifications say a client should do.
The address bar is an interface for humans to enter and see URI-like strings.
Sometimes the differences between what you see in a browser's address bar and what you can pass into curl is significant.
Many options and URLs
As mentioned above, curl supports hundreds of command-line options and it also supports an unlimited number of URLs. If your shell or command-line system supports it, there is really no limit to how long a command line you can pass to curl.
curl parses the entire command line first, apply the wishes from the command-line options used, and then go over the URLs one by one (in a left to right order) to perform the operations.
For some options (for example -o or -O that tell curl where to store the
transfer), you may want to specify one option for each URL on the command
line.
curl returns an exit code for its operation on the last URL used. If you
instead rather want curl to exit with an error on the first URL in the set
that fails, use the --fail-early option.
One output for each given URL
If you use a command-line with two URLs, you must tell curl how to handle both
of them. The -o and -O options instruct curl how to save the output for
one URL of the URLs, so you might want to have as many of those options as
you have URLs on the command line.
If you have more URLs than output options on the command line, the URL content without a corresponding output instruction then instead gets sent to stdout.
Using the --remote-name-all flag automatically makes curl act as if -O was
used for all given URLs that do not have any output option.
Separate options per URL
In previous sections we described how curl always parses all options in the whole command line and applies those to all the URLs that it transfers.
That was a simplification: curl also offers an option (-:, --next) that
inserts a boundary between a set of options and URLs for which it applies the
options. When the command-line parser finds a --next option, it applies the
following options to the next set of URLs. The --next option thus works as a
divider between a set of options and URLs. You can use as many --next
options as you please.
As an example, we do an HTTP GET to a URL and follow redirects, we then make a second HTTP POST to a different URL and we round it up with a HEAD request to a third URL. All in a single command line:
curl --location http://example.com/1 --next
  --data sendthis http://example.com/2 --next
  --head http://example.com/3
Trying something like that without the --next options on the command line
would generate an illegal command line since curl would attempt to combine
both a POST and a HEAD:
Warning: You can only select one HTTP request method! You asked for both
Warning: POST (-d, --data) and HEAD (-I, --head).
URL globbing
At times you want to get a range of URLs that are mostly the same, with only a small portion of it changing between the requests. Maybe it is a numeric range or maybe a set of names. curl offers "globbing" as a way to specify many URLs like that easily.
The globbing uses the reserved symbols [] and {} for this, symbols that
normally cannot be part of a legal URL (except for numerical IPv6 addresses
but curl handles them fine anyway). If the globbing gets in your way, disable
it with -g, --globoff.
When using [] or {} sequences when invoked from a command line prompt, you probably have to put the full URL within double quotes to avoid the shell from interfering with it. This also goes for other characters treated special, like for example '&', '?' and '*'.
While most transfer related functionality in curl is provided by the libcurl library, the URL globbing feature is not.
Numerical ranges
You can ask for a numerical range with [N-M] syntax, where N is the start index and it goes up to and including M. For example, you can ask for 100 images one by one that are named numerically:
curl -O "http://example.com/[1-100].png"
and it can even do the ranges with zero prefixes, like if the number is three digits all the time:
curl -O "http://example.com/[001-100].png"
Or maybe you only want even-numbered images so you tell curl a step counter too. This example range goes from 0 to 100 with an increment of 2:
curl -O "http://example.com/[0-100:2].png"
Alphabetical ranges
curl can also do alphabetical ranges, like when a site has sections named a to z:
curl -O "http://example.com/section[a-z].html"
List
Sometimes the parts do not follow such an easy pattern, and then you can instead give the full list yourself but then within the curly braces instead of the brackets used for the ranges:
curl -O "http://example.com/{one,two,three,alpha,beta}.html"
Combinations
You can use several globs in the same URL which then makes curl iterate over those, too. To download the images of Ben, Alice and Frank, in both the resolutions 100 x 100 and 1000 x 1000, a command line could look like:
curl -O "http://example.com/{Ben,Alice,Frank}-{100x100,1000x1000}.jpg"
Or download all the images of a chess board, indexed by two coordinates ranged 0 to 7:
curl -O "http://example.com/chess-[0-7]x[0-7].jpg"
You can, of course, mix ranges and series. Get a week's worth of logs for both the web server and the mail server:
curl -O "http://example.com/{web,mail}-log[0-6].txt"
Output variables for globbing
In all the globbing examples previously in this chapter we have selected to
use the -O / --remote-name option, which makes curl save the target file
using the filename part of the used URL.
Sometimes that is not enough. You are downloading multiple files and maybe you want to save them in a different subdirectory or create the saved filenames differently. curl, of course, has a solution for these situations as well: output filename variables.
Each "glob" used in a URL gets a separate variable. They are referenced as
#[num] - that means the single character # followed by the glob number
which starts with 1 for the first glob and ends with the last glob.
Save the main pages of two different sites:
curl "http://{one,two}.example.com" -o "file_#1.txt"
Save the outputs from a command line with two globs in a subdirectory:
curl "http://{site,host}.host[1-5].example.com" -o "subdir/#1_#2"
Using []{} in URLs
When the globbing concept was introduced in curl in the 1990s, we all used the
same Internet standard for how the URL syntax was defined, and in this
standard these four symbols are documented as reserved. You had to
URL-encode them in the URL if you wanted to use them (%HH style). Those
symbols were therefore not used in URLs and were downright attractive to use
for globbing purposes.
Later on, the URL syntax has gradually been relaxed and changed and these days
every now and then we see URLs used where one of the four symbols []{} are
used as-is, without being URL-encoded. Passing such a URL to curl causes it to spew
out syntax errors when the glob parser goes crazy.
To work around that problem, you have two separate options. You either encode the symbols yourself, or you switch off globbing.
Encode the symbols like this:
| symbol | encoding |
|---|---|
[ | %5b |
] | %5d |
{ | %7b |
} | %7d |
Or switch off globbing with -g or --globoff.
Reading URLs from a file
Starting in curl 8.13.0, curl can be told to download a set of URLs provided
in a text file, one URL per line. It is done with the standard --url option
but instead of providing a URL you provide the filename with a @ symbol as
prefix, like: --url @filename. It can be told to load the list of URLs from
stdin by a single dash as filename, like --url @-.
When curl is asked to download URLs provided in a file, it implies using
--remote-name for each provided URL. The URLs are assumed to be "absolute"
and there is no globbing applied or done on them. Features such as
--skip-existing work fine in combination with this.
Any line in the URL file that starts with # is treated as a comment and is
skipped.
Download many files in parallel provided in a text file:
curl --url @filelist.txt --parallel
Connection reuse
When setting up connections to sites, curl keeps old connections around for a while so that if the next transfer is done using the same host as a previous transfer, it can reuse the same connection again and thus save a lot of time. We call this persistent connections. curl always tries to keep connections alive and reuses existing connections as far as it can.
Connections are kept in the connection pool, sometimes also called the connection cache.
The curl command-line tool can, however, only keep connections alive for as long as it runs, so as soon as it exits back to your command line it has to close down all currently open connections (and also free and clean up all the other caches it uses to decrease time of subsequent operations). We call the pool of alive connections the connection cache.
If you want to perform N transfers or operations against the same host or same base URL, you could gain a lot of speed by trying to do them in as few curl command lines as possible instead of repeatedly invoking curl with one URL at a time.
Parallel transfers
The default behavior of getting the specified URLs one by one in a serial fashion makes it easy to understand exactly when each URL is fetched but it can be slow.
curl offers the -Z (or --parallel) option that instead instructs curl to
attempt to do the specified transfers in a parallel fashion. When this is
enabled, curl performs a lot of transfers simultaneously instead of
serially. It does up to 50 transfers at the same time by default and as soon
as one of them completes, the next one is kicked off.
For cases where you want to download many files from different sources and a few of them might be slow, a few fast, this can speed things up tremendously.
If 50 parallel transfers is wrong for you, the --parallel-max option is there
to allow you to change that amount.
Reduce load on individual hosts
When executing high-volume transfers in parallel, it is easy to inadvertently
"hammer" a single server. To prevent your script from acting like a DDoS
attack - and to avoid getting your IP blacklisted - curl provides the
--parallel-max-host option. This flag allows you to cap the number of
concurrent connections made to any single origin.
In this context, an origin is defined as the unique combination of the protocol, hostname, and port number. By setting a limit, you ensure that even if you are downloading hundreds of files, curl only opens a specific number of "pipes" to any individual server at once.
For example, to perform a parallel download while ensuring no more than 4 connections are active to the same host at any time, use:
curl --parallel --parallel-max-host 4 --urls @download_list.txt
Parallel transfer progress meter
Naturally, the ordinary progress meter display that shows file transfer progress for a single transfer is not that useful for parallel transfers so when curl performs parallel transfers, it shows a different progress meter that displays information about all the current ongoing transfers in a single line.
Connection before multiplex
When curl is asked to do parallel transfers, it prioritizes having the additional transfer reuse and multiplexing happen over pre-existing connections. This can potentially lower the total amount of connections (and thereby resources) necessary, but it might be slightly slower at start-up.
With --parallel-immediate, curl is instructed to reverse the prioritization
and instead prefer creating a new connection immediately rather than risk
waiting a little to see if the transfer can be multiplexed on another
connection.
trurl
trurl is a separate command line tool with the sole purpose of parsing, manipulating and outputting URLs and parts of URLs. A companion tool to curl for your command lines and scripting needs.
trurl uses libcurl’s URL parser. This ensures that curl and trurl always have the same opinion about URLs and that both tools parse them identically and consistently.
Usage
Typically you pass in one or more URLs to trurl and specify what components you want output. Possibly while modifying the URL(s) as well.
trurl knows URLs and every URL consists of up to ten separate and independent components. These components can be extracted, removed and updated with trurl.
trurl example command lines
Replace the hostname of a URL:
$ trurl --url https://curl.se --set host=example.com
https://example.com/
Create a URL by setting components:
$ trurl --set host=example.com --set scheme=ftp
ftp://example.com/
Redirect a URL:
$ trurl --url https://curl.se/we/are.html --redirect here.html
https://curl.se/we/here.html
Change port number:
$ trurl --url https://curl.se/we/../are.html --set port=8080
https://curl.se:8080/are.html
Extract the path from a URL:
$ trurl --url https://curl.se/we/are.html --get '{path}'
/we/are.html
Extract the port from a URL:
$ trurl --url https://curl.se/we/are.html --get '{port}'
443
Append a path segment to a URL:
$ trurl --url https://curl.se/hello --append path=you
https://curl.se/hello/you
Append a query segment to a URL:
$ trurl --url "https://curl.se?name=hello" --append query=search=string
https://curl.se/?name=hello&search=string
Read URLs from stdin:
$ cat urllist.txt | trurl --url-file -
...
Output JSON:
$ trurl "https://fake.host/hello#frag" --set user=::moo:: --json
[
  {
    "url": "https://%3a%3amoo%3a%3a@fake.host/hello#frag",
    "parts": {
      "scheme": "https",
      "user": "::moo::",
      "host": "fake.host",
      "path": "/hello",
      "fragment": "frag"
    }
  }
]
Remove tracking tuples from query:
$ trurl "https://curl.se?search=hey&utm_source=tracker" \
  --trim query="utm_*"
https://curl.se/?search=hey
Show a specific query key value:
$ trurl "https://example.com?a=home&here=now&thisthen" -g '{query:a}'
home
Sort the key/value pairs in the query component:
$ trurl "https://example.com?b=a&c=b&a=c" --sort-query
https://example.com?a=c&b=a&c=b
Work with a query that uses a semicolon separator:
$ trurl "https://curl.se?search=fool;page=5" --trim query="search" \
  --query-separator ";"
https://curl.se?page=5
Accept spaces in the URL path:
$ trurl "https://curl.se/this has space/index.html" --accept-space
https://curl.se/this%20has%20space/index.html
More
Everything you want to know about trurl is found at https://curl.se/trurl. It is probably already available for your Linux distribution of choice.
Config file
curl commands with multiple command-line options can become cumbersome to work with. The number of characters can even exceed the maximum length allowed by your terminal application.
To aid such situations, curl allows you to write command-line options in a plain text config file and tell curl to read options from that file when applicable.
You can also use config files to assign data to variables and transform the data with functions, making them incredibly useful. This is discussed in the Variables section.
Some examples below contain multiple lines for readability. The backslash
(\) is used to instruct the terminal to ignore the newline.
Specify the config file to use
Using the -K or long form --config option tells curl to read from a config file.
curl  \
    --config configFile.txt \
    --url https://example.com
The file path specified is relative to the current directory in your terminal.
You can name the config file whatever you like. configFile.txt is used for
simplicity in the example above.
Syntax
Enter one command per line. Use a hash symbol for comments:
# curl config file

# Follow redirects
--location

# Do a HEAD request
--head
Command line options
You can use both short and long options, exactly as you would write them on a command line.
You can also write the long option WITHOUT the leading two dashes to make it easier to read.
# curl config file

# Follow redirects
location

# Do a HEAD request
head
Arguments
A command line option that takes an argument must have its argument provided on the SAME LINE as the option.
# curl config file

user-agent "Everything-is-an-agent"
You can also use = or : between the option and its argument. As you see
above, it is not necessary, but some like the clarity it offers. Setting the
user-agent option again:
# curl config file

user-agent = "Everything-is-an-agent"
The user agent string example we have used above has no white spaces, so the quotes are technically not needed:
# curl config file

user-agent = Everything-is-an-agent
See "When to use quotes" below for more info on when quotes should be used.
URLs
When entering URLs at the command line, everything that is not an option is
assumed to be a URL. However, in a config file, you must specify a URL with
--url or url.
# curl config file

url = https://example.com
When to use quotes
You need to use double quotes when:
- the parameter contains white space, or starts with the characters
:or=. - you need to use escape sequences (available options:
\\,\",\t,\n,\rand\v. A backslash preceding any other letter is ignored).
If a parameter containing white space is not enclosed in double quotes, curl considers the next space or newline as the end of the argument.
Default config file
When curl is invoked, it always (unless -q is used), checks for a default
config file and uses it if found.
curl looks for the default config file in the following locations, in this order:
-
$CURL_HOME/.curlrc -
$XDG_CONFIG_HOME/curlrc(Added in 7.73.0) -
$HOME/.curlrc -
Windows:
%USERPROFILE%\\.curlrc -
Windows:
%APPDATA%\\.curlrc -
Windows:
%USERPROFILE%\\Application Data\\.curlrc -
Non-Windows: use getpwuid to find the home directory
-
On Windows, if it finds no
.curlrcfile in the sequence described above, it checks for one in the same directory the curl executable is placed.
On Windows two filenames are checked per location: .curlrc and _curlrc,
preferring the former. Ancient curl versions on Windows checked for _curlrc
only.
Variables
This concept of variables for the command line and config files was added in curl 8.3.0.
A user sets a variable to a plain string with --variable varName=content
or from the contents of a file with --variable varName@file where the file
can be stdin if set to a single dash (-).
A variable in this context is given a specific name and it holds contents. Any number of variables can be set. If you set the same variable name again, it gets overwritten with new content. Variable names are case sensitive, can be up to 128 characters long and may consist of the characters a-z, A-Z, 0-9 and underscore.
Assign variables
Setting variables
You can set variables at the command line with --variable or in config files
with variable (no dashes):
curl --variable varName=content
or in a config file:
# Curl config file

variable varName=content
Assigning contents from file
You can assign the contents of a plain text file to a variable, too:
curl --variable varName@filename
Starting in curl 8.12.0, you can get a byte range from content by appending
[N-M] to the variable name, where N and M are numerical byte offsets
into the content where the second number can be omitted to mean until end of
data. For example, get the contents from a file from byte offset 100 to 199,
inclusive:
curl --variable "varName[100-199]@filename"
Alternatively, get offset three to twelve from a plain text:
curl --variable "varName[3-12]=thefulltexttogetrangefrom"
Given a byte range that has no data results in an empty string. Asking for a range that is larger than the content makes curl use the piece of the data that exists.
Expand variables
Variables can be expanded in option parameters using {{varName}} when the
option name is prefixed with --expand-. This makes the content of the
variable varName get inserted.
If you reference a name that does not exist as a variable, a blank string is inserted.
Insert {{ verbatim in the string by escaping it with a backslash:
\{{.
The example below contains multiple lines for readability. The backslash (\)
is used to instruct the terminal to ignore the newline.
In the example below, the variable host is set and then expanded:
curl \
    --variable host=example \
    --expand-url "https://{{host}}.com"
For options specified without the --expand- prefix, variables are not
expanded.
Variable content holding null bytes that are not encoded when expanded causes curl to exit with an error.
Environment variables
Import an environment variable with --variable %VARNAME. This import makes curl
exit with an error if the given environment variable is not set. A user can
also opt to set a default value if the environment variable does not exist,
using =content or @file as described above.
As an example, assign the %USER environment variable to a curl
variable and insert it into a URL. Because no default value is specified, this
operation fails if the environment variable does not exist:
curl \
    --variable %USER \
    --expand-url "https://example.com/api/{{USER}}/method"
Instead, let's use dummy as a default value if %USER does not exist:
curl \
    --variable %USER=dummy \
    --expand-url "https://example.com/api/{{USER}}/method"
Or get the default contents from a local file:
curl \
    --variable %USER@file \
    --expand-url "https://example.com/api/{{USER}}/method"
Expand --variable
The --variable option itself can also be expanded, which allows you to
assign variables to the contents of other variables.
curl \
    --expand-variable var1={{var2}} \
    --expand-variable fullname="Mrs {{first}} {{last}}" \
    --expand-variable source@{{filename}}
Or done in a config file:
# Curl config file

variable host=example

expand-variable url=https://{{host}}.com

expand-variable source@{{filename}}
Expand functions
When expanding variables, curl offers a set of functions to change how they
are expanded. Functions are applied with colon + function name after the
variable, like this: {{varName:function}}.
Multiple functions can be applied to the variable. They are then applied in a
left-to-right order: {{varName:func1:func2:func3}}
The available functions are: trim, json, url, b64 and 64dec.
trim
Expands the variable without leading and trailing white space. White space is defined as:
- horizontal tabs
- spaces
- new lines
- vertical tabs
- form feed and carriage returns
This is extra useful when reading data from files.
--expand-url "https://example.com/{{path:trim}}"
json
Expands the variable as a valid JSON string. This makes it easier to insert valid JSON into an argument (the quotes are not included in the resulting JSON).
--expand-json "\"full name\": \"{{first:json}} {{last:json}}\""
To trim the variable first, apply both functions (in this order):
--expand-json "\"full name\": \"{{varName:trim:json}}\""
url
Expands the variable URL encoded. Also known as percent encoded. This
function ensures that all output characters are legal within a URL and the
rest are encoded as %HH where HH is a two-digit hexadecimal number for the
ASCII value.
--expand-data "varName={{varName:url}}"
To trim the variable first, apply both functions (in this order):
--expand-data "varName={{varName:trim:url}}"
b64
Expands the variable base64 encoded. Base64 is an encoding for binary data that only uses 64 specific characters.
--expand-data "content={{value:b64}}"
To trim the variable first, apply both functions (in this order):
--expand-data "content={{value:trim:b64}}"
Example: get the contents of a file called $HOME/.secret into a variable
called fix. Make sure that the content is trimmed and percent-encoded sent
as POST data:
curl \
    --variable %HOME=/home/default \
    --expand-variable fix@{{HOME}}/.secret \
    --expand-data "{{fix:trim:url}}" \
    --url https://example.com/
64dec
The opposite of b64: this decodes base64-encoded content. Base64 is an
encoding for binary data that only uses 64 specific characters.
--expand-data "content={{value:64dec}}"
Example: you get content using base64 encoding in the environment variable
FILE, but you want to pass it on in the curl invocation as part of the URL
in decoded form:
curl \
    --variable %FILE \
    --expand-url https://example.com/{{FILE:64dec}}
Note: if 64dec is used on content that is not valid Base64, for example
if it contains invalid characters not part of the Base64 set, the function
unconditionally returns the string 64dec-fail.
Passwords
Passwords are tricky and sensitive. Leaking a password can make someone other than you access the resources and the data otherwise protected.
curl offers several ways to receive passwords from the user and then subsequently pass them on or use them to something else.
The most basic curl authentication option is -u / --user. It accepts an
argument that is the username and password, colon separated. Like when alice
wants to request a page requiring HTTP authentication and her password is
12345:
$ curl -u alice:12345 http://example.com/
Command line leakage
Several potentially bad things are going on here. First, we are entering a password on the command line and the command line might be readable for other users on the same system (assuming you have a multi-user system). curl helps minimize that risk by trying to blank out passwords from process listings.
One way to avoid passing the username and password on the command line is to
instead use a .netrc file or a config file.
You can also use the -u option without specifying the password, and then
curl instead prompts the user for it when it runs.
Network leakage
Secondly, this command line sends the user credentials to an HTTP server, which is a clear-text protocol that is open for man-in-the-middle or other snoopers to spy on the connection and see what is sent. In this command line example, it makes curl use HTTP Basic authentication and that is completely insecure.
There are several ways to avoid this, and the key is, of course, then to avoid protocols or authentication schemes that send credentials in plain text over the network. Easiest is perhaps to make sure you use encrypted versions of protocols. Use HTTPS instead of HTTP, use FTPS instead of FTP and so on.
If you need to stick to a plain text and insecure protocol, then see if you
can switch to using an authentication method that avoids sending the
credentials in the clear. If you want HTTP, such methods would include Digest
(--digest), Negotiate (--negotiate.) and NTLM (--ntlm).
Progress meter
curl has a built-in progress meter. When curl is invoked to transfer data (either uploading or downloading) it can show that meter in the terminal screen to show how the transfer is progressing, namely the current transfer speed, how long it has been going on and how long it thinks it might be left until completion.
The progress meter is inhibited if curl deems that there is output going to
the terminal, as the progress meter would interfere with that output and mess
up what gets displayed. A user can also forcibly switch off the progress meter
with the -s / --silent option, which tells curl to hush.
If you invoke curl and do not get the progress meter, make sure your output is directed somewhere other than the terminal.
curl also features an alternative and simpler progress meter that you enable
with -# / --progress-bar. As the long name implies, it instead shows the
transfer as a progress bar.
At times when curl is asked to transfer data, it cannot figure out the total size of the requested operation and that then subsequently makes the progress meter contain fewer details and it cannot, for example, make forecasts for transfer times, etc.
Units
The progress meter displays bytes and bytes per second.
It also uses suffixes for larger amounts of bytes, using the 1024 base system so 1024 is one kilobyte (1K), 2048 is 2K, etc. curl supports these:
| Suffix | Amount | Name |
|---|---|---|
| K | 2^10 | kilobyte |
| M | 2^20 | megabyte |
| G | 2^30 | gigabyte |
| T | 2^40 | terabyte |
| P | 2^50 | petabyte |
The times are displayed using H:MM:SS for hours, minutes and seconds.
Progress meter legend
This is the progress meter shown for each single transfer when doing them in a serial manner. When parallel transfers are enabled, curl instead uses the format described below.
The progress meter exists to show a user that something actually is happening. The different fields in the output have the following meaning:
% Total  % Received % Xferd Average Speed          Time             Curr.
                            Dload  Upload Total    Current  Left    Speed
0  151M  0 38608    0     0  9406      0  4:41:43  0:00:04  4:41:39  9287
From left to right:
| Title | Meaning |
|---|---|
% | Percentage completed of the whole transfer |
Total | Total size of the whole expected transfer (if known) |
% | Percentage completed of the download |
Received | Currently downloaded number of bytes |
% | Percentage completed of the upload |
Xferd | Currently uploaded number of bytes |
Average Speed Dload | Average transfer speed of the entire download so far, in number of bytes per second |
Average Speed Upload | Average transfer speed of the entire upload so far, in number of bytes per second |
Time Total | Expected time to complete the operation, in HH:MM:SS notation for hours, minutes and seconds |
Time Current | Time passed since the start of the transfer, in HH:MM:SS notation for hours, minutes and seconds |
Time Left | Expected time left to completion, in HH:MM:SS notation for hours, minutes and seconds |
Curr. Speed | Average transfer speed over the last 5 seconds in number of bytes per second |
Parallel progress meter
When --parallel is used, curl can do many transfers simultaneously and then the above mentioned progress meter does not really work as it then needs to tell the user the status about a large number of transfers in a single status line.
When curl does parallel transfers, it might only have size information about a subset of the data until late in the process, which makes it often show a few blank fields. For example it cannot tell a total expected transfer time until it knows the expected content size of all involved transfers.
DL% UL%  Dled  Uled  Xfers  Live Total     Current  Left    Speed
88  --  2682K     0    57    70  --:--:--  0:00:07 --:--:-- 1190k
From left to right:
| Title | Meaning |
|---|---|
DL% | Percentage of download completed |
UL% | Percentage of uploaded completed |
DLed | Number of bytes downloaded |
ULed | Number of bytes uploaded |
Xfers | Number of transfers that are completed |
Live | Number of live, ongoing, transfers |
Total | The total expected time for all transfers to complete, in HH:MM:SS notation for hours, minutes and seconds |
Current | How long time it has been running, in HH:MM:SS notation for hours, minutes and seconds |
Left | Expected time left to completion, in HH:MM:SS notation for hours, minutes and seconds |
Speed | Average transfer speed over the last 5 seconds in number of bytes per second |
Version
To get to know what version of curl you have installed, run
curl --version
or use the shorthand version:
curl -V
The output from that command line is typically four lines, out of which some are rather long and might wrap in your terminal window.
An example output from a Debian Linux in June 2020:
curl 7.68.0 (x86_64-pc-linux-gnu) libcurl/7.68.0 OpenSSL/1.1.1g
zlib/1.2.11 brotli/1.0.7 libidn2/2.3.0 libpsl/0.21.0 (+libidn2/2.3.0)
libssh2/1.8.0 nghttp2/1.41.0 librtmp/2.3
Release-Date: 2020-01-08
Protocols: dict file ftp ftps gopher http https imap imaps ldap ldaps pop3
pop3s rtmp rtsp scp sftp smb smbs smtp smtps telnet tftp
Features: AsynchDNS brotli GSS-API HTTP2 HTTPS-proxy IDN IPv6 Kerberos
Largefile libz NTLM NTLM_WB PSL SPNEGO SSL TLS-SRP UnixSockets
while the same command line invoked on a Windows 10 machine on the same date looks like:
curl 7.55.1 (Windows) libcurl/7.55.1 WinSSL
Release-Date: [unreleased]
Protocols: dict file ftp ftps http https imap imaps pop3 pop3s smtp smtps
telnet tftp
Features: AsynchDNS IPv6 Largefile SSPI Kerberos SPNEGO NTLM SSL
The meaning of the four lines?
Line 1: curl
The first line starts with curl and first shows the main version number of
the tool. Then follows the platform the tool was built for within parentheses
and the libcurl version. Those three fields are common for all curl builds.
If the curl version number has -DEV appended to it, it means the version is
built straight from an in-development source code and it is not an officially
released and blessed version.
The rest of this line contains names of third party components this build of
curl uses, often with their individual version number next to it with a slash
separator. Like OpenSSL/1.1.1g and nghttp2/1.41.0. This can for example
tell you which TLS backends this curl uses.
Line 1: TLS versions
Line 1 may contain one or more TLS libraries. curl can be built to support more than one TLS library which then makes curl - at start-up - select which particular backend to use for this invocation.
If curl supports more than one TLS library like this, the ones that are not
selected by default are listed within parentheses. Thus, if you do not specify
which backend to use (with the CURL_SSL_BACKEND environment variable)
the one listed without parentheses is used.
Line 2: Release-Date
This line shows the date this curl version was released by the curl project, and it can also show a secondary "Patch date" if it has been updated somehow after it was originally released.
This says [unreleased] if curl was built another way than from a release
tarball, and as you can see above that is how Microsoft did it for Windows 10
and the curl project does not recommend it.
Line 3: Protocols
This is a list of all transfer protocols (URL schemes really) in alphabetical order that this curl build supports. All names are shown in lowercase letters.
This list can contain these protocols:
dict, file, ftp, ftps, gopher, http, https, imap, imaps, ldap, ldaps, mqtt, pop3, pop3s, rtsp, scp, sftp, smb, smbs, smtp, smtps, telnet and tftp
Line 4: Features
The list of features this build of curl supports. If the name is present in the list, that feature is enabled. If the name is not present, that feature is not enabled.
Features that can be present there:
- alt-svc - Support for the alt-svc: header
- AsynchDNS - This curl uses asynchronous name resolves. Asynchronous name resolves can be done using either the c-ares or the threaded resolver backends.
- brotli - support for automatic brotli compression over HTTP(S)
- CharConv - curl was built with support for character set conversions (like EBCDIC)
- Debug - This curl uses a libcurl built with Debug. This enables more error-tracking and memory debugging etc. For curl-developers only.
- GSS-API - GSS-API authentication is enabled
- HTTP2 - HTTP/2 support has been built-in.
- HTTP3 - HTTP/3 support has been built-in.
- HTTPS-proxy - This curl is built to support HTTPS proxy.
- IDN - This curl supports IDN - international domain names.
- IPv6 - You can use IPv6 with this.
- krb4 - Krb4 for FTP is supported
- Largefile - This curl supports transfers of large files, files larger than 2GB.
- libz - Automatic gzip decompression of compressed files over HTTP is supported.
- Metalink - This curl supports Metalink. In modern curl versions this option is never available.
- MultiSSL - This curl supports multiple TLS backends. The first line details exactly which TLS libraries.
- NTLM - NTLM authentication is supported.
- NTLM_WB - NTLM authentication is supported.
- PSL - Public Suffix List (PSL) is available and means that this curl has been built with knowledge about public suffixes, used for cookies.
- SPNEGO - SPNEGO authentication is supported.
- SSL - SSL versions of various protocols are supported, such as HTTPS, FTPS, POP3S and so on.
- SSPI - SSPI is supported
- TLS-SRP - SRP (Secure Remote Password) authentication is supported for TLS.
- UnixSockets - Unix sockets support is provided.
Exit code
A lot of effort has gone into the project to make curl return a usable exit code when something goes wrong and it always returns 0 (zero) when the operation went as planned.
If you write a shell script or batch file that invokes curl, you can always check the return code to detect problems in the invoked command. Below, you find a list of return codes as of the time of this writing. Over time we tend to slowly add new ones so if you get a code back not listed here, please refer to more updated curl documentation for aid.
A basic Unix shell script could look like something like this:
#!/bin/sh
curl http://example.com
res=$?
if test "$res" != "0"; then
   echo "the curl command failed with: $res"
fi
Available exit codes
-
Unsupported protocol. This build of curl has no support for this protocol. Usually this happens because the URL was misspelled to use a scheme part that either has a space in front of it or spells
httplikehtptor similar. Another common mistake is that you use a libcurl installation that was built with one or more protocols disabled and you now ask libcurl to use one of those protocols that were disabled in the build. -
Failed to initialize. This is mostly an internal error or a problem with the libcurl installation or system libcurl runs in.
-
URL malformed. The syntax was not correct. This happens when you mistype a URL so that it ends up wrong, or in rare situations you are using a URL that is accepted by another tool that curl does not support only because there is no universal URL standard that everyone adheres to.
-
A feature or option that was needed to perform the desired request was not enabled or was explicitly disabled at build-time. To make curl able to do this, you probably need another build of libcurl.
-
Could not resolve proxy. The address of the given proxy host could not be resolved. Either the given proxy name is wrong, or the DNS server is misbehaving and does not know about this name when it should or perhaps even the system you run curl on is misconfigured so that it does not find/use the correct DNS server.
-
Could not resolve host. The given remote host's address was not resolved. The address of the given server could not be resolved. Either the given hostname is wrong, or the DNS server is misbehaving and does not know about this name when it should or perhaps even the system you run curl on is misconfigured so that it does not find/use the correct DNS server.
-
Failed to connect to host. curl managed to get an IP address to the machine and it tried to set up a TCP connection to the host but failed. This can be because you have specified the wrong port number, entered the wrong hostname, the wrong protocol or perhaps because there is a firewall or other network equipment in between that blocks the traffic from getting through.
-
Unknown FTP server response. The server sent data curl could not parse. This is either because of a bug in curl, a bug in the server or because the server is using an FTP protocol extension that curl does not support. The only real workaround for this is to tweak curl options to try to get it to use other FTP commands that perhaps do not get this unknown server response back.
-
FTP access denied. The server denied login or denied access to the particular resource or directory you wanted to reach. Most often you tried to change to a directory that does not exist on the server. The directory of course is what you specify in the URL.
-
FTP accept failed. While waiting for the server to connect back when an active FTP session is used, an error code was sent over the control connection or similar.
-
FTP weird PASS reply. curl could not parse the reply sent to the PASS request. PASS in the command curl sends the password to the server with, and even anonymous connections to FTP server actually sends a password - a fixed anonymous string. Getting a response back from this command that curl does not understand is a strong indication that this is not an FTP server at all or that the server is badly broken.
-
During an active FTP session (PORT is used) while waiting for the server to connect, the timeout expired. It took too long for the server to get back. This is usually a sign that something is preventing the server from reaching curl successfully, such as a firewall or other network arrangements.
-
Unknown response to FTP PASV command. curl could not parse the reply sent to the PASV request. This is a strange server. PASV is used to set up the second data transfer connection in passive mode, see the FTP uses two connections section for more on that. You might be able to work around this problem by using PORT instead, with the
--ftp-portoption. -
Unknown FTP 227 format. curl could not parse the 227-line the server sent. This is most certainly a broken server. A 227 is the FTP server's response when sending back information on how curl should connect back to it in passive mode. You might be able to work around this problem by using PORT instead, with the
--ftp-portoption. -
FTP cannot get host. Could not use the host IP address we got in the 227-line. This is most likely an internal error.
-
HTTP/2 error. A problem was detected in the HTTP2 framing layer. This is somewhat generic and can be one out of several problems, see the error message for details.
-
FTP could not set binary. Could not change transfer method to binary. This server is broken. curl needs to set the transfer to the correct mode before it is started as otherwise the transfer cannot work.
-
Partial file. Only a part of the file was transferred. When the transfer is considered complete, curl verifies that it actually received the same amount of data that it was told before-hand that it was going to get. If the two numbers do not match, this is the error code. It could mean that curl got fewer bytes than advertised or that it got more. curl itself cannot know which number is wrong or which is correct, if any.
-
FTP could not download/access the given file. The RETR (or similar) command failed. curl got an error from the server when trying to download the file.
-
Not used
-
Quote error. A quote command returned an error from the server. curl allows several different ways to send custom commands to an IMAP, POP3, SMTP or FTP server and features a generic check that the commands work. When any of the individually issued commands fails, this is the exit status returned. The advice is generally to watch the headers in the FTP communication to better understand exactly what failed and how.
-
HTTP page not retrieved. The requested URL was not found or returned another error with the HTTP error code being 400 or above. This return code only appears if
-f, --failis used. -
Write error. curl could not write data to a local filesystem or similar. curl receives data chunk by chunk from the network and it stores it like at (or writes it to stdout), one piece at a time. If that write action gets an error, this is the exit status.
-
Not used
-
Upload failed. The server refused to accept or store the file that curl tried to send to it. This is usually due to wrong access rights on the server but can also happen due to out of disk space or other resource constraints. This error can happen for many protocols.
-
Read error. Various reading problems. The inverse to exit status 23. When curl sends data to a server, it reads data chunk by chunk from a local file or stdin or similar, and if that reading fails in some way this is the exit status curl returns.
-
Out of memory. A memory allocation request failed. curl needed to allocate more memory than what the system was willing to give it and curl had to exit. Try using smaller files or make sure that curl gets more memory to work with.
-
Operation timeout. The specified time-out period was reached according to the conditions. curl offers several timeouts, and this exit code tells one of those timeout limits were reached. Extend the timeout or try changing something else that allows curl to finish its operation faster. Often, this happens due to network and remote server situations that you cannot affect locally.
-
Not used
-
FTP PORT failed. The PORT command failed. Not all FTP servers support the PORT command; try doing a transfer using PASV instead. The PORT command is used to ask the server to create the data connection by connecting back to curl. See also the FTP uses two connections section.
-
FTP could not use REST. The REST command failed. This command is used for resumed FTP transfers. curl needs to issue the REST command to do range or resumed transfers. The server is broken, try the same operation without range/resume as a crude workaround.
-
Not used
-
HTTP range error. The range request did not work. Resumed HTTP requests are not necessarily acknowledged or supported, so this exit code signals that for this resource on this server, there can be no range or resumed transfers.
-
HTTP post error. Internal post-request generation error. If you get this error, please report the exact circumstances to the curl project.
-
A TLS/SSL connect error. The SSL handshake failed. The SSL handshake can fail due to numerous different reasons so the error message may offer some additional clues. Maybe the parties could not agree to a SSL/TLS version, an agreeable cipher suite or similar.
-
Bad download resume. Could not continue an earlier aborted download. When asking to resume a transfer that then ends up not possible to do, this error can get returned. For FILE, FTP or SFTP.
-
Could not read the given file when using the FILE:// scheme. Failed to open the file. The file could be non-existing or is it a permission problem perhaps?
-
LDAP cannot bind. LDAP "bind" operation failed, which is a necessary step in the LDAP operation and thus this means the LDAP query could not be performed. This might happen because of a wrong username or password, or for other reasons.
-
LDAP search failed. The given search terms caused the LDAP search to return an error.
-
Not used
-
Not used
-
Aborted by callback. An application told libcurl to abort the operation. This error code is not generally made visible to users and not to users of the curl tool.
-
Bad function argument. A function was called with a bad parameter - this return code is present to help application authors to understand why libcurl cannot perform certain actions and should never be returned by the curl tool. Please file a bug report to the curl project if this happens to you.
-
Not used
-
Interface error. A specified outgoing network interface could not be used. curl typically decides outgoing network and IP addresses by itself but when explicitly asked to use a specific one that curl cannot use, this error can occur.
-
Not used
-
Too many redirects. When following HTTP redirects, libcurl hit the maximum number set by the application. The maximum number of redirects is unlimited by libcurl but is set to 50 by default by the curl tool. The limit is present to stop endless redirect loops. Change the limit with
--max-redirs. -
Unknown option specified to libcurl. This could happen if you use a curl version that is out of sync with the underlying libcurl version. Perhaps your newer curl tries to use an option in the older libcurl that was not introduced until after the libcurl version you are using but is known to your curl tool code as that is newer. To decrease the risk of this and make sure it does not happen: use curl and libcurl of the same version number.
-
Malformed telnet option. The telnet option you provided to curl did not use the correct syntax.
-
Not used
-
The server's SSL/TLS certificate or SSH fingerprint failed verification. curl can then not be sure of the server being who it claims to be. See the using TLS with curl and using SCP and SFTP with curl sections for more details.
-
The server did not reply anything, which in this context is considered an error. When an HTTP(S) server responds to an HTTP(S) request, it always returns something as long as it is alive and sound. All valid HTTP responses have a status line and responses header. Not getting anything at all back is an indication the server is faulty or perhaps that something prevented curl from reaching the right server or that you are trying to connect to the wrong port number etc.
-
SSL crypto engine not found.
-
Cannot set SSL crypto engine as default.
-
Failed sending network data. Sending data over the network is a crucial part of most curl operations and when curl gets an error from the lowest networking layers that the sending failed, this exit status gets returned. To pinpoint why this happens, some serious digging is usually required. Start with enabling verbose mode, do tracing and if possible check the network traffic with a tool like Wireshark or similar.
-
Failure in receiving network data. Receiving data over the network is a crucial part of most curl operations and when curl gets an error from the lowest networking layers that the receiving of data failed, this exit status gets returned. To pinpoint why this happens, some serious digging is usually required. Start with enabling verbose mode, do tracing and if possible check the network traffic with a tool like Wireshark or similar.
-
Not used
-
Problem with the local certificate. The client certificate had a problem so it could not be used. Permissions? The wrong passphrase?
-
Could not use the specified SSL cipher. The cipher names need to be specified exactly and they are also unfortunately specific to the particular TLS backend curl has been built to use. For the current list of support ciphers and how to write them, see the online docs at https://curl.se/docs/ssl-ciphers.html.
-
Peer certificate cannot be authenticated with known CA certificates. This usually means that the certificate is either self-signed or signed by a CA (Certificate Authority) that is not present in the CA store curl uses.
-
Unrecognized transfer encoding. Content received from the server could not be parsed by curl.
-
Not used
-
Maximum file size exceeded. When curl has been told to restrict downloads to not do it if the file is too big, this is the exit code for that condition.
-
Requested SSL (TLS) level failed. In most cases this means that curl failed to upgrade the connection to TLS when asked to.
-
Sending the data requires a rewind that failed. In some situations curl needs to rewind in order to send the data again and if this cannot be done, the operation fails.
-
Failed to initialize the OpenSSL SSL Engine. This can only happen when OpenSSL is used and would signify a serious internal problem.
-
The username, password, or similar was not accepted and curl failed to log in. Verify that the credentials are provided correctly and that they are encoded the right way.
-
File not found on TFTP server.
-
Permission problem on TFTP server.
-
Out of disk space on TFTP server.
-
Illegal TFTP operation.
-
Unknown TFTP transfer ID.
-
File already exists (TFTP).
-
No such user (TFTP).
-
Not used
-
Not used
-
Problem with reading the SSL CA cert. The default or specified CA cert bundle could not be read/used to verify the server certificate.
-
The resource (file) referenced in the URL does not exist.
-
An unspecified error occurred during the SSH session. This sometimes indicates an incompatibility problem between the SSH libcurl curl uses and the SSH version used by the server curl speaks to.
-
Failed to shut down the SSL connection.
-
Not used
-
Could not load CRL file, missing or wrong format
-
TLS certificate issuer check failed. The most common reason for this is that the server did not send the proper intermediate certificate in the TLS handshake.
-
The FTP
PRETcommand failed. This is a non-standard command and far from all servers support it. -
RTSP: mismatch of CSeq numbers
-
RTSP: mismatch of Session Identifiers
-
Unable to parse FTP file list. The FTP directory listing format used by the server could not be parsed by curl. FTP wildcards can not be used on this server.
-
FTP chunk callback reported error
-
No connection available, the session is queued
-
SSL public key does not match pinned public key. Either you provided a bad public key, or the server has changed.
-
Invalid SSL certificate status. The server did not provide a proper valid certificate in the TLS handshake.
-
Stream error in HTTP/2 framing layer. This is usually an unrecoverable error, but trying to force curl to speak HTTP/1 instead might circumvent it.
-
An API function was called from inside a callback. If the curl tool returns this, something has gone wrong internally
-
Authentication error.
-
HTTP/3 layer error. This is somewhat generic and can be one out of several problems, see the error message for details.
-
QUIC connection error. This error may be caused by an TLS library error. QUIC is the transport protocol used for HTTP/3.
-
Proxy handshake error. Usually that means that a SOCKS proxy did not play along.
-
A TLS client certificate is required but was not provided.
-
An internal call to poll() or select() returned error that is not recoverable.
Error message
When curl exits with a non-zero code, it also outputs an error message (unless
--silent is used). That error message may add some additional information or
circumstances to the exit status number itself so the same error number can
get different error messages.
Users can also craft their own error messages with
--write-out. The pseudo variable
%{onerror} allows you to set a message that only gets displayed on errors,
and it offers %{errormsg} and %{exitcode} among all the variables.
For example:
curl --write-out "%{onerror}curl says: (%{exitcode}) %{errormsg}" \
  https://curl.se/
"Not used"
The list of exit codes above contains a number of values marked as 'not used'. Those are exit status codes that are not used in modern versions of curl but that have been used or were intended to be used in the past. They may be used in a future version of curl.
Additionally, the highest used error status in this list is 99, but future curl versions might have added more exit codes after that number.
Copy as curl
Using curl to reproduce an operation a user managed to do with his or her browser is a common request and area people ask for help about.
How do you get a curl command line to get a resource, like the browser would get it, nice and easy? Chrome, Firefox, Edge and Safari all have this feature.
From Firefox
You get the site shown with Firefox's network tools. You then right-click on the specific request you want to repeat in the "Web Developer->Network" tool when you see the HTTP traffic, and in the menu that appears you select "Copy as cURL". Like this screenshot below shows. The operation then generates a curl command line to your clipboard and you can then paste that into your favorite shell window. This feature is available by default in all Firefox installations.
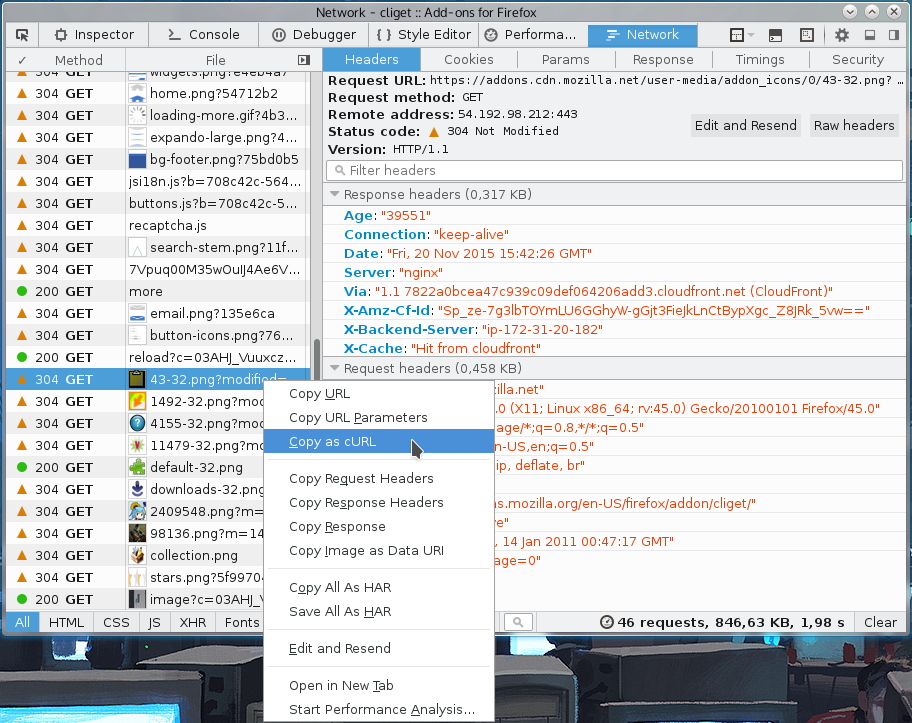
From Chrome and Edge
When you pop up the More tools->Developer mode in Chrome or Edge, and you select the Network tab you see the HTTP traffic used to get the resources of the site. On the line of the specific resource you are interested in, you right-click with the mouse and you select "Copy as cURL" and it generates a command line for you in your clipboard. Paste that in a shell to get a curl command line that makes the transfer. This feature is available by default in all Chrome and Chromium installations. (Note: Chromium browsers in Windows may generate an incorrect command line that is misquoted due to a bug in Chromium).
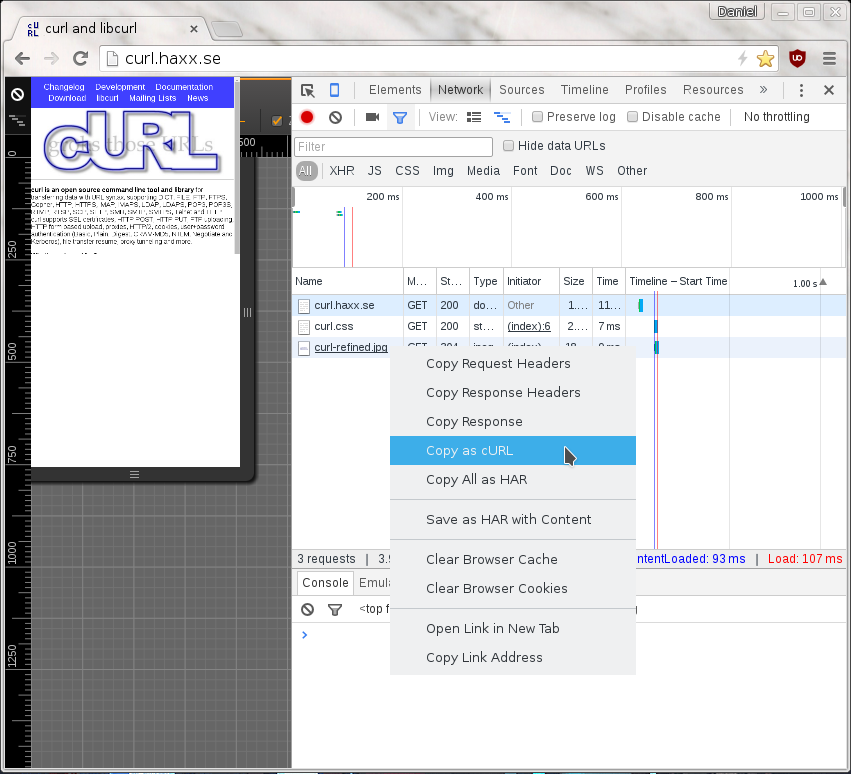
From Safari
In Safari, the "development" menu is not visible until you go into preferences->Advanced and enable it. Once you have done that, you can select Show web inspector in that development menu and get to see a new console pop up that is similar to the development tools of Firefox and Chrome.
Select the network tab, reload the webpage and then you can right click the particular resources that you want to fetch with curl, as if you did it with Safari..
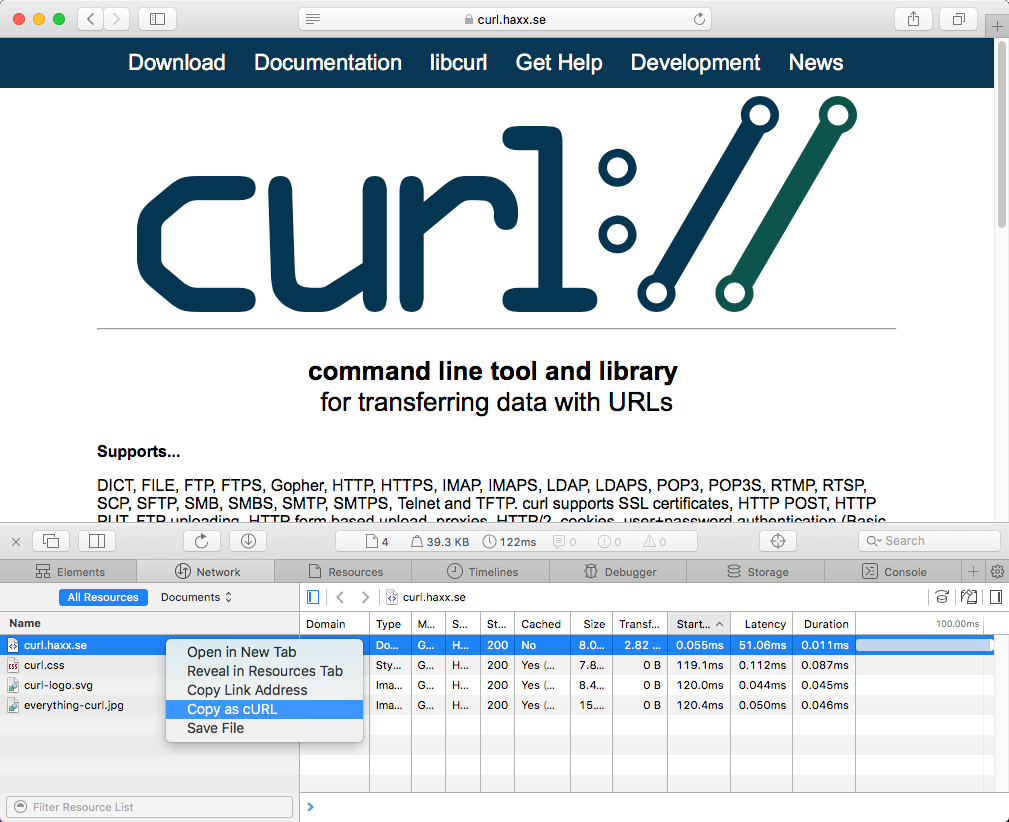
On Firefox, without using the devtools
If this is something you would like to get done more often, you probably find using the developer tools a bit inconvenient and cumbersome to pop up to get the command line copied. Then cliget is the perfect add-on for you as it gives you a new option in the right-click menu, so you can get a quick command line generated really quickly, like this example when I right-click an image in Firefox:

Not perfect
These methods all give you a command line to reproduce their HTTP transfers. They are often not the perfect solution to your problems. Why? Well mostly because these tools are written to rerun the exact same request that you copied, while you often want to rerun the same logic but not send an exact copy of the same cookies and file contents etc.
These tools give you command lines with static and fixed cookie contents to send in the request, because that is the contents of the cookies that were sent in the browser's requests. You most likely want to rewrite the command line to dynamically adapt to whatever the content is in the cookie that the server told you in a previous response. Etc.
The copy as curl functionality is also often notoriously bad at using -F and
instead they provide handcrafted --data-binary solutions including the mime
separator strings etc.
Command line transfers
Previous chapters described curl concepts and something about the basic command lines. You use command-line options and you pass on URLs to work with.
In this chapter, we are going to dive deeper into doing actual transfers with curl. What the curl tool can do and how to tell curl to use these features to send or retrieve data for you. You should consider all these features as different tools that are here to help you do your file transfer tasks as conveniently as possible.
- Verbose
- Downloads
- Uploads
- Transfer controls
- Connections
- Timeouts
- .netrc
- Proxies
- TLS
- SCP and SFTP
- DICT
- IMAP
- IPFS
- MQTT
- POP3
- SMTP
- TELNET
- TFTP
Verbose
If your curl command does not execute or return what you expected it to, your
first gut reaction should always be to run the command with the -v / --verbose option to get more information.
When verbose mode is enabled, curl gets more talkative and explains and shows a lot more of its doings. It adds informational tests and prefix them with '*'. For example, let's see what curl might say when trying a simple HTTP example (saving the downloaded data in the file called 'saved'):
$ curl -v http://example.com -o saved
* Rebuilt URL to: http://example.com/
Ok so we invoked curl with a URL that it considers incomplete so it helps us and it adds a trailing slash before it moves on.
* Trying 93.184.216.34...
This tells us curl now tries to connect to this IP address. It means the name 'example.com' has been resolved to one or more addresses and this is the first (and possibly only) address curl tries to connect to.
* Connected to example.com (93.184.216.34) port 80 (#0)
It worked. curl connected to the site and here it explains how the name maps to the IP address and on which port it has connected to. The '(#0)' part is which internal number curl has given this connection. If you try multiple URLs in the same command line you can see it use more connections or reuse connections, so the connection counter may increase or not increase depending on what curl decides it needs to do.
If we use an HTTPS:// URL instead of an HTTP one, there are also a whole
bunch of lines explaining how curl uses CA certs to verify the server's
certificate and some details from the server's certificate, etc. Including
which ciphers were selected and more TLS details.
In addition to the added information given from curl internals, the -v
verbose mode also makes curl show all headers it sends and receives. For
protocols without headers (like FTP, SMTP, POP3 and so on), we can consider
commands and responses as headers and they thus also are shown with -v.
If we then continue the output seen from the command above (but ignore the actual HTML response), curl shows:
> GET / HTTP/1.1
> Host: example.com
> User-Agent: curl/7.45.0
> Accept: */*
>
This is the full HTTP request to the site. This request is how it looks in a default curl 7.45.0 installation and it may, of course, differ slightly between different releases and in particular it changes if you add command line options.
The last line of the HTTP request headers looks empty, and it is. It signals the separation between the headers and the body, and in this request there is no "body" to send.
Moving on and assuming everything goes according to plan, the sent request gets a corresponding response from the server and that HTTP response starts with a set of headers before the response body:
< HTTP/1.1 200 OK
< Accept-Ranges: bytes
< Cache-Control: max-age=604800
< Content-Type: text/html
< Date: Sat, 19 Dec 2015 22:01:03 GMT
< Etag: "359670651"
< Expires: Sat, 26 Dec 2015 22:01:03 GMT
< Last-Modified: Fri, 09 Aug 2013 23:54:35 GMT
< Server: ECS (ewr/15BD)
< Vary: Accept-Encoding
< X-Cache: HIT
< x-ec-custom-error: 1
< Content-Length: 1270
<
This may look mostly like mumbo jumbo to you, but this is a normal set of HTTP headers—metadata—about the response. The first line's "200" might be the most important piece of information in there and means "everything is fine".
The last line of the received headers is, as you can see, empty, and that is the marker used for the HTTP protocol to signal the end of the headers.
After the headers comes the actual response body, the data payload. The regular -v verbose mode does not show that data but only displays
{ [1270 bytes data]
That 1270 bytes should then be in the 'saved' file. You can also see that there was a header named Content-Length: in the response that contained the exact file length (though it may not always be present in responses).
HTTP/2 and HTTP/3
When doing file transfers using version two or three of the HTTP protocol, curl sends and receives compressed headers. To display outgoing and incoming HTTP/2 and HTTP/3 headers in a readable and understandable way, curl shows the uncompressed versions in a style similar to how they appear with HTTP/1.1.
Silence
The opposite of verbose is, of course, to make curl more silent. With the -s
(or --silent) option you make curl switch off the progress meter and not
output any error messages for when errors occur. It gets mute. It still
outputs the downloaded data you ask it to.
With silence activated, you can ask for it to still output the error message on
failures by adding -S or --show-error.
Trace options
There are times when -v is not enough. In particular, when you want to store
the complete stream including the actual transferred data.
For situations when curl does encrypted file transfers with protocols such as HTTPS, FTPS or SFTP, other network monitoring tools (like Wireshark or tcpdump) are not able to do this job as easily for you.
For this, curl offers two other options that you use instead of -v.
--trace [filename] saves a full trace in the given filename. You can also
use '-' (a single minus) instead of a filename to get it passed to stdout. You
would use it like this:
$ curl --trace dump http://example.com
When completed, there is a 'dump' file that can turn out pretty sizable. In this case, the 15 first lines of the dump file looks like:
== Info: Rebuilt URL to: http://example.com/
== Info:   Trying 93.184.216.34...
== Info: Connected to example.com (93.184.216.34) port 80 (#0)
=> Send header, 75 bytes (0x4b)
0000: 47 45 54 20 2f 20 48 54 54 50 2f 31 2e 31 0d 0a GET / HTTP/1.1..
0010: 48 6f 73 74 3a 20 65 78 61 6d 70 6c 65 2e 63 6f Host: example.co
0020: 6d 0d 0a 55 73 65 72 2d 41 67 65 6e 74 3a 20 63 m..User-Agent: c
0030: 75 72 6c 2f 37 2e 34 35 2e 30 0d 0a 41 63 63 65 url/7.45.0..Acce
0040: 70 74 3a 20 2a 2f 2a 0d 0a 0d 0a                pt: */*....
<= Recv header, 17 bytes (0x11)
0000: 48 54 54 50 2f 31 2e 31 20 32 30 30 20 4f 4b 0d HTTP/1.1 200 OK.
0010: 0a                                              .
<= Recv header, 22 bytes (0x16)
0000: 41 63 63 65 70 74 2d 52 61 6e 67 65 73 3a 20 62 Accept-Ranges: b
0010: 79 74 65 73 0d 0a                               ytes..
Every single sent and received byte gets displayed individually in hexadecimal numbers. Received headers are output line by line.
If you think the hexadecimals are not helping, you can try --trace-ascii [filename] instead, also this accepting '-' for stdout and that makes the 15
first lines of tracing look like:
== Info: Rebuilt URL to: http://example.com/
== Info:   Trying 93.184.216.34...
== Info: Connected to example.com (93.184.216.34) port 80 (#0)
=> Send header, 75 bytes (0x4b)
0000: GET / HTTP/1.1
0010: Host: example.com
0023: User-Agent: curl/7.45.0
003c: Accept: */*
0049:
<= Recv header, 17 bytes (0x11)
0000: HTTP/1.1 200 OK
<= Recv header, 22 bytes (0x16)
0000: Accept-Ranges: bytes
<= Recv header, 31 bytes (0x1f)
0000: Cache-Control: max-age=604800
Time stamps
The --trace-time option prefixes all verbose/trace outputs with a high
resolution timer for when the line is printed. It works with the regular -v / --verbose option as well as with --trace and --trace-ascii.
An example could look like this:
$ curl -v --trace-time http://example.com
23:38:56.837164 * Rebuilt URL to: http://example.com/
23:38:56.841456 *   Trying 93.184.216.34...
23:38:56.935155 * Connected to example.com (93.184.216.34) port 80 (#0)
23:38:56.935296 > GET / HTTP/1.1
23:38:56.935296 > Host: example.com
23:38:56.935296 > User-Agent: curl/7.45.0
23:38:56.935296 > Accept: */*
23:38:56.935296 >
23:38:57.029570 < HTTP/1.1 200 OK
23:38:57.029699 < Accept-Ranges: bytes
23:38:57.029803 < Cache-Control: max-age=604800
23:38:57.029903 < Content-Type: text/html
---- snip ----
The lines are all the local time as hours:minutes:seconds and then number of microseconds in that second.
Identify transfers and connections
As the trace information flow showing on screen or to a file using these options is a continuous stream even though your command line might make curl use a large number of separate connections and different transfers, there are times when you want to see to which specific transfers or connections the various information below to. To better understand the trace output.
You can then add --trace-ids to the line and you see how curl adds two
numbers to all tracing: the connection number and the transfer number. They
are two separate identifiers because connections can be reused and multiple
transfers can use the same connection.
More data
If the amount of tracing data is not enough. Like when you suspect and want to
debug a problem in a more fundamental lower protocol level, curl provides the
--trace-config option for you.
With this option you tell curl to also include logging about components that it otherwise does not include by default, such as details about TLS, HTTP/2 or HTTP/3 protocol bits. It also has convenience options for adding the connection and transfer identifiers and time stamps.
The --trace-config option accepts an argument where you specify a
comma-separated list with the areas you want it to trace. For example, include
identifiers and show me HTTP/2 details:
curl --trace-config ids,http/2 https://example.com
The exact set of options varies, but here are some ones to try:
| area | description |
|---|---|
ids | the same identifiers as --trace-ids provides |
time | the same time output as --trace-time provides |
all | show everything possible |
tls | TLS protocol exchange details |
http/2 | HTTP/2 frame information |
http/3 | HTTP/3 frame information |
* | additional ones in future versions |
Doing a quick run with all is often a good way to get to see which specific
areas that are shown, as then you can do follow-up runs with more specific
areas set.
Write out
--write-out or -w for short, outputs text and information after a transfer
is completed. It offers a large range of variables that you can include in the
output, variables that have been set with values and information from the
transfer.
Instruct curl to output a string by passing plain text to this option:
curl -w "formatted string" http://example.com/
…and you can also have curl read that string from a given file instead if you prefix the string with '@':
curl -w @filename http://example.com/
…or even have curl read the string from stdin if you use '-' as filename:
curl -w @- http://example.com/
Variables
The variables that are available are accessed by writing %{variable_name} in
the string and that variable is substituted by the correct value. To output a
plain % you write it as %%. You can also output a newline by using \n, a
carriage return with \r and a tab space with \t.
As an example, we can output the Content-Type and the response code from an HTTP transfer, separated with newlines and some extra text like this:
curl -w "Type: %{content_type}\nCode: %{response_code}\n" \
  http://example.com
The output is sent to stdout by default so you probably want to make sure that
you do not also send the downloaded content to stdout as then you might have a
hard time to separate out the data; or use %{stderr} to send the output to
stderr.
HTTP headers
This option also provides an easy to use way to output the contents of HTTP response headers from the most recent transfer.
Use %header{name} in the string, where name is the case insensitive name
of the header (without the trailing colon). The output header contents are
then shown exactly as was sent over the network, with leading and trailing
whitespace trimmed. Like this:
curl -w "Server: %header{server}\n" http://example.com
Starting in curl 8.17.0, you can output the contents of all occurrences of a
header field with a specific name - even for a whole redirect "chain" - by
appending :all:[separator] to the header name. The [separator] string (if
not blank) is a text that gets output between each header if there are more
than one to display. When more than one header is shown, they are output in
the chronological order of appearance over the wire. To include a close brace
(}) in the separator, escape it with a backslash: \}.
Output
By default, this option makes the selected data get output on stdout. If that
is not good enough, the pseudo-variable %{stderr} can be used to direct (the
following) part to stderr and %{stdout} brings it back to stdout.
Send the write-out output to a specific file instead of stdout (or the
currently selected output stream) by using the %output{filename}
instruction. The data following is then written to that file. If you would
rather have curl append data to that file instead of creating it from
scratch, prefix the filename with >>. Like this: %output{>>filename}.
A write-out argument can include output to stderr, stdout and files as the user sees fit.
Time
Using %time{format}, you can output the current UTC time in your selected
format. The characters within {} create a format string that may contain
special character sequences called conversion specifications. Each conversion
specification starts with % and is followed by a character that instructs
curl to output a particular time detail. All other characters used are
displayed as-is.
The list of time conversion specifiers.
Windows
NOTE: In Windows, the %-symbol is a special symbol used to expand
environment variables. In batch files all occurrences of % must be doubled
when using this option to properly escape. If this option is used at the
command prompt then the % cannot be escaped and unintended expansion is
possible.
Available --write-out variables
See the list of available --write-out variables.
Available --write-out variables
Some of these variables are not available in really old curl versions.
| Variable | Description |
|---|---|
certs | Outputs the certificate chain from the most recent TLS handshake - with details. (Introduced in 7.88.0) |
conn_id | The connection identifier last used by the transfer. The connection id is unique number among all connections using the same connection cache. (Introduced in 8.2.0) |
content_type | Content-Type of the requested document, if there was any. |
errormsg | Error message from the transfer. Empty if no error occurred. (Introduced in 7.75.0) |
exitcode | Numerical exit code from the transfer. 0 if no error occurred. (Introduced in 7.75.0) |
filename_effective | The ultimate filename that curl writes out to. Practical if curl is told to write to a file with the --remote-name or --output option. It is most useful in combination with the --remote-header-name option. |
ftp_entry_path | The initial path curl ended up in when logging on to the remote FTP server. |
header_json | A JSON object with all HTTP response headers from the recent transfer. Values are provided as arrays, since in the case of multiple headers there can be multiple values. (Introduced in 7.83.0) |
http_code | The former variable name for what is now known as response_code. |
http_connect | the numerical code that was found in the last response (from a proxy) to a curl CONNECT request. |
http_version | The HTTP version that was used. |
json | all write-out variables as a single JSON object. (Introduced in 7.72.0) |
local_ip | IP address of the local end of the most recently used connection - can be either IPv4 or IPv6 |
local_port | Local port number of the most recently used connection |
method | HTTP method the most recent request used. (Introduced in 7.72.0) |
num_certs | Number of the certificates in the most recent TLS handshake. (Introduced in 7.88.0) |
num_connects | Number of new connects made in the recent transfer. |
num_headers | Number of response headers in the last response |
num_redirects | Number of redirects that were followed in the request. |
num_retries | Number of retries actually performed when --retry has been used. (Introduced in 8.9.0) |
onerror | If the transfer ended with an error, show the rest of the string, otherwise stop here. (Introduced in 7.75.0) |
proxy_ssl_verify_result | The result of the SSL peer certificate verification that was requested when communicating with a proxy. 0 means the verification was successful. |
proxy_used | Returns 1 if the previous transfer used a proxy, otherwise 0. Useful to for example determine if a NOPROXY pattern matched the hostname or not. (Introduced in 8.7.0) |
redirect_url | The actual URL a redirect would take you to when an HTTP request was made without -L to follow redirects. |
referer | The Referer: header, if there was any. (Introduced in 7.76.0) |
remote_ip | The remote IP address of the most recently used connection — can be either IPv4 or IPv6. |
remote_port | The remote port number of the most recently made connection. |
response_code | The numerical response code that was found in the last transfer. |
scheme | scheme used in the previous URL |
size_download | Total number of bytes that were downloaded. |
size_header | Total number of bytes of the downloaded headers. |
size_request | Total number of bytes that were sent in the HTTP request. |
size_upload | Total number of bytes that were uploaded. |
speed_download | Average download speed that curl measured for the complete download in bytes per second. |
speed_upload | Average upload speed that curl measured for the complete upload in bytes per second. |
ssl_verify_result | the result of the SSL peer certificate verification that was requested. 0 means the verification was successful. |
stderr | Makes the rest of the output get written to stderr. |
stdout | makes the rest of the output get written to stdout. |
time_appconnect | The time in seconds, it took from the start until the SSL/SSH/etc connect/handshake to the remote host was completed. |
time_connect | The time in seconds, it took from the start until the TCP connect to the remote host (or proxy) was completed. |
time_namelookup | The time in seconds, it took from the start until the name resolving was completed. |
time_pretransfer | The time in seconds, it took from the start until the file transfer was about to begin. This includes all pre-transfer commands and negotiations that are specific to the particular protocol(s) involved. |
time_redirect | The time in seconds, it took for all redirection steps including name lookup, connect, pre-transfer and transfer before the final transaction was started. time_redirect the complete execution time for multiple redirections. |
time_starttransfer | The time in seconds, it took from the start until the first byte was about to be transferred. This includes time_pretransfer and also the time the server needed to calculate the result. |
time_total | The total time in seconds, that the full operation lasted. The time is displayed with microsecond resolution. |
tls_earlydata | The amount of bytes that were sent as TLS 1.3 early data. This is zero if this TLS feature was not used and negative if the data sent was rejected by the server. The use of early data is enabled with --tls-earlydata. (Introduced in 8.13.0) |
url | The URL used in the transfer. (Introduced in 7.75.0) |
url_effective | The URL that was fetched last. This is particularly meaningful if you have told curl to follow Location: headers (with -L). |
urlnum | 0-based numerical index of the URL used in the transfer. (Introduced in 7.75.0) |
xfer_id | The numerical identifier of the last transfer done. -1 if no transfer has been started yet for the handle. The transfer id is unique among all transfers performed using the same connection cache. (Introduced in 8.2.0) |
In curl 8.1.0, variables to output only specific URL components were added, for when the url or url_effective variables show more than you want.
| Variable | Description |
|---|---|
url.fragment | The fragment part of the URL that was fetched. |
url.host | The hostname part of the URL that was fetched. |
url.options | The options part of the URL that was fetched. Only available for some schemes. |
url.password | The password part of the URL that was fetched. |
url.path | The path part of the URL that was fetched. |
url.port | The port number of the URL that was fetched. |
url.query | The query part of the URL that was fetched. |
url.scheme | The scheme part of the URL that was fetched. |
url.user | The user part of the URL that was fetched. |
url.zoneid | The zone id part of the URL that was fetched. Only available if the hostname is an IPv6 address. |
urle.fragment | The fragment part of the effective (last) URL that was fetched. |
urle.host | The hostname part of the effective (last) URL that was fetched. |
urle.options | The options part of the effective (last) URL that was fetched. Only available for some schemes. |
urle.password | The password part of the effective (last) URL that was fetched. |
urle.path | The path part of the effective (last) URL that was fetched. |
urle.port | The port number of the effective (last) URL that was fetched. |
urle.query | The query part of the effective (last) URL that was fetched. |
urle.scheme | The scheme part of the effective (last) URL that was fetched. |
urle.user | The user part of the effective (last) URL that was fetched. |
urle.zoneid | The zone id part of the effective (last) URL that was fetched. Only available if the hostname is an IPv6 address. |
Time specifiers
The following conversion specifications are available for the --write-out
option's %time{} feature:
| flag | outputs |
|---|---|
%a | The abbreviated name of the day of the week according to the current locale. |
%A | The full name of the day of the week according to the current locale. |
%b | The abbreviated month name according to the current locale. |
%B | The full month name according to the current locale. |
%c | The preferred date and time representation for the current locale. (In the POSIX locale this is equivalent to %a %b %e %H:%M:%S %Y.) |
%C | The century number (year/100) as a 2-digit integer. |
%d | The day of the month as a decimal number (range 01 to 31). |
%D | Equivalent to %m/%d/%y. (This format is ambiguous and should be avoided.) |
%e | Like %d, the day of the month as a decimal number, but a leading zero is replaced by a space. |
%f | The number of microseconds elapsed of the current second. (This is a curl special code and not a standard one.) |
%F | Equivalent to %Y-%m-%d (the ISO 8601 date format). |
%G | The ISO 8601 week-based year with century as a decimal number. The 4-digit year corresponding to the ISO week number (see %V). This has the same format and value as %Y, except that if the ISO week number belongs to the previous or next year, that year is used instead. |
%g | Like %G, but without century, that is, with a 2-digit year (00-99). |
%h | Equivalent to %b. |
%H | The hour as a decimal number using a 24-hour clock (range 00 to 23). |
%I | The hour as a decimal number using a 12-hour clock (range 01 to 12). |
%j | The day of the year as a decimal number (range 001 to 366). |
%k | The hour (24-hour clock) as a decimal number (range 0 to 23); single digits are preceded by a blank. |
%l | The hour (12-hour clock) as a decimal number (range 1 to 12); single digits are preceded by a blank. |
%m | The month as a decimal number (range 01 to 12). |
%M | The minute as a decimal number (range 00 to 59). |
%p | Either "AM" or "PM" according to the given time value, or the corresponding strings for the current locale. Noon is treated as "PM" and midnight as "AM". |
%P | Like %p but in lowercase: "am" or "pm" or a corresponding string for the current locale. |
%r | The time in am or pm notation. |
%R | The time in 24-hour notation (%H:%M). For a version including the seconds, see %T below. |
%s | The number of seconds since the Epoch, 1970-01-01 00:00:00 +0000 (UTC). |
%S | The second as a decimal number (range 00 to 60). (The range is up to 60 to allow for occasional leap seconds.) See %f for microseconds. |
%T | The time in 24-hour notation (%H:%M:%S). |
%u | The day of the week as a decimal, range 1 to 7, Monday being 1. |
%U | The week number of the current year as a decimal number, range 00 to 53, starting with the first Sunday as the first day of week 01. See also %V and %W. |
%V | The ISO 8601 week number (see NOTES) of the current year as a decimal number, range 01 to 53, where week 1 is the first week that has at least 4 days in the new year. See also %U and %W. |
%w | The day of the week as a decimal, range 0 to 6, Sunday being 0. See also %u. |
%W | The week number of the current year as a decimal number, range 00 to 53, starting with the first Monday as the first day of week 01. |
%x | The preferred date representation for the current locale without the time. |
%X | The preferred time representation for the current locale without the date. |
%y | The year as a decimal number without a century (range 00 to 99). |
%Y | The year as a decimal number including the century. |
%z | The +hhmm or -hhmm numeric timezone (that is, the hour and minute offset from UTC). As time is always UTC, this outputs +0000. |
%Z | The timezone name. As time is always UTC, this outputs the UTC timezone name, typically GMT. |
%% | A literal % character. |
Downloads
"Download" means getting data from a server on a network, and the server is then clearly considered to be "above" you. This is loading data down from the server onto your machine where you are running curl.
Downloading is probably the most common use case for curl — retrieving the specific data pointed to by a URL onto your machine.
- What exactly is downloading?
- Storing downloads
- Download to a file named by the URL
- HTML and charsets
- Shell redirects
- Discard received data
- Multiple downloads
- My browser shows something else
- Maximum file size
- Storing metadata in file system
- Raw
- Retry
- Resuming and ranges
What is downloading?
You specify the resource to download by giving curl a URL. curl defaults to
downloading a URL unless told otherwise, and the URL identifies what to
download. In this example the URL to download is http://example.com:
curl http://example.com
The URL is broken down into its individual components (as explained elsewhere), the correct server is contacted and is then asked to deliver the specific resource—often a file. The server then delivers the data, or it refuses or perhaps the client asked for the wrong data and then that data is delivered.
A request for a resource is protocol-specific so an FTP:// URL works
differently than an HTTP:// URL or an SFTP:// URL.
A URL without a path part, that is a URL that has a hostname part only (like
the http://example.com example above) gets a slash ('/') appended to it
internally and then that is the resource curl asks for from the server.
If you specify multiple URLs on the command line, curl downloads each URL one by one. It does not start the second transfer until the previous one is complete, etc.
Storing downloads
If you try the example download as in the previous section, you might notice that curl outputs the downloaded data to stdout unless told to do something else. Outputting data to stdout is really useful when you want to pipe it into another program or similar, but it is not always the optimal way to deal with your downloads.
Give curl a specific filename to save the download in with -o [filename]
(with --output as the long version of the option), where filename is either
a filename, a relative path to a filename or a full path to the file.
Also note that you can put the -o before or after the URL; it makes no
difference:
curl -o output.html http://example.com/
curl -o /tmp/index.html http://example.com/
curl http://example.com -o ../../folder/savethis.html
This is, of course, not limited to http:// URLs but works the same way no
matter which type of URL you download:
curl -o file.txt ftp://example.com/path/to/file-name.ext
If you ask curl to send the output to the terminal, it attempts to detect and
prevent binary data from being sent there since that can seriously mess up
your terminal (sometimes to the point where it stops working). You can
override curl's binary-output-prevention and force the output to get sent to
stdout by using -o -.
curl has several other ways to store and name the downloaded data. Details follow.
Overwriting
When curl downloads a remote resource into a local filename as described above, it overwrites that file in case it already existed. It clobbers it.
curl offers a way to avoid this clobbering: --no-clobber.
When using this option, and curl finds that there already exists a file with
the given name, curl instead appends a period plus a number to the filename in
an attempt to find a name that is not already used. It starts with 1 and
then continues trying numbers until it reaches 100 and picks the first
available one.
For example, if you ask curl to download a URL to picture.png, and in that
directory there already are two files called picture.png and
picture.png.1, the following saves the file as picture.png.2:
curl --no-clobber https://example.com/image -o picture.png
A user can use the --write-out option's
%filename_effective variable to figure out which name that was eventually
used.
Leftovers on errors
By default, if curl runs into a problem during a download and exits with an error, the partially transferred file is left as-is. It could be a small fraction of the intended file, or it could be almost the entire thing. It is up to the user to decide what to do with the leftovers.
The --remove-on-error command line option changes this behavior. It tells
curl to delete any partially saved file if curl exits with an error. No more
leftovers.
Download to a file named by the URL
Many URLs, however, already contain the filename part in the rightmost end.
curl lets you use that as a shortcut so you do not have to repeat it with
-o. Instead of:
curl -o file.html http://example.com/file.html
You can save the remote URL resource into the local file 'file.html' with this:
curl -O http://example.com/file.html
This is the -O (uppercase letter o) option, or --remote-name for the long
name version. The -O option selects the local filename to use by picking the
filename part of the URL that you provide. This is important. You specify the
URL and curl picks the name from this data. If the site redirects curl further
(and if you tell curl to follow redirects), it does not change the filename
curl uses for storing this.
Store in another directory
When the correct filename to use has been selected as explained above, you can
still change the directory in which that file is saved by using
--output-dir. It is especially useful in combination with -O of course, as
that option otherwise implies saving the file in the current directory.
To save the new file in the /tmp directory using a filename taken from the
URL:
curl -O --output-dir /tmp http://example.com/file.html
Use the URL's filename part for all URLs
As a reaction to adding a hundred -O options when using a hundred URLs, we
introduced an option called --remote-name-all. This makes -O the default
operation for all given URLs. You can still provide individual "storage
instructions" for URLs but if you leave one out for a URL that gets
downloaded, the default action is then switched from stdout to -O style.
Use the target filename from the server
HTTP servers have the option to provide a header named Content-Disposition:
in responses. That header may contain a suggested filename for the contents
delivered, and curl can be told to use that hint to name its local file. The
-J / --remote-header-name enables this. If you also use the -O option, it
makes curl use the filename from the URL by default and only if there is
actually a valid Content-Disposition header available, it switches to saving
using that name.
If there are multiple Content-Disposition headers, curl picks the name from the first one it sees.
By default curl saves that file in your current directory, which can be
changed with --output-dir.
-J has some challenges and risks associated with it that users need to be
vary of:
-
It only uses the rightmost part of the suggested filename; the path part is stripped out.
-
Since the filename is provided by the server, curl does not overwrite any preexisting local file in your current directory if the server happens to provide such a filename (unless you use
--clobber). -
filename encoding and character sets issues. curl does not decode the name in any way, so you may end up with a URL-encoded filename where a browser would otherwise decode it to something more readable using a sensible character set.
Location: too
The above approach mentioned works pretty well, but has limitations. One of
them being that if the site instead of providing a Content-Disposition
header only redirects the client to a new URL to download from, curl does not
pick up the new name but instead keeps using the one from the originally
provided URL.
Since curl 8.19.0, -J also picks up the filename from Location: headers and
uses that filename if no Content-Disposition header arrives.
If you run a command line like:
curl -L -O -J https://example.com/download?id=6347d
Assuming the site redirects curl to the actual download URL for the tarball you want to download like this:
HTTP/1 301 redirect

Location: https://example.org/release.tar.gz
This makes curl save the contents of that transfer in a local file called
release.tar.gz.
If there is both a redirect and a Content-Disposition header, the latter
takes precedence.
What filename?
Since the selected final name used for storing the data is selected based on contents of a header passed from the server, using this option in a scripting scenario introduces the challenge: what filename did curl actually use?
A user can easily extract this information with curl’s -w option. Like this:
curl -w '%{filename_effective}' -O -J -L \
  https://example.com/download?id=6347d
This command line outputs the used filename to stdout.
Tweak the command line further to instead direct that name to stderr or to a specific file etc. Whatever you think works.
HTML and charsets
curl downloads the exact binary data that the server sends. This might be of importance to you in case, for example, you download an HTML page or other text data that uses a certain character encoding that your browser then displays as expected. curl does not translate the arriving data.
A common example where this causes some surprising results is when a user downloads a webpage with something like:
curl https://example.com/ -o storage.html
…and when inspecting the storage.html file after the fact, the user realizes
that one or more characters look funny or downright wrong. This might occur
because the server sent the characters using charset X, while your editor and
environment use charset Y. In an ideal world, we would all use UTF-8
everywhere but unfortunately, that is still not the case.
A common workaround for this issue that works decently is to use the
common iconv utility to translate a text file to and from different
charsets.
Shell redirects
When you invoke curl from a shell or some other command-line prompt system,
that environment generally provides you with a set of output redirection
abilities. In most Linux and Unix shells and with Windows' command prompts,
you direct stdout to a file with > filename. Using this, of course, makes the
use of -o or -O superfluous.
curl http://example.com/ > example.html
Redirecting output to a file redirects all output from curl to that file, so even if you ask to transfer more than one URL to stdout, redirecting the output gets all the URLs' output stored in that single file.
curl http://example.com/1 http://example.com/2 > files
Unix shells usually allow you to redirect the stderr stream separately. The
stderr stream is usually a stream that also gets shown in the terminal, but you
can redirect it separately from the stdout stream. The stdout stream is for
the data while stderr is metadata and errors, etc., that are not data. You can
redirect stderr with 2>file like this:
curl http://example.com > files.html 2>errors
Mix
If you specify more URLs to transfer data from than you provide storage options on the command line, the remaining URLs are sent to stdout.
For example, getting one URL saved to a file and the next to stdout:
curl http://example.com -o save http://stdout.example/
Discard received data
Sometimes it is convenient to run a transfer but not actually store the data anywhere. This can be done in several ways.
-
You can opt to save it to a file and then delete the file after completion.
-
You can redirect the output to
/dev/nullor its equivalent. Unfortunately different systems have different ways to do this which makes such a curl command line system specific. -
Use
--out-nullas a portable option to silently discard the received data without storing it anywhere.
Example to view the verbose output for a full transfer:
curl -v https://download.example/ --out-null
If you use an older curl version that does not support --out-null, use the
platform-specific null device instead:
Unix-like systems:
curl -v https://download.example/ -o /dev/null
Windows:
curl -v https://download.example/ -o NUL
Multiple downloads
As curl can be told to download many URLs in a single command line, there are, of course, times when you want to store these downloads in nicely named local files.
The key to understanding this is that each download URL needs its own "storage instruction". Without said "storage instruction", curl defaults to sending the data to stdout. If you ask for two URLs and only tell curl where to save the first URL, the second one is sent to stdout. Like this:
curl -o one.html http://example.com/1 http://example.com/2
The "storage instructions" are read and handled in the same order as the download URLs so they do not have to be next to the URL in any way. You can round up all the output options first, last or interleaved with the URLs. You choose.
These examples all work the same way:
curl -o 1.txt -o 2.txt http://example.com/1 http://example.com/2
curl http://example.com/1 http://example.com/2 -o 1.txt -o 2.txt
curl -o 1.txt http://example.com/1 http://example.com/2 -o 2.txt
curl -o 1.txt http://example.com/1 -o 2.txt http://example.com/2
The -O is similarly an instruction for a single download so if you download
multiple URLs, use more of them:
curl -O -O http://example.com/1 http://example.com/2
Parallel
Unless told otherwise, curl downloads all given URLs in a serial fashion, one
by one. By using -Z (or --parallel) curl can instead do the transfers
in parallel: several ones at once.
My browser shows something else
A common use case is using curl to get a URL that you can get in your browser when you paste the URL in the browser's address bar.
A browser getting a URL as input does so much more and in so many different ways than curl that what curl shows in your terminal output is probably not at all what you see in your browser window.
Client differences
curl gets exactly what you ask it to get and it never parses the actual content—the data—that the server delivers. A browser gets data and it activates different parsers depending on what kind of content it thinks it gets. For example, if the data is HTML it parses it to display a webpage and possibly download other sub resources such as images, JavaScript and CSS files. When curl downloads HTML it gets that single HTML resource, even if it, when parsed by a browser, would trigger a whole busload of more downloads. If you want curl to download any sub-resources as well, you need to pass those URLs to curl and ask it to get those, like any other URLs.
Clients also differ in how they send their requests, and some aspects of a request for a resource include, for example, format preferences, asking for compressed data, or telling the server from which previous page we are "coming from". curl's requests differ a little or a lot from how your browser sends its requests.
Server differences
The server that receives the request and delivers data is often set up to act in certain ways depending on what kind of client it thinks communicates with it. Sometimes it is as innocent as trying to deliver the best content for the client, sometimes it is to hide some content for some clients or even to try to work around known problems in specific browsers. Then there are also, of course, various kinds of login systems that might rely on HTTP authentication or cookies or the client being from the pre-validated IP address range.
Sometimes getting the same response from a server using curl as the response
you get with a browser ends up really hard work. Users then typically record
their browser sessions with the browser's networking tools and then compare
that recording with recorded data from curl's --trace-ascii option and
proceed to modify curl's requests (often with -H / --header) until the
server starts to respond the same to both.
This type of work can be both time consuming and tedious. You should always do this with permission from the server owners or admins.
Intermediaries' fiddlings
Intermediaries are proxies, explicit or implicit ones. Some environments force you to use one or you may choose to use one for various reasons, but there are also the transparent ones that intercept your network traffic silently and proxy it for you no matter what you want.
Proxies are "middle men" that terminate the traffic and then act on your behalf to the remote server. This can introduce all sorts of explicit filtering and "saving" you from certain content or even "protecting" the remote server from what data you try to send to it, but even more so it introduces another software's view on how the protocol works and what the right things to do are.
Interfering intermediaries are often the cause of lots of headaches and mysteries down to downright malicious modifications of content.
We strongly encourage you to use HTTPS or other means to verify that the contents you are downloading or uploading are really the data that the remote server has sent to you and that your precious bytes end up verbatim at the intended destination.
Maximum filesize
When you want to make sure your curl command line does not download a too-large file, instruct curl to stop before doing that, if it knows the size before the transfer starts. Maybe that would use too much bandwidth, take too long time or you do not have enough space on your hard drive:
curl --max-filesize 100000 https://example.com/
Give curl the largest download you can accept in number of bytes and if curl can figure out the size before the transfer starts it aborts before trying to download something larger.
There are many situations in which curl cannot figure out the size at the time the transfer starts. Such transfers thus are then aborted first when they actually reach that limit.
Storing metadata in file system
When saving a download to a file with curl, the --xattr option tells curl to
also store certain file metadata in "extended file attributes". These extended
attributes are standardized name/value pairs stored in the file system,
assuming one of the supported file systems and operating systems are used.
Currently, the URL is stored in the xdg.origin.url attribute and, for HTTP,
the content type is stored in the mime_type attribute. If the file system
does not support extended attributes when this option is set, a warning is
issued.
Raw
When --raw is used, it disables all internal HTTP decoding of content or
transfer encodings and instead makes curl passed on unaltered, raw, data.
This is typically used if you are writing a middle software and you want to pass on the content to another HTTP client and allow that to do the decoding instead.
Retry
Normally curl only makes a single attempt to perform a transfer and returns an
error if not successful. Using the --retry option you can tell curl to retry
certain failed transfers.
If a transient error is returned when curl tries to perform a transfer, it retries this number of times before giving up. Setting the number to 0 makes curl do no retries (which is the default). Transient error means either: a timeout, an FTP 4xx response code or an HTTP 408, 429, 500, 502, 503 or 504 response code.
Tweak your retries
When curl is about to retry a transfer, it first waits one second and then for
all forthcoming retries it doubles the waiting time until it reaches 10
minutes which then is the delay between the rest of the retries. Using
--retry-delay you can disable this exponential backoff algorithm and set
your own delay between the attempts. With --retry-max-time you cap the total
time allowed for retries. The --max-time option still specifies the longest
time a single of these transfers is allowed to spend.
Make curl retry up to 5 times, but no more than two minutes:
curl --retry 5 --retry-max-time 120 https://example.com
Connection refused
The default retry mechanism only retries transfers for what are considered transient errors. Those are errors that the server itself hints and qualifies as being there right now but that might be gone at a later time.
Sometimes you as a user know more about the situation and you can then help
out curl to do better retries. For starters, you can tell curl to consider
"connection refused" to be a transient error. Maybe you know that the server
you communicate with is a flaky one or maybe you know that you sometimes try
to download from it when it reboots or similar. You use --retry-connrefused
for this.
For example: retry up to 5 times and consider ECONNREFUSED a reason for
retry:
curl --retry 5 --retry-connrefused https://example.com
Retry on any and all errors
The most aggressive form of retry is for the cases where you know that the
URL is supposed to work and you do not tolerate any failures. Using
--retry-all-errors makes curl treat all transfers failures as reason for
retry.
For example: retry up to 12 times for all errors:
curl --retry 12 --retry-all-errors https://example.com
Resuming and ranges
Resuming a download means first checking the size of what is already present locally and then asking the server to send the rest of it so it can be appended. curl also allows resuming the transfer at a custom point without actually having anything already locally present.
curl supports resumed downloads on several protocols. Tell it where to start
the transfer with the -C, --continue-at option that takes either a plain
numerical byte counter offset where to start or the string - that asks curl
to figure it out itself based on what it knows. When using -, curl uses the
destination filename to figure out how much data that is already present
locally and uses that as an offset when asking for more data from the
server.
To start downloading an FTP file from byte offset 100:
curl --continue-at 100 ftp://example.com/bigfile
Continue downloading a previously interrupted download:
curl --continue-at - http://example.com/bigfile -O
If you instead want a specific byte range from the remote resource transferred, you can ask for only that. For example, when you only want 1000 bytes from offset 100 to avoid having to download the entire huge remote file:
curl --range 100-1099 http://example.com/bigfile
Uploads
Uploading is a term for sending data to a remote server. Uploading is done differently for each protocol, and several protocols may even allow different ways of uploading data.
Protocols allowing upload
You can upload data using one of these protocols: FILE, FTP, FTPS, HTTP, HTTPS, IMAP, IMAPS, SCP, SFTP, SMB, SMBS, SMTP, SMTPS and TFTP.
HTTP offers several uploads
HTTP, and its bigger brother HTTPS, offer several different ways to upload data to a server, and curl provides easy command-line options to do it the three most common ways, described below.
An interesting detail with HTTP is that an upload can also be a download, in the same operation and in fact many downloads are initiated with an HTTP POST.
POST
POST is the HTTP method that was invented to send data to a receiving web application, and it is, for example, how most common HTML forms on the web work. It usually sends a chunk of relatively small amounts of data to the receiver.
The upload kind is usually done with the -d or --data options, but there
are a few additional alterations.
Read the detailed description on how to do this with curl in the HTTP POST with curl chapter.
multipart formpost
Multipart formposts are also used in HTML forms on websites; typically when there is a file upload involved. This type of upload is also an HTTP POST but it sends the data formatted according to some special rules, which is what the multipart name means.
Since it sends the data formatted completely differently, you cannot select which type of POST to use at your own whim but it entirely depends on what the receiving server end expects and can handle.
HTTP multipart formposts are done with -F. See the detailed description in
the HTTP multipart formposts chapter.
PUT
HTTP PUT is the upload method that was designed to send a complete resource meant to be put as-is on the remote site or even replace an existing resource there. That said, this is also the least used upload method for HTTP on the web today and lots, if not most, web servers do not even have PUT enabled.
You send off an HTTP upload using the -T option with the file to upload:
curl -T uploadthis http://example.com/
FTP and SFTP uploads
Working with FTP and SFTP, you get to see the remote file system you are accessing. You tell the server exactly in which directory you want the upload to be placed and which filename to use. If you specify the upload URL with a trailing slash, curl appends the locally used filename to the URL and then that becomes the filename used when stored remotely:
curl -T uploadthis ftp://example.com/this/directory/
FTP and SFTP also support appending to the target file when uploading
instead of overwriting, with the --append option:
curl -T uploadthis --append ftp://example.com/directory/remotename
Learn much more about FTPing in the FTP with curl section.
SMTP uploads
You may not consider sending an email to be uploading, but to curl it is. You
upload the mail body to the SMTP server. With SMTP, you also need to include
all the mail headers you need (To:, From:, Date:, etc.) in the mail body
as curl does not add any at all.
curl -T mail smtp://mail.example.com/ --mail-from user@example.com
Learn more about using SMTP with curl in the Sending email section.
Progress meter for uploads
The general progress meter curl provides (see the Progress meter section) works fine for uploads as well. What needs to be remembered is that the progress meter is automatically disabled when you are sending output to stdout, and most protocols curl support can output something even for an upload.
Therefore, you may need to explicitly redirect the downloaded data to a file
(using shell redirect '>', -o or similar) to get the progress meter
displayed for upload.
Globbing
curl also supports globbing in the -T
argument so you can opt to easily upload a range of files:
curl -T 'image[1-99].jpg' ftp://ftp.example.com/upload/
or a series of files:
curl -T '{file1,file2}' https://example.com/upload/
or
curl -T '{Huey,Dewey,Louie}.jpg' ftp://ftp.example.com/nephews/
Transfer controls
curl offers several different knobs and levers to control how transfers are performed. How fast to let them go, how slow to let them run and how to do multiple transfers.
Stop slow transfers
Having a fixed maximum time for a curl operation can be cumbersome, especially if you, for example, do scripted transfers and the file sizes and transfer times vary a lot. A fixed timeout value then needs to be set unnecessarily high to cover for worst cases.
As an alternative to a fixed time-out, you can tell curl to abandon the transfer if it gets below a certain speed and stays below that threshold for a specific period of time.
For example, if a transfer speed goes below 1000 bytes per second during 15 seconds, stop it:
curl --speed-time 15 --speed-limit 1000 https://example.com/
Rate limiting
When curl transfers data, it attempts to do that as fast as possible. It goes for both uploads and downloads. Exactly how fast that goes depends on several factors, including your computer's ability, your own network connection's bandwidth, the load on the remote server you are transferring to/from and the latency to that server. Your curl transfers are also likely to compete with other transfers on the networks the data travels over, from other users or other apps by the same user.
In many setups, however, you can more or less saturate your own network connection with a single curl command line. If you have a 10 megabit per second connection to the Internet, chances are curl can use all of those 10 megabits to transfer data.
For most use cases, using as much bandwidth as possible is a good thing. It makes the transfer faster, it makes the curl command complete sooner and it makes the transfer use resources from the server for a shorter period of time.
Sometimes, having curl starve out other network functions on your local
network connection is inconvenient. In these situations you may want to tell
curl to slow down so that other network users get a better chance to get their
data through as well. With --limit-rate [speed] you can tell curl to not go
faster than the given number of bytes per second. The rate limit value can be
given with a letter suffix using one of K, M and G for kilobytes, megabytes
and gigabytes.
To make curl not download data any faster than 200 kilobytes per second:
curl https://example.com/ --limit-rate 200K
The given limit is the maximum average speed allowed during a period of several seconds. It means that curl might use higher transfer speeds in short bursts, but over time it averages to no more than the given rate.
curl does not know what the maximum possible speed is — it goes as fast as it can and is allowed. You might know your connection's maximum speed, curl does not.
Request rate limiting
When told to do multiple transfers in a single command line, there might be times when a user would rather have those multiple transfers done slower than as fast as possible. We call that request rate limiting.
With the --rate option, you specify the maximum transfer frequency you allow
curl to use - in number of transfer starts per time unit (sometimes called
request rate). Without this option, curl starts the next transfer as fast as
possible.
If given several URLs and a transfer completes faster than the allowed rate, curl delays starting the next transfer to maintain the requested rate. This option is for serial transfers and has no effect when --parallel is used.
The request rate is provided as N/U where N is an integer number and U is
a time unit. Supported units are s (second), m (minute), h (hour) and
d (day, as in a 24 hour unit). The default time unit, if no /U is
provided, is number of transfers per hour.
If curl is told to allow 10 requests per minute, it does not start the next request until 6 seconds have elapsed since the previous transfer was started.
This function uses millisecond resolution. If the allowed frequency is set more than 1000 per second, it instead runs unrestricted.
When retrying transfers, enabled with --retry, the separate retry delay logic is used and not this setting.
If this option is used several times, the last one is used.
For example, make curl download 100 images but doing it no faster than 2 transfers per second:
curl --rate 2/s -O https://example.com/[1-100].jpg
Make curl download 10 images but doing it no faster than 3 transfers per hour:
curl --rate 3/h -O https://example.com/[1-10].jpg
Make curl download 200 images but not faster than 14 transfers per minute:
curl --rate 14/m -O https://example.com/[1-200].jpg
Number of units
Starting in curl 8.10.0 this option accepts an optional number of units. The request rate is then provided as N / Z U (with no spaces) where N is a number, Z is a number of time units and U is a time unit.
The number and the units are the same as mentioned above, but now you can also specify a number of time units. N requests per Z number of N units.
For example, make no more than eight transfers every five seconds:
curl --rate 8/5s -O https://example.com/[1-100].jpg
Compression
Automatic compression of data before it gets sent can help getting the data to the other end faster due to the reduced bandwidth needed.
curl offers automatic compression and decompression for SFTP, SCP and HTTP(S). With HTTP(S) it is only possible to do it for downloads, while SFTP and SCP offer it for both directions.
For HTTP
See HTTP compression for the details.
For SFTP/SCP
Provide the --compressed-ssh option on the command line and the transfer
automatically and transparently uses compression if it can. Like:
curl -O --compressed-ssh sftp://example.com/bigfile
Skip download if already done
Sometimes when writing a script or similar to do Internet transfers every now and then you end up in a situation when you rather have curl skip doing the transfer if indeed the target file is already present locally. Maybe after the previous invoke, maybe for another reason.
This kind of extra logic can certainly be added in common shell script logic before curl is invoked in many cases but not all. For example things get complicated when you ask curl to use globbing download ranges.
For example, download one thousand images from a site but skip the ones that we already have downloaded previously:
curl --skip-existing -O https://example.com/image[0-999].jpg
It should be noted that this only checks the presence of the local file, it makes no attempts to verify that it actually has the correct content and it has no way to do any such checks.
curl offers other options to do conditional transfers based on modified date or contents for HTTP transfers.
Connections
Most of the URLs you use with curl have a hostname and involve communication over IP. curl must first figure out the IP address(es) of the host you want to communicate with, then connect to it. "Connecting to it" means performing a protocol handshake.
For ordinary command line usage, operating on a URL, these are details which are taken care of under the hood, and which you can mostly ignore. But at times you might find yourself wanting to tweak the specifics…
- Setup
- Name resolve tricks
- Connection timeout
- Happy Eyeballs
- Network interface
- Local port number
- Keep alive
Setup
There are several options that let the user control different aspects of how connections are setup.
VLAN
With the --vlan-priority command line option you set a priority value
between 0 and 7 that is set in the Ethernet header. It is thus limited to your
local network only and are not used across any routers.
VLAN priority as defined in IEEE 802.1Q.
Example:
curl --vlan-priority 4 https://example.com
Type of Service
The IPv4 protocol header has a "Type of Service (TOS)" field. It is called
"Traffic Class" in IPv6. A user can set the value using the --ip-tos option
to either a numerical value between zero and 255, or by using one of the
recognized names:
CS0, CS1, CS2, CS3, CS4, CS5, CS6, CS7, AF11, AF12, AF13,
AF21, AF22, AF23, AF31, AF32, AF33, AF41, AF42, AF43, EF,
VOICE-ADMIT, ECT1, ECT0, CE, LE, LOWCOST, LOWDELAY,
THROUGHPUT, RELIABILITY, MINCOST
Example:
curl --ip-tos CS5 https://example.com
Multipath TCP
Multipath TCP is a way for a TCP connection to use multiple concurrent network paths to maximize throughput and increase redundancy, compared to the normal single path that ordinary TCP uses.
You can ask curl to use Multipath TCP with the --mptcp option. It only works
on Linux and it requires Linux 5.6 or later. It has no effect on QUIC or UDP
connections.
The server curl connects to must also support MPTCP. If not, the connection seamlessly falls back to "normal" TCP.
Example:
curl --mptcp https://example.com
Name resolve tricks
curl offers many ways to make it use another host than the one it normally would connect to.
Edit the hosts file
Maybe you want the command curl http://example.com to connect to your local
server instead of the actual server.
You can normally and easily do that by editing your hosts file (/etc/hosts
on Linux and Unix-like systems) and adding, for example, 127.0.0.1 example.com to
redirect the host to your localhost. However this edit requires admin access and
it has the downside that it affects all other applications at the same time.
Change the Host: header
The Host: header is the normal way an HTTP client tells the HTTP server which
server it speaks to, as typically an HTTP server serves many different names
using the same software instance.
Thus, by passing in a custom modified Host: header you can have the server
respond with the contents of the site even when you did not actually connect
to that hostname.
For example, you run a test instance of your main site www.example.com on
your local machine and you want to have curl ask for the index html:
curl -H "Host: www.example.com" http://localhost/
When setting a custom Host: header and using cookies, curl extracts the
custom name and uses that as host when matching cookies to send off.
The Host: header is not enough when communicating with an HTTPS server. With
HTTPS there is a separate extension field in the TLS protocol called SNI
(Server Name Indication) that lets the client tell the server the name of the
server it wants to talk to. curl only extracts the SNI name to send from the
given URL.
Provide a custom IP address for a name
Do you know better than the name resolver where curl should go? Then you can
give an IP address to curl yourself. If you want to redirect port 80 access
for example.com to instead reach your localhost:
curl --resolve example.com:80:127.0.0.1 http://example.com/
You can even specify multiple --resolve switches to provide multiple
redirects of this sort, which can be handy if the URL you work with uses HTTP
redirects or if you want to have your command line work with multiple URLs.
--resolve inserts the address into curl's DNS cache, so it effectively makes
curl believe that is the address it got when it resolved the name.
When talking HTTPS, this sends SNI for the name in the URL and curl verifies the server's response to make sure it serves for the name in the URL.
The pattern you specify in the option needs to be a hostname and its corresponding port number and only if that exact pair is used in the URL is the address substituted. For example, if you want to replace a hostname in an HTTPS URL on its default port number, you need to tell curl it is for port 443, like:
curl --resolve example.com:443:192.168.0.1 https://example.com/
Provide a replacement name
As a close relative to the --resolve option, the --connect-to option
provides a minor variation. It allows you to specify a replacement name and
port number for curl to use under the hood when a specific name and port
number is used to connect.
For example, suppose you have a single site called www.example.com that in
turn is actually served by three different individual HTTP servers: load1,
load2 and load3, for load balancing purposes. In a typical normal procedure,
curl resolves the main site and gets to speak to one of the load balanced
servers (as it gets a list back and picks one of them) and all is well. If you
want to send a test request to one specific server out of the load balanced
set (load1.example.com for example) you can instruct curl to do that.
You can still use --resolve to accomplish this if you know the specific IP
address of load1. Without having to first resolve and fix the IP address
separately, you can tell curl:
curl --connect-to www.example.com:80:load1.example.com:80 \
  http://www.example.com
It redirects from a SOURCE NAME + SOURCE PORT to a DESTINATION NAME +
DESTINATION PORT. curl then resolves the load1.example.com name and
connects, but in all other ways still assumes it is talking to
www.example.com.
Name resolve tricks with c-ares
As should be detailed elsewhere in this book, curl may be built with several different name resolving backends. One of those backends is powered by the c-ares library and when curl is built to use c-ares, it gets a few extra superpowers that curl built to use other name resolve backends do not get. Namely, it gains the ability to more specifically instruct what DNS servers to use and how that DNS traffic is using the network.
With --dns-servers, you can specify exactly which DNS server curl should use
instead of the default one. This lets you run your own experimental server that
answers differently, or use a backup one if your regular one is unreliable or dead.
With --dns-ipv4-addr and --dns-ipv6-addr you ask curl to "bind" its local
end of the DNS communication to a specific IP address and with
--dns-interface you can instruct curl to use a specific network interface to
use for its DNS requests.
These --dns-* options are advanced and are only meant for people who know
what they are doing and understand what these options do. They offer
customizable DNS name resolution operations.
Connection timeout
curl typically makes a TCP connection to the host as an initial part of its network transfer. This TCP connection can fail or be slow, if there are shaky network conditions or faulty remote servers.
To reduce the impact on your scripts or other use, you can set the maximum
time in seconds which curl allows for the connection attempt. With
--connect-timeout you tell curl the maximum time to allow for connecting,
and if curl has not connected in that time it returns a failure.
The connection timeout only limits the time curl is allowed to spend up until the moment it connects, so once the TCP connection has been established it can take a longer time. See the Timeouts section for more on generic curl timeouts.
If you specify a low timeout, you effectively disable curl's ability to connect to remote servers, slow servers or servers you access over unreliable networks.
The connection timeout can be specified as a decimal value for sub-second precision. For example, to allow 2781 milliseconds to connect:
curl --connect-timeout 2.781 https://example.com/
Happy Eyeballs
When curl is about to connect to a given host, it has a list of addresses to try. The address list is separated into two lists: one list with IPv4 addresses and one list with IPv6 addresses.
curl starts by initiating a connect attempt to the first address in the IPv6 list. If the connect attempt fails, it moves on to the next address in the list iterating through them all one by one until one works.
If, after two hundred milliseconds curl still tries to connect to IPv6, it starts a second series of attempts over IPv4 in parallel. In the same style it iterates over the list of IPv4 addresses on connect errors. A connection race if you will.
The first connect that works wins, and all the other attempts are then discarded.
HTTP/3 racing
When asked to attempt HTTP/3 (with --http3), curl ups the connection racing
game one level.
curl first starts the Happy Eyeballs connect attempt for QUIC as described above. First it tries IPv6 QUIC and then IPv4 QUIC after a timeout. If there is no successful QUIC connection within the first two hundred milliseconds (or no UDP package received at all within half the timeout window, one hundred milliseconds by default), curl starts a second Happy Eyeballs scenario for TCP - first IPv6 TCP and then IPv4 TCP after the timeout.
The first connect attempt that succeeds out of the up to four parallel ones that are running, wins. The "losers" are then discarded.
Tweak
The two hundred milliseconds may delay your connects longer than you might want. For example when TCP packets over IPv6 are never getting any response on a certain network path or server.
Or vice versa, you may need to communicate to a server with high latency, in which case the default timeout would strike too early.
For moments and scenarios like these, curl provides the
--happy-eyeballs-timeout-ms command line option. It changes the default two
hundred milliseconds to whatever you specify. Setting it to zero makes curl
start the connection attempts at exactly the same time.
Network interface
On machines with multiple network interfaces that are connected to multiple networks, there are situations where you can decide which network interface you would prefer the outgoing network traffic to use. Or which originating IP address (out of the multiple ones you have) to use in the communication.
Tell curl which network interface, which IP address or even hostname that you
would like to "bind" your local end of the communication to, with the
--interface option:
curl --interface eth1 https://www.example.com/

curl --interface 192.168.0.2 https://www.example.com/

curl --interface machine2 https://www.example.com/
We discourage use of a hostname in there, because how that forces curl to do a name resolve to figure out an IP address. If you cannot specify an interface name, consider using a fixed IP address.
In addition, you can ask to explicitly use an IP address or interface name to
prevent curl from having to guess. Do this by prefix the string with if! for
interface name or host! for an IP address. Like this:
curl --interface "host!192.168.0.2" https://www.example.com/

curl --interface "if!eth1" https://www.example.com/
You can even specify a specific IP and on a specific interface by providing both like this:
curl --interface "if!eith1!192.168.0.2" https://www.example.com/
Local port number
A TCP connection is created between an IP address and a port number in the local end and an IP address and a port number in the remote end. The remote port number can be specified in the URL and usually helps identify which service you are targeting.
The local port number is usually randomly assigned to your TCP connection by the network stack and you normally do not have to think about it much further. However, in some circumstances you find yourself behind network equipment, firewalls or similar setups that put restrictions on what source port numbers that can be allowed to set up the outgoing connections.
For situations like this, you can specify which local ports curl should bind the connection to. You can specify a single port number to use, or a range of ports. We recommend using a range because ports are scarce resources and the exact one you want may already be in use. If you ask for a local port number (or range) that curl cannot obtain for you, it exits with a failure.
Also, on most operating systems you cannot bind to port numbers below 1024 without having a higher privilege level (root) and we generally advise against running curl as root if you can avoid it.
Ask curl to use a local port number between 4000 and 4200 when getting this HTTPS page:
curl --local-port 4000-4200 https://example.com/
Keep alive
TCP connections can be totally without traffic in either direction when they are not used. A totally idle connection can therefore not be clearly separated from a connection that has gone completely stale because of network or server issues.
At the same time, lots of network equipment such as firewalls or NATs are keeping track of TCP connections these days, so that they can translate addresses, block "wrong" incoming packets, etc. These devices often count completely idle connections as dead after N minutes, where N varies between device to device but at times is as short as 10 minutes or even less.
One way to help avoid a really slow connection (or an idle one) getting treated as dead and wrongly killed, is to make sure TCP keep alive is used. TCP keepalive is a feature in the TCP protocol that makes it send "ping frames" back and forth when it would otherwise be totally idle. It helps idle connections to detect breakage even when no traffic is moving over it, and helps intermediate systems not consider the connection dead.
curl uses TCP keepalive by default for the reasons mentioned here. There might be times when you want to disable keepalive or you may want to change the interval between the TCP "pings" (curl defaults to 60 seconds). You can switch off keepalive with:
curl --no-keepalive https://example.com/
or change the interval to 5 minutes (300 seconds) with:
curl --keepalive-time 300 https://example.com/
Starting in curl 8.9.0 you can set the number of keepalive probes curl sends
but not getting a response to before it gives up, with --keepalive-cnt. Like
this:
curl --keepalive-cnt 3 https://example.com
Timeouts
Network operations are by their nature rather unreliable or perhaps fragile operations as they depend on a set of services and networks to be up and working for things to work. The availability of these services can come and go and the performance of them may also vary greatly from time to time.
The design of TCP even allows the network to get completely disconnected for an extended period of time without it necessarily getting noticed by the participants in the transfer.
The result of this is that sometimes Internet transfers take a long time. Further, most operations in curl have no time-out by default.
Maximum time allowed to spend
Tell curl with -m / --max-time the maximum time, in seconds, that you allow
the command line to spend before curl exits with a timeout error code
(28). When the set time has elapsed, curl exits no matter what is going on at
that moment—including if it is transferring data. It really is the maximum
time allowed.
The given maximum time can be specified with a decimal precision; 0.5 means
500 milliseconds and 2.37 equals 2370 milliseconds.
Example:
curl --max-time 5.5 https://example.com/
(Your locale may use another symbol than a dot for expressing numerical fractions.)
Never spend more than this to connect
--connect-timeout limits the time curl spends trying to connect to the
host. All the necessary steps done before the connection is considered
complete have to be completed within the given time frame. Failing to connect
within the given time causes curl to exit with a timeout exit code (28).
The steps done before a connect is considered successful include DNS lookup and subsequent TCP, TLS or QUIC handshakes.
The given maximum connect time can be specified with a decimal precision;
0.5 means 500 milliseconds and 2.37 equals 2370 milliseconds:
curl --connect-timeout 2.37 https://example.com/
.netrc
Unix systems have for a long time offered a way for users to store their user
name and password for remote FTP servers. ftp clients have supported this for
decades and this way allowed users to quickly login to known servers without
manually having to reenter the credentials each time. The .netrc file is
typically stored in a user's home directory. (On Windows, two filenames in the
home directory are checked: .netrc and _netrc, preferring the former.
Older versions on Windows checked for _netrc only.)
This being a widespread and well used concept, curl also supports it—if you ask it to. curl does not, however, limit this feature to FTP, but can get credentials for machines for any protocol with this. See further below for how.
The .netrc file format
The .netrc file format is simple: you specify lines with a machine name and follow that with the login and password that are associated with that machine.
Each field is provided as a sequence of letters that ends with a space or
newline. Since 7.84.0, curl also supports quoted strings. They start and end
with double quotes (") and support the escaped special letters \", \n,
\r, and \t. Quoted strings are the only way a space character can be used
in a username or password.
machine name
Identifies a remote machine name. curl searches the .netrc file for a machine token that matches the remote machine specified in the URL. Once a match is made, the subsequent .netrc tokens are processed, stopping when the end of file is reached or another machine is encountered.
default
This is the same as machine name except that default matches any name. There can be only one default token, and it must be after all machine tokens. To provide a default anonymous login for hosts that are not otherwise matched, add a line similar to this in the end:
default login anonymous password user@domain
login name
The username string for the remote machine. You cannot use a space in an unquoted name but spaces are supported when using a name as a quoted string.
password string
Supply a password. If this token is present, curl supplies the specified string if the remote server requires a password as part of the login process. Note that if this token is present in the .netrc file you really should make sure the file is not readable by anyone besides the user. You cannot use a space in an unquoted password; use a quoted string to include spaces.
macdef name
Define a macro. This is not supported by curl. In order for the rest of
the .netrc to still work fine, curl properly skips every definition done
with macdef that it finds.
An example .netrc for the host example.com with a user named 'daniel', using the password 'qwerty' would look like:
machine example.com
login daniel
password qwerty
It can also be written on a single line with the same functionality:
machine example.com login daniel password qwerty
Username matching
When a URL is provided with a username and .netrc is used, then curl tries to find the matching password for that machine and login combination.
Enable netrc
-n, --netrc tells curl to look for and use the .netrc file.
If the NETRC environment variable is set, that filename is used as the netrc file.
--netrc-file [file] is similar to --netrc, except that you also provide
the path to the actual file to use. This is useful when you want to provide
the information in another directory or with another filename.
--netrc-optional is similar to --netrc, but this option makes the .netrc usage optional and not mandatory as the --netrc option.
Proxies
A proxy is a machine or software that does something on behalf of you, the client.
You can also see it as a middle man that sits between you and the server you want to work with, a middle man that you connect to instead of the actual remote server. You ask the proxy to perform your desired operation for you and then it runs off and do that and then it returns the data to you.
There are several different types of proxies and we shall list and discuss them in subsections below.
- Discover your proxy
- PAC
- Captive portals
- Proxy type
- HTTP proxy
- SOCKS proxy
- MITM proxy
- Authentication
- HTTPS proxy
- Proxy environment variables
- Proxy headers
- haproxy
Discover your proxy
Some networks are setup to require a proxy in order for you to reach the Internet or perhaps that special network you are interested in. The use of proxies are introduced on your network by the people and management that run your network for policy or technical reasons.
In the networking space there are a few methods for the automatic detection of proxies and how to connect to them, but none of those methods are truly universal and curl supports none of them. Furthermore, when you communicate to the outside world through a proxy that often means that you have to put a lot of trust on the proxy as it is able to see and modify all the non-secure network traffic you send or get through it. That trust is not easy to assume automatically.
If you check your browser's network settings, sometimes under an advanced settings tab, you can learn what proxy or proxies your browser is configured to use. Chances are big that you should use the same one or ones when you use curl.
As an example, you can find proxy settings for Firefox browser in Preferences => General => Network Settings as shown below:
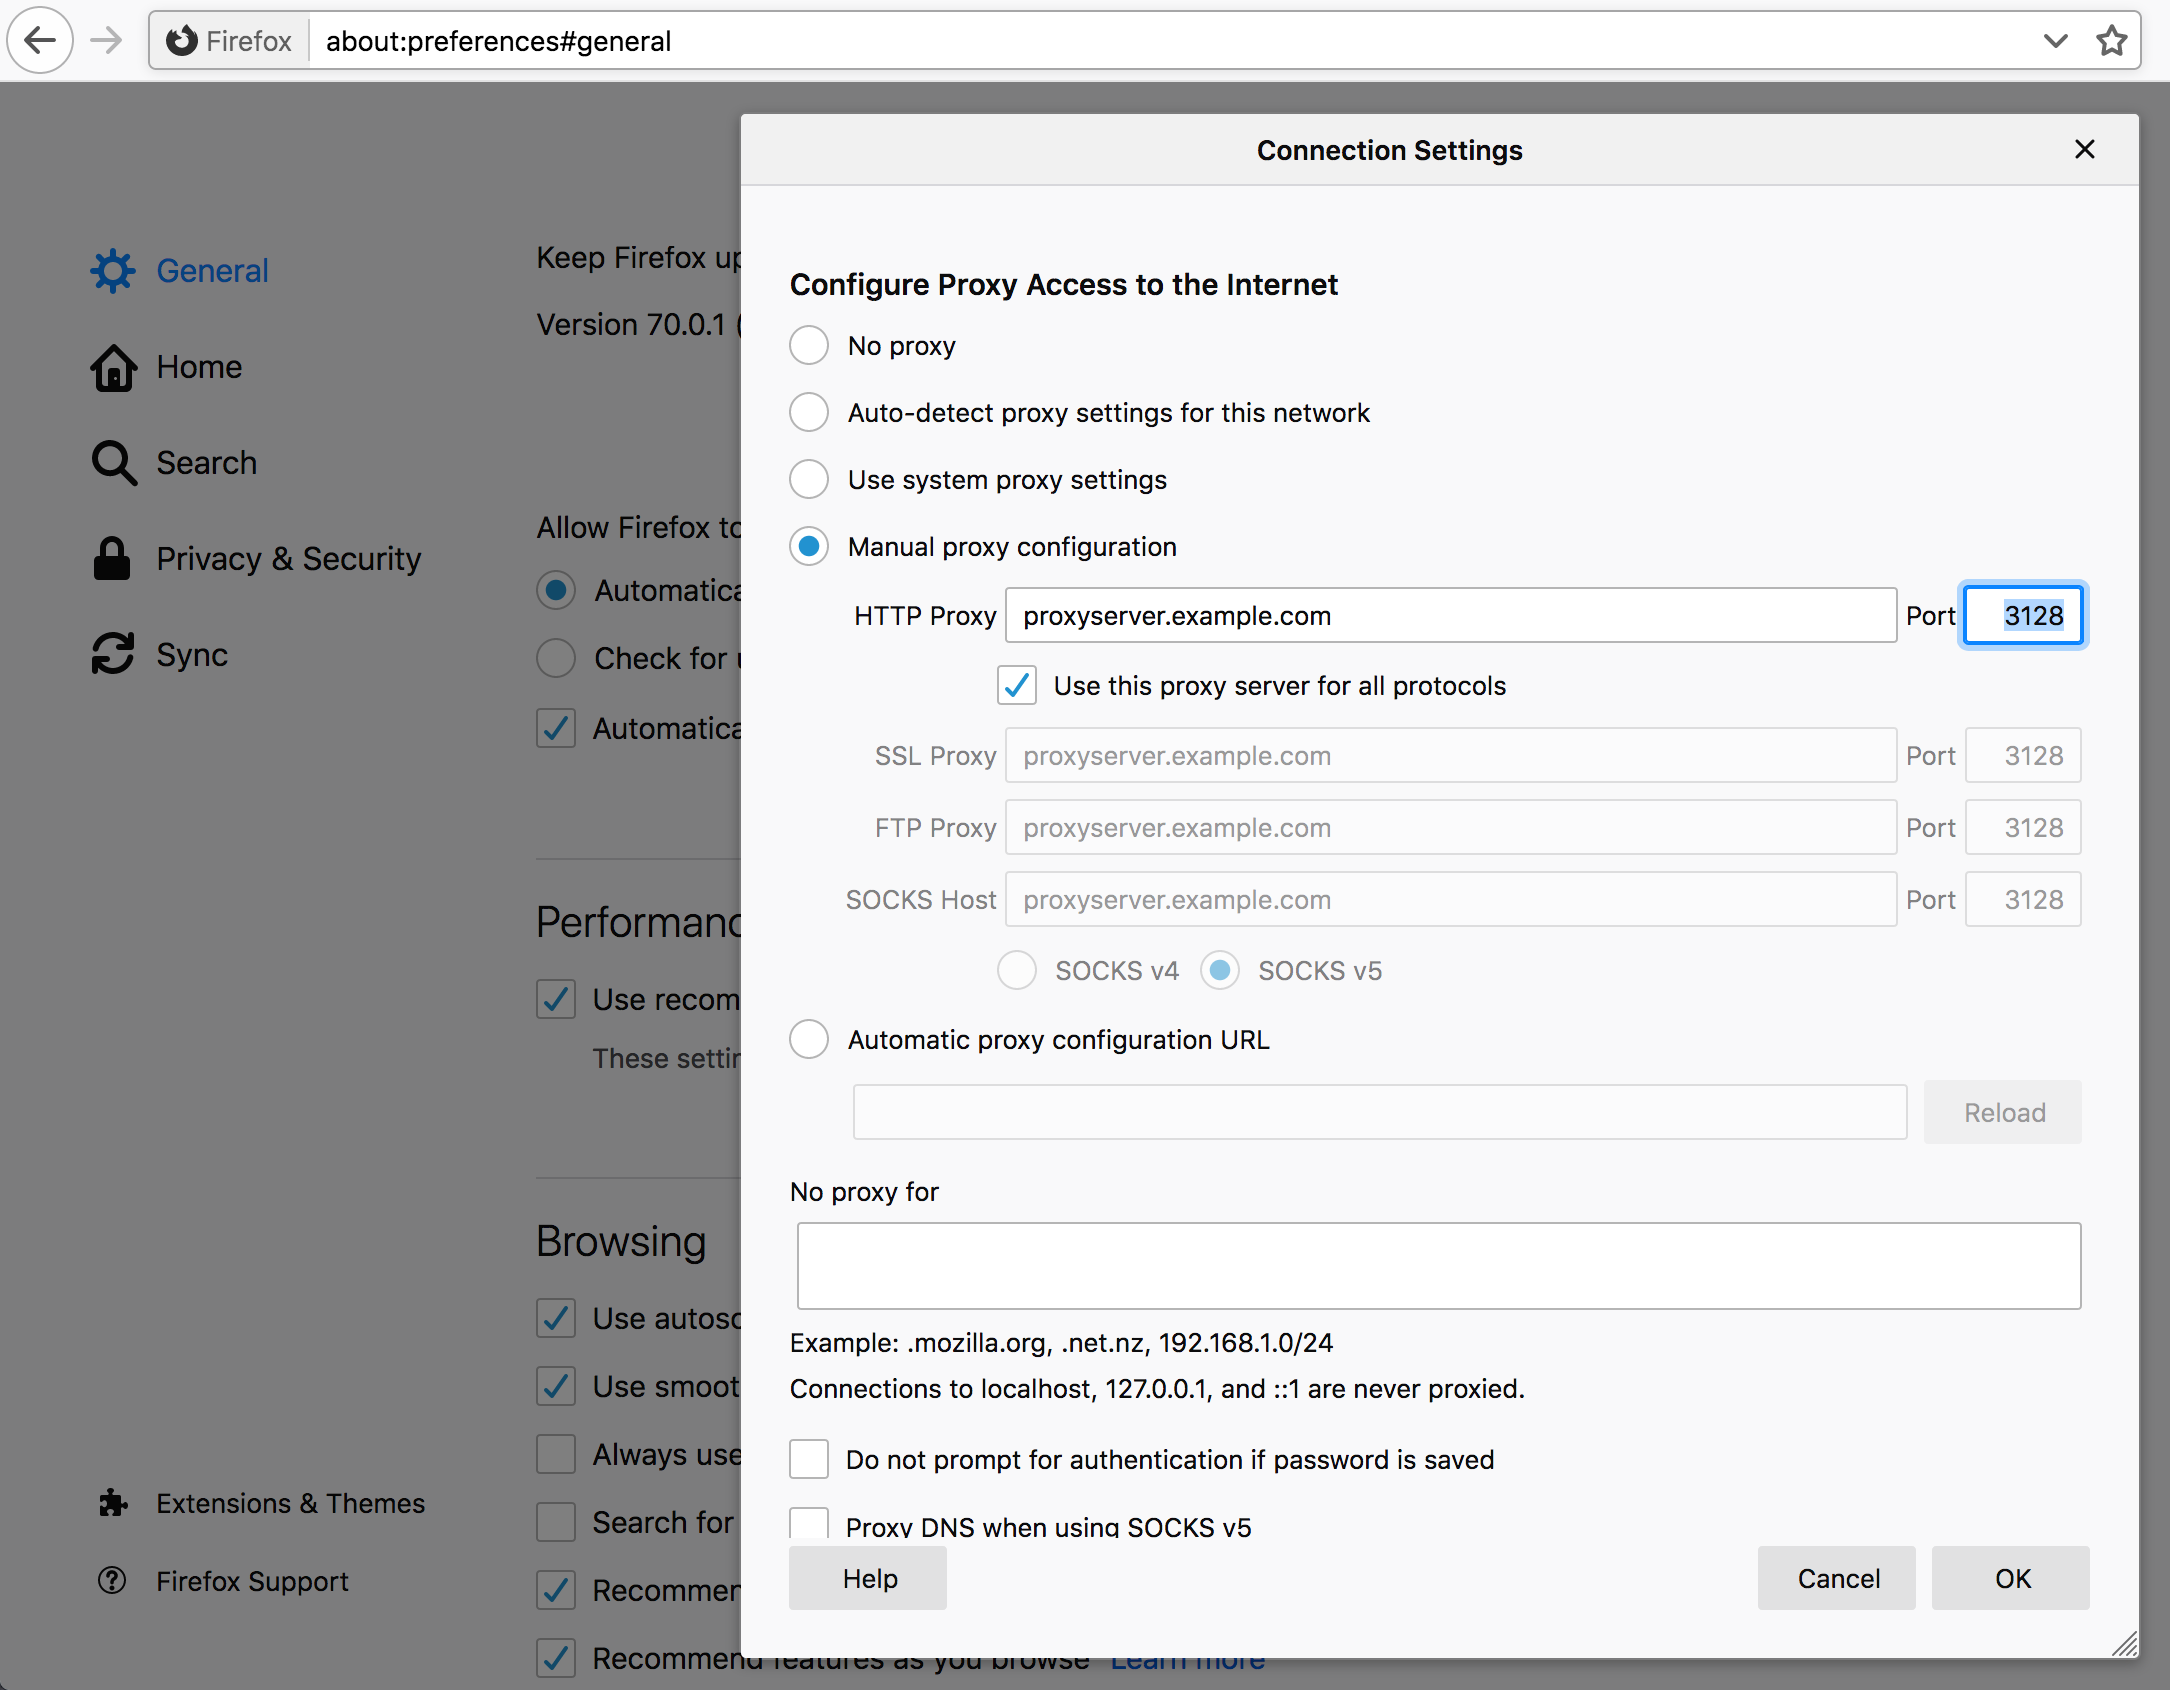
PAC
Some network environments provides several different proxies that should be used in different situations, and a customizable way to handle that is supported by the browsers. This is called "proxy auto-config", or PAC.
A PAC file contains a JavaScript function that decides which proxy a given network connection (URL) should use, and even if it should not use a proxy at all. Browsers most typically read the PAC file off a URL on the local network.
Since curl has no JavaScript capabilities, curl does not support PAC files. If your browser and network use PAC files, the easiest route forward is usually to read the PAC file manually and figure out the proxy you need to specify to run curl successfully.
Captive portals
These are not proxies but they are blocking the way between you and the server you want to access.
A captive portal is one of these systems that are popular to use in hotels, airports and for other sorts of network access to a larger audience. The portal captures all network traffic and redirects you to a login webpage until you have either clicked OK and verified that you have read their conditions or perhaps even made sure that you have paid plenty of money for the right to use the network.
curl's traffic is of course also captured by such portals and often the best way is to use a browser to accept the conditions and get rid of the portal since from then on they often allow all other traffic originating from that same machine (MAC address) for a period of time.
Most often you can use curl too to submit that affirmation, if you figure out how to submit the form and what fields to include in it. If this is something you end up doing many times, it may be worth exploring.
Proxy type
curl supports several different types of proxies.
The default proxy type is HTTP so if you specify a proxy hostname (or IP
address) without a scheme part (the part that is often written as http://)
curl goes with assuming it is an HTTP proxy.
curl provides a number of options to set the proxy type instead of using the scheme prefix. See the SOCKS section.
HTTP proxy
An HTTP proxy is a proxy that the client speaks HTTP with to get the transfer
done. curl does by default, assume that a host you point out with -x or
--proxy is an HTTP proxy, and unless you also specify a port number it
defaults to port 1080 (and the reason for that particular port number is
purely historical).
If you want to request the example.com webpage using a proxy on 192.168.0.1 port 8080, a command line could look like:
curl -x 192.168.0.1:8080 http://example.com/
Recall that the proxy receives your request, forwards it to the real server, then reads the response from the server and then hands that back to the client.
If you enable verbose mode with -v when talking to a proxy, it shows that
curl connects to the proxy instead of the remote server, and might see that it
uses a slightly different request line.
HTTPS with HTTP proxy
HTTPS was designed to allow and provide secure and safe end-to-end privacy
from the client to the server (and back). In order to provide that when
speaking to an HTTP proxy, the HTTP protocol has a special request that curl
uses to setup a tunnel through the proxy that it then can encrypt and
verify. This HTTP method is known as CONNECT.
When the proxy tunnels encrypted data through to the remote server after a CONNECT method sets it up, the proxy cannot see nor modify the traffic without breaking the encryption:
curl -x proxy.example.com:80 https://example.com/
Non-HTTP protocols over an HTTP proxy
An HTTP proxy means the proxy itself speaks HTTP. HTTP proxies are primarily used to proxy HTTP but it is also fairly common that they support other protocols as well. In particular, FTP is fairly commonly supported.
When talking FTP over an HTTP proxy, it is usually done by more or less pretending the other protocol works like HTTP and asking the proxy to get this URL even if the URL is not using HTTP. This distinction is important because it means that when sent over an HTTP proxy like this, curl does not really speak FTP even though given an FTP URL; thus FTP-specific features do not work:
curl -x http://proxy.example.com:80 ftp://ftp.example.com/file.txt
What you can do instead then, is to tunnel through the HTTP proxy.
HTTP proxy tunneling
Most HTTP proxies allow clients to tunnel through it to a server on the other side. That is exactly what's done every time you use HTTPS through the HTTP proxy.
You tunnel through an HTTP proxy with curl using -p or --proxytunnel.
When you do HTTPS through a proxy you normally connect through to the default HTTPS remote TCP port number 443. Most HTTP proxies white list and allow connections only to hosts on that port number and perhaps a few others. Most proxies deny clients from connecting to any random port (for reasons only the proxy administrators know).
Still, assuming that the HTTP proxy allows it, you can ask it to tunnel through to a remote server on any port number so you can do other protocols normally even when tunneling. You can do FTP tunneling like this:
curl -p -x http://proxy.example.com:80 ftp://ftp.example.com/file.txt
You can tell curl to use HTTP/1.0 in its CONNECT request issued to the HTTP
proxy by using --proxy1.0 [proxy] instead of -x.
SOCKS proxy
SOCKS is a protocol used for proxies and curl supports it. curl supports both SOCKS version 4 as well as version 5, and both versions come in two flavors.
You can select the specific SOCKS version to use by using the correct scheme
part for the given proxy host with -x, or you can specify it with a separate
option instead of -x.
SOCKS4 is for the version 4 but curl resolves the name:
curl -x socks4://proxy.example.com http://www.example.com/

curl --socks4 proxy.example.com http://www.example.com/
SOCKS4a is for the version 4 with resolving done by the proxy:
curl -x socks4a://proxy.example.com http://www.example.com/

curl --socks4a proxy.example.com http://www.example.com/
SOCKS5 is for the version 5 and SOCKS5-hostname is for the version 5 without resolving the hostname locally:
curl -x socks5://proxy.example.com http://www.example.com/

curl --socks5 proxy.example.com http://www.example.com/
The SOCKS5-hostname versions. This sends the hostname to the proxy so there is no name resolving done by curl locally:
curl -x socks5h://proxy.example.com http://www.example.com/

curl --socks5-hostname proxy.example.com http://www.example.com/
Helpful table to figure how which side that resolves the name for which socks version:
| SOCKS | who resolves the name | works with IPv6 |
|---|---|---|
| 4 | curl | no |
| 4a | proxy | no |
| 5 | curl | yes |
| 5h | proxy | yes |
MITM proxy
MITM means Man-In-The-Middle. MITM proxies are usually deployed by companies in "enterprise environments" and elsewhere, where the owners of the network have a desire to investigate even TLS encrypted traffic.
To do this, they require users to install a custom "trust root" (Certificate Authority (CA) certificate) in the client, and then the proxy terminates all TLS traffic from the client, impersonates the remote server and acts like a proxy. The proxy then sends back a generated certificate signed by the custom CA. Such proxy setups usually transparently capture all traffic from clients to TCP port 443 on a remote machine. Running curl in such a network would also get its HTTPS traffic captured.
This practice, of course, allows the middle man to decrypt and snoop on all TLS traffic.
Proxy authentication
HTTP and SOCKS proxies can require authentication, so curl then needs to provide the proper credentials to the proxy to be allowed to use it. Failing to do so (or providing the wrong credentials) makes the proxy return HTTP responses using code 407.
Authentication for proxies is similar to "normal" HTTP authentication. It is separate from the server authentication to allow clients to independently use both normal host authentication as well as proxy authentication.
With curl, you set the username and password for the proxy authentication with
the -U user:password or --proxy-user user:password option:
curl -U daniel:secr3t -x myproxy:80 http://example.com
This example defaults to using the Basic authentication scheme. Some proxies
requires other authentication schemes (and the headers that are returned when
you get a 407 response tells you which) and then you can ask for a specific
method with --proxy-digest, --proxy-negotiate, --proxy-ntlm. The above
example command again, but asking for NTLM auth with the proxy:
curl -U daniel:secr3t -x myproxy:80 http://example.com --proxy-ntlm
There is also the option that asks curl to figure out which method the proxy
wants and supports and then go with that (with the possible expense of extra
round-trips) using --proxy-anyauth. Asking curl to use any method the proxy
wants is then like this:
curl -U daniel:secr3t -x myproxy:80 http://example.com --proxy-anyauth
HTTPS proxy
All the other mentioned protocols to speak with the proxy are clear text protocols, HTTP and the SOCKS versions. Using those methods could allow someone to eavesdrop on your traffic the local network where you or the proxy reside. Because over the connection between curl and the proxy, the data is sent in the clear.
One solution for that is to use an HTTPS proxy, speaking HTTPS to the proxy, which then establishes a secure and encrypted connection that is safe from easy surveillance.
When an HTTPS proxy is specified, the default port used on that host is 443.
In most other ways, HTTPS proxies work like HTTP proxies.
HTTP/2
When curl speaks with an HTTPS proxy, you have the option to use
--proxy-http2 to a ask curl to try using HTTP/2 with the proxy.
By default, curl speaks HTTP/1.1 with HTTPS proxies, but if this option is used curl attempts to negotiate and use HTTP/2 instead.
Proxy environment variables
curl checks for the existence of specially named environment variables before it runs to see if a proxy is requested to get used.
You specify the proxy by setting a variable named [scheme]_proxy to hold the
proxy hostname (the same way you would specify the host with -x). If you
want to tell curl to use a proxy when access an HTTP server, you set the
http_proxy environment variable. Like this:
http_proxy=http://proxy.example.com:80
curl -v www.example.com
While the above example shows HTTP, you can, of course, also set ftp_proxy,
https_proxy, and so on. All these proxy environment variable names except
http_proxy can also be specified in uppercase, like HTTPS_PROXY.
To set a single variable that controls all protocols, the ALL_PROXY
exists. If a specific protocol variable one exists, such a one takes
precedence.
No proxy
You sometimes end up in a situation where one or a few hostnames should be
excluded from going through the proxy that normally would be used. This is
then done with the NO_PROXY variable. Set that to a comma- separated list of
hostnames that should not use a proxy when being accessed. You can set
NO_PROXY to be a single asterisk ('*') to match all hosts.
If a name in the exclusion list starts with a dot (.), then the name matches
that entire domain. For example .example.com matches both www.example.com
and home.example.com but not nonexample.com.
As an alternative to the NO_PROXY variable, there is also a --noproxy
command line option that serves the same purpose and works the same way.
Since curl 7.86.0, a user can exclude an IP network using the CIDR notation:
append a slash and number of bits to an IP address to specify the bit size of
the network to match. For example, match the entire 16-bit network starting
with 192.168 by providing the pattern 192.168.0.0/16.
http_proxy in lower case only
The HTTP version of the proxy environment variables is treated differently
than the others. It is only accepted in its lower case version because of the
CGI protocol, which lets users run scripts in a server when invoked by an HTTP
server. When a CGI script is invoked by a server, it automatically creates
environment variables for the script based on the incoming headers in the
request. Those environment variables are prefixed with uppercase HTTP_.
An incoming request to an HTTP server using a request header like Proxy: yada therefore creates the environment variable HTTP_PROXY set to contain
yada before the CGI script is started. If such a CGI script runs curl, it is
important that curl does not treat that as a proxy to use.
Accepting the upper case version of this environment variable has been the source for many security problems in lots of software through times.
Proxy headers
When you want to add HTTP headers meant specifically for an HTTP or HTTPS
proxy, and not for the remote server, the --header option falls short.
For example, if you issue an HTTPS request through an HTTP proxy, it is done
by first issuing a CONNECT to the proxy that establishes a tunnel to the
remote server and then it sends the request to that server. That first
CONNECT is only issued to the proxy and you may want to make sure only that
receives your special header, and send another set of custom headers to the
remote server.
Set a specific different User-Agent: only to the proxy:
curl --proxy-header "User-Agent: magic/3000" -x proxy https://example.com/
haproxy
The haproxy protocol, while still having proxy in its name, is different than other proxy options and does not work with proxies in the same way the other proxy options do.
This is a way for a client to pass its IP address to the server in spite of how the traffic reaches it: tunnels, TCP proxies, load balancers, transparent proxies and what not. Services that somehow change what source IP address that is being used when the traffic ends up in the server, making it impossible for the server to figure out the IP address of the client by itself.
The haproxy protocol is simple. It needs to be supported by the server, meaning a user cannot decide to use it with an unwilling or uncooperative server. If it does support it, you can tell curl to use it to pass on its own IP address to the server.
curl and haproxy
curl only supports the haproxy protocol v1.
To pass on the actual IP address of the connection that is being used right now, add the boolean flag like this:
curl --haproxy-protocol https://example.com/
If such a command line for some reason does not provide the IP address you think it should pass on, you can specify the exact address yourself, using either an IPv4 or an IPv6 numerical address:
curl --haproxy-clientip 10.0.0.1 https://example.com/
curl --haproxy-clientip fe80::fea3:8a22 https://example.com/
TLS
TLS stands for Transport Layer Security and is the name for the technology that was formerly called SSL. The term SSL has not really died though so these days both the terms TLS and SSL are often used interchangeably to describe the same thing.
TLS is a cryptographic security layer "on top" of TCP that makes the data tamper proof and guarantees server authenticity, based on strong public key cryptography and digital signatures.
- Ciphers
- Enable TLS
- TLS versions
- Verifying server certificates
- Certificate pinning
- OCSP stapling
- Client certificates
- TLS auth
- TLS backends
- SSLKEYLOGFILE
- ECH
- Built-in certificate store
- TLS sessions and early data
- Post-quantum
Ciphers
When curl connects to a TLS server, it negotiates how to speak the protocol and that negotiation involves several parameters and variables that both parties need to agree to. One of the parameters is which cryptography algorithms to use, the so called cipher. Over time, security researchers figure out flaws and weaknesses in existing ciphers and they are gradually phased out over time.
Using the verbose option, -v, you can get information about which cipher and
TLS version are negotiated. By using the --ciphers option, you can change
what cipher to prefer in the negotiation, but mind you, this is a power
feature that takes knowledge to know how to use in ways that do not make
things worse.
Enable TLS
curl supports the TLS version of many protocols. HTTP has HTTPS, FTP has FTPS, LDAP has LDAPS, POP3 has POP3S, IMAP has IMAPS and SMTP has SMTPS.
If the server side supports it, you can use the TLS version of these protocols with curl.
There are two general approaches to do TLS with protocols. One of them is to speak TLS already from the first connection handshake while the other is to upgrade the connection from plain-text to TLS using protocol specific instructions.
With curl, if you explicitly specify the TLS version of the protocol (the one
that has a name that ends with an 'S' character) in the URL, curl tries to
connect with TLS from start, while if you specify the non-TLS version in the
URL you can usually upgrade the connection to TLS-based with the --ssl
option.
The support table looks like this:
| Clear | TLS version | --ssl |
|---|---|---|
| HTTP | HTTPS | no |
| LDAP | LDAPS | no |
| FTP | FTPS | yes |
| POP3 | POP3S | yes |
| IMAP | IMAPS | yes |
| SMTP | SMTPS | yes |
The protocols that can do --ssl all favor that method. Using --ssl means
that curl attempts to upgrade the connection to TLS but if that fails, it
still continues with the transfer using the plain-text version of the
protocol. To make the --ssl option require TLS to continue, there is
instead the --ssl-reqd option which makes the transfer fail if curl cannot
successfully negotiate TLS.
Require TLS security for your FTP transfer:
curl --ssl-reqd ftp://ftp.example.com/file.txt
Suggest TLS to be used for your FTP transfer:
curl --ssl ftp://ftp.example.com/file.txt
Connecting directly with TLS (to HTTPS://, LDAPS://, FTPS:// etc) means that
TLS is mandatory and curl returns an error if TLS is not negotiated.
Get a file over HTTPS:
curl https://www.example.com/
TLS versions
SSL was invented in the mid 90s and has developed ever since. SSL version 2 was the first widespread version used on the Internet but that was deemed insecure already a long time ago. SSL version 3 took over from there, and it too has been deemed not safe enough for use.
TLS version 1.0 was the first standard. RFC 2246 was published 1999. TLS 1.1 came out in 2006, further improving security, followed by TLS 1.2 in 2008. TLS 1.2 came to be the gold standard for TLS for a decade.
TLS 1.3 (RFC 8446) was finalized and published as a standard by the IETF in August 2018. This is the most secure and fastest TLS version as of date. It is however so new that a lot of software, tools and libraries do not yet support it.
curl is designed to use a secure version of SSL/TLS by default. It means that it does not negotiate SSLv2 or SSLv3 unless specifically told to, and in fact several TLS libraries no longer provide support for those protocols so in many cases curl is not even able to speak those protocol versions unless you make a serious effort.
| Option | Use |
|---|---|
| --sslv2 | SSL version 2 |
| --sslv3 | SSL version 3 |
| --tlsv1 | TLS >= version 1.0 |
| --tlsv1.0 | TLS >= version 1.0 |
| --tlsv1.1 | TLS >= version 1.1 |
| --tlsv1.2 | TLS >= version 1.2 |
| --tlsv1.3 | TLS >= version 1.3 |
Verifying server certificates
Having a secure connection to a server is not worth a lot if you cannot also be certain that you are communicating with the correct host. If we do not know that, we could be talking with an impostor that appears to be who we think it is.
To check that it communicates with the right TLS server, curl uses a CA store - a set of certificates to verify the signature of the server's certificate. All servers provide a certificate to the client as part of the TLS handshake and all public TLS-using servers have acquired that certificate from an established Certificate Authority.
After some applied crypto magic, curl knows that the server is in fact the correct one that acquired that certificate for the hostname that curl used to connect to it. Failing to verify the server's certificate is a TLS handshake failure and curl exits with an error.
In rare circumstances, you may decide that you still want to communicate with
a TLS server even if the certificate verification fails. You then accept the
fact that your communication may be subject to Man-In-The-Middle attacks. You
lower your guards with the -k or --insecure option.
Native CA stores
Operating systems like Windows and macOS tend to have their own CA stores.
If you run curl with Schannel on Windows, curl uses Windows' own CA store by default.
If you use curl with any other TLS backend than Schannel, it uses a CA store
provided in a separate file or directory, independently of the native CA
store. However, for some of them you can still ask curl to instead prefer the
native CA store using the --ca-native command line option. This option is
supported with OpenSSL (and forks), wolfSSL and GnuTLS.
For HTTPS proxies, the corresponding option is called --proxy-ca-native.
CA store in file(s)
If curl is not built to use a TLS library that is native to your platform (like Schannel), it has to either have been built to know where the local CA store is, or users need to provide a path to the CA store when curl is invoked.
You can point out a specific CA bundle to use in the TLS handshake with the
--cacert command line option. That bundle needs to be in PEM format. You can
also set the environment variable CURL_CA_BUNDLE to the full path.
CA store on Windows
curl built on Windows that is not using the native TLS library (Schannel), have an extra sequence for how the CA store can be found and used.
curl searches for a CA cert file named curl-ca-bundle.crt in these
directories and in this order:
- application's directory
- current working directory
- Windows System directory (e.g.
C:\windows\system32) - Windows Directory (e.g.
C:\windows) - all directories along
%PATH%
Certificate pinning
TLS certificate pinning is a way to verify that the public key used to sign the servers certificate has not changed. It is pinned.
When negotiating a TLS or SSL connection, the server sends a certificate indicating its identity. A public key is extracted from this certificate and if it does not exactly match the public key provided to this option, curl aborts the connection before sending or receiving any data.
You tell curl a filename to read the sha256 value from, or you specify the
base64 encoded hash directly in the command line with a sha256// prefix. You
can specify one or more hashes like that, separated with semicolons (;).
curl --pinnedpubkey "sha256//83d34tasd3rt…" https://example.com/
This feature is not supported by all TLS backends.
OCSP stapling
This uses the TLS extension called Certificate Status Request to ask the server to provide a fresh "proof" from the CA in the handshake, that the certificate that it returns is still valid. This is a way to make really sure the server's certificate has not been revoked.
If the server does not support this extension, the test fails and curl returns an error. It is still common that servers do not support this.
Ask for the handshake to use the status request like this:
curl --cert-status https://example.com/
This feature is only supported by the OpenSSL and GnuTLS backends.
Client certificates
TLS client certificates are a way for clients to cryptographically prove to servers that they are truly the right peer (also sometimes known as Mutual TLS or mTLS). A command line that uses a client certificate specifies the certificate and the corresponding key, and they are then passed on the TLS handshake with the server.
You need to have your client certificate already stored in a file when doing this and you should supposedly have gotten it from the right instance via a different channel previously.
The key is typically protected by a password that you need to provide or get prompted for interactively.
curl offers options to let you specify a single file that is both the client
certificate and the private key concatenated using --cert, or you can
specify the key file independently with --key:
curl --cert mycert:mypassword https://example.com
curl --cert mycert:mypassword --key mykey https://example.com
For some TLS backends you can also pass in the key and certificate using different types:
curl --cert mycert:mypassword --cert-type PEM \
     --key mykey --key-type PEM https://example.com
TLS auth
TLS connections offer a (rarely used) feature called Secure Remote
Passwords. Using this, you authenticate the connection for the server using a
name and password and the command line flags for this are --tlsuser <name>
and --tlspassword <secret>. Like this:
curl --tlsuser daniel --tlspassword secret https://example.com
TLS backends
When curl is built, it gets told to use a specific TLS library. That TLS library is the engine that provides curl with the powers to speak TLS over the wire. We often refer to them as different "backends" as they can be seen as different pluggable pieces into the curl machine. curl can be built to be able to use one or more of these backends.
Sometimes features and behaviors differ slightly when curl is built with different TLS backends, but the developers work hard on making those differences as small and unnoticeable as possible.
Showing the curl version information with curl --version includes the TLS library and version in the first line of output.
Multiple TLS backends
When curl is built with multiple TLS backends, it can be told which one to use each time it is started. It is always built to use a specific one by default unless one is asked for.
If you invoke curl --version for a curl with multiple backends it mentions
MultiSSL as a feature in the last line. The first line includes all the
supported TLS backends with the non-default ones within parentheses.
To set a specific one to get used, set the environment variable
CURL_SSL_BACKEND to its name.
SSLKEYLOGFILE
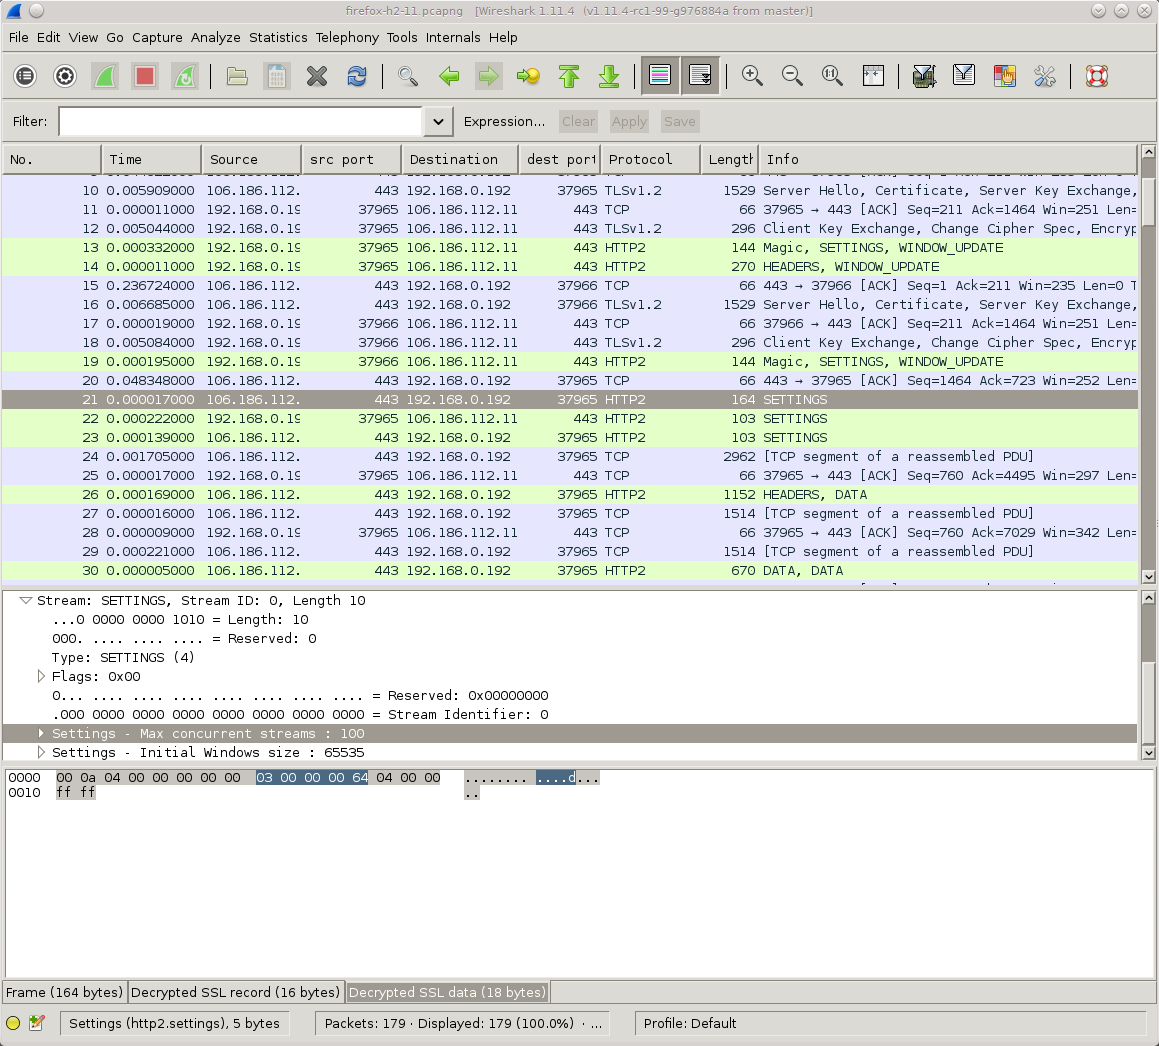
Since a long time back, the venerable network analyzer tool Wireshark (screenshot above) has provided a way to decrypt and inspect TLS traffic when sent and received by Firefox and Chrome.
This is similarly possible to do with curl.
You do this by making the browser or curl tell Wireshark the encryption secrets so that it can decrypt them:
- set the environment variable named
SSLKEYLOGFILEto a filename of your choice before you start the browser or curl - Setting the same filename path in the Master-secret field in Wireshark. Go to Preferences->Protocols->TLS and edit the path as shown in the screenshot below.
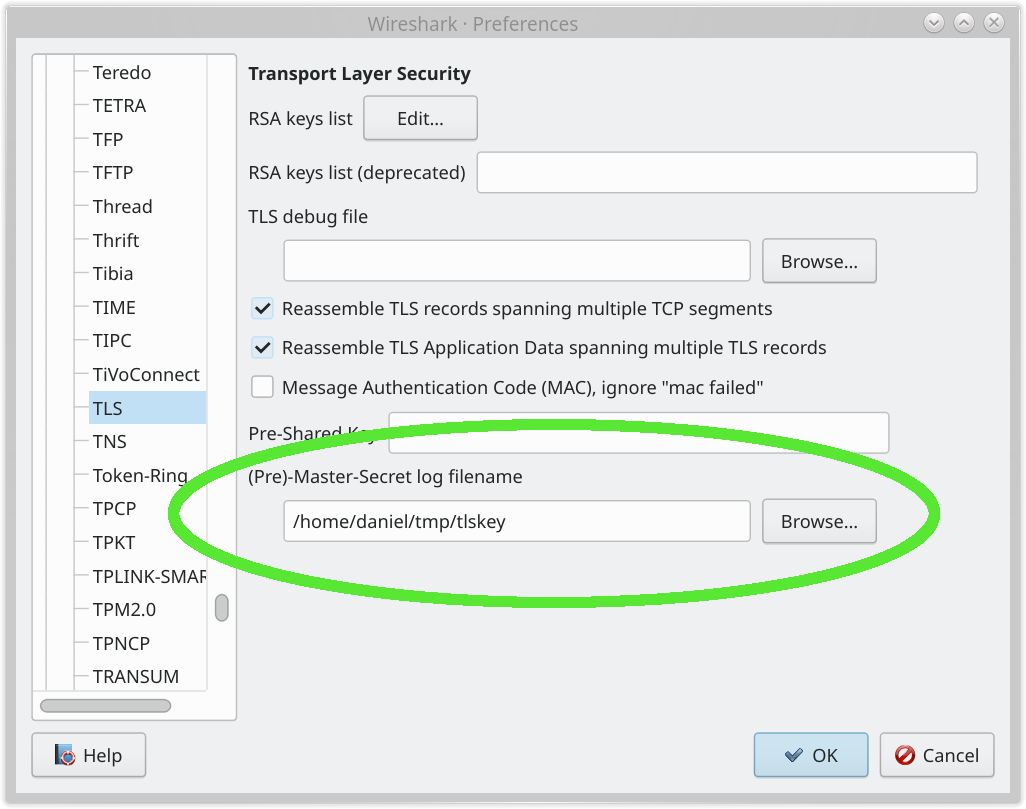
Having done this simple operation, you can now inspect curl's or your browser's HTTPS traffic in Wireshark. Super handy and awesome.
Remember that if you record TLS traffic and want to save it for analyzing later, you need to also save the file with the secrets so that you can decrypt that traffic capture at a later time as well.
libcurl-using applications too
Support for SSLKEYLOGFILE is provided by libcurl itself - making it possible
for you to trace and inspect the TLS network data for any application built to
use libcurl - not only the curl command line tool.
Restrictions
The support for SSLKEYLOGFILE requires that curl was built with a TLS
backend that supports this feature. The backends that support SSLKEYLOGFILE
are: OpenSSL, AWS-LC, BoringSSL, GnuTLS and wolfSSL. LibreSSL (a fork of
OpenSSL) only supports it for TLS <= 1.2
If curl was built to use another backend, you cannot record your curl TLS traffic this way.
ECH
The --ech option in curl (added as an experimental feature in version
8.8.0) is used to enable Encrypted Client Hello, a TLS 1.3 extension
designed to improve privacy. In a standard TLS handshake, the domain name you
are visiting (the SNI or Server Name Indication) is sent in plaintext,
allowing network observers and Internet service providers to see exactly which
hostname you are connecting to. ECH fixes this by encrypting the hostname
using a public key retrieved from the server’s DNS records.
Using the --ech Flag
The --ech option accepts several keywords or specific configurations to
control how strictly curl handles the encryption:
-
--ech true: This is the "opportunistic" mode.curlattempts to use ECH if it can find the necessary configuration (usually via DNS), but if ECH fails or is unavailable, it falls back to a standard, unencrypted handshake. -
--ech hard: This is the "strict" mode. If you use this,curlrequires a successful ECH handshake to proceed. If ECH is not supported by the server or the configuration cannot be found, the connection fails entirely. -
--ech grease: This sends a "fake" ECH extension (GREASE) to test server compatibility without actually encrypting the SNI. It helps ensure that middleboxes on the network do not break when they see ECH-related data. -
--ech ecl:<base64>: If you already have the server’s ECH configuration (anECHConfigList), you can provide it directly as a base64-encoded string instead of relying on DNS discovery.
Requirements and Dependencies
For --ech to work, your environment must meet specific criteria. First, ECH
is strictly a TLS 1.3 feature. Second, because ECH requires the client to
fetch a public key from DNS before the handshake even begins, it is almost
always used in conjunction with DNS over HTTPS (DoH). A typical command
might look like this:
curl --ech hard --doh-url https://1.1.1.1/dns-query https://example.com
curl can also get the necessary public key over clear-text DNS if built accordingly, but as the DNS traffic is then not encrypted the security properties are weaker.
Finally, your version of curl must be built against a TLS library that
supports ECH, such as OpenSSL, BoringSSL, AWS-LC, or wolfSSL.
You can check if your build supports it by running curl -V and looking for
ECH in the features list. Since it is still considered an experimental
feature, you may need a custom-built version of the tool.
Built-in certificate store
Historically, curl relies on an external file (usually named cacert.pem or
curl-ca-bundle.crt) or the system's native certificate store to verify the
identity of TLS servers. Using a built-in bundle, curl can get built as a
truly self-contained binary without any requirement on an external certificate
store.
The --dump-ca-embed option, introduced in curl 8.10.0, is a diagnostic
and utility option used to output the Certificate Authority (CA) bundle that
has been built into the curl executable.
Why use it?
The primary purpose of this feature is to simplify deployments in environments
where you cannot guarantee the presence of a system CA store, such as minimal
Docker containers, embedded systems, or "portable" versions of curl that
need to work across different machines without external dependencies. By using
--dump-ca-embed, you can verify exactly which certificates your specific
version of curl is trusting or extract that bundle for use with other tools.
See what is built-in
To use it, call curl with the flag. By default, it prints the entire PEM-formatted CA bundle to your terminal's standard output (stdout):
curl --dump-ca-embed
If you want to save this embedded bundle to a file for later use (perhaps to
pass to another tool using its own --cacert equivalent), redirect the
output:
curl --dump-ca-embed > embedded-certs.pem
Considerations
-
Build-Time Requirement: This option only works if the curl binary was specifically compiled with the embedding feature enabled (using the
--with-ca-embedbuild flag). If your version of curl was not built this way, the command typically produces no output or returns an error. -
Checking Support: You can check if your curl build supports this by running
curl -V. Look forCAembedin the list of features. -
Time sensitive: While embedding certificates makes the binary more portable, it also means the certificates are "frozen" at the time of the build. To update the set of certificates for trusted certificate authorities, you would typically need to replace the entire curl binary or override the embedded bundle using the standard
--cacertor--ca-nativeoptions.
TLS sessions and early data
TLS sessions are a performance-boosting shortcut that allows a client and server to bypass the computationally expensive "full handshake" by remembering their previous connection. During an initial exchange, the server issues a Session Ticket (in TLS 1.3) or a Session ID (in older TLS versions) that functions as a cryptographic proof of their shared state. When the client returns, it presents this token to "resume" the session, allowing both parties to immediately derive encryption keys from their previous secrets without re-verifying certificates or performing a full key exchange. This process drastically cuts down on latency and CPU usage for repeat visitors, though it technically creates a "fingerprint" that allows the server to identify the returning device at the transport layer.
TLS session cache
In curl 8.20.0 and earlier, the --ssl-sessions option is still considered
experimental and therefore not enabled by default. Without this feature
enabled, curl only supports an in-memory TLS session cache.
Using a TLS session cache on disk increases the chances of successful early data use.
The --ssl-sessions option provides a way to persist TLS session data between
separate curl command invocations. This flag functions similarly to curl’s
cookie handling (--cookie-jar), allowing you to save session tickets to a file
and reload them later.
To use it, you provide a filename where curl should read and write the session data. If the file exists, curl attempts to "resume" a previous session with the server using the tickets stored in that file. If the file does not exist, curl performs a full handshake and then saves the resulting session ticket to the file for future use.
Example:
### First run: Performs a full handshake and saves the session
curl --ssl-sessions tls-cache.txt https://example.com

# Second run: Uses the saved session for a faster handshake
curl --ssl-sessions tls-cache.txt https://example.com
The main benefit of --ssl-sessions is a reduction in Time To First Byte
(TTFB). In a resumed session, the server does not need to re-send its entire
certificate chain, which can often be several kilobytes of data. Furthermore,
session resumption often requires fewer round-trips than a full handshake.
When combined with --tls-earlydata (0-RTT), curl can even send the HTTP
request in the first packet of the connection.
Early data
The --tls-earlydata option is the switch that enables TLS 1.3 0-RTT (Zero
Round Trip Time). In a standard TLS handshake, even with version 1.3, there
is a back-and-forth exchange before the client can send its actual request
(like an HTTP GET). 0-RTT allows a client that has connected to a server
previously to "resume" that session and send data—the "early data"—immediately
along with its first handshake message. This effectively eliminates the
latency penalty of the handshake for repeat visitors.
How to use early data
Using the feature is straightforward in terms of syntax, but it relies on a successful previous connection to the same server to function. You append the flag to your command:
curl --tls-earlydata https://example.com
Combined with a session cache:
curl --tls-earlydata --ssl-sessions tls-cache.txt https://example.com
When this flag is active, curl attempts to use a saved TLS session ticket (if one exists in its cache) to send the request headers immediately. If the server accepts the early data, the response returns much faster. If the server rejects it (which is a standard security fallback), curl automatically retries the request using a normal handshake, so there is no risk of the connection failing entirely because you used the flag.
Security and idempotency
Because 0-RTT data is sent before the full handshake is finalized, it is
technically vulnerable to replay attacks. An attacker could capture the
early data packet and resend it to the server. For this reason, curl (and
most responsible clients) should only use early data for idempotent
requests—those that do not change state on the server, like GET or HEAD.
You should avoid using --tls-earlydata with POST or DELETE requests unless
you are absolutely certain the server has specific protections (like unique
tokens or strict replay windows) in place.
Session tracking
While TLS 1.3 session reuse and early data provide significant performance benefits, it introduces a notable privacy trade-off: it allows a server to track a client across different connections. This tracking occurs because 0-RTT with curl relies on Session Tickets that the server issues to the client during its initial handshake. When curl returns and attempts to continue a previous session, it presents this specific ticket to the server to prove it has a previous relationship. Because this ticket is unique to that specific session, the server can instantly correlate the new connection with the previous one, effectively functioning as a transport-layer tracking cookie.
This tracking mechanism is particularly powerful because it happens before any application-layer data—such as HTTP cookies or login credentials—is even processed. Even if the curl command line otherwise does not use cookies or similar, if the underlying TLS implementation maintains a session cache and sends an early data ticket, the server can identify the returning client. To mitigate this, privacy-focused clients often "partition" these session tickets so they cannot be used to track users across different websites, or they may disable 0-RTT entirely when high levels of anonymity are required.
Requirements
To see the benefits of --tls-earlydata, several stars must align:
-
TLS 1.3: The server and client must both support and negotiate TLS 1.3.
-
Session Resumption: You typically need to be using a session cache or have a previous connection in the same curl process so curl has a session ticket to "resume."
-
Library Support: Your curl build must be linked against a TLS library that supports 0-RTT, such as OpenSSL, BoringSSL, or wolfSSL. You can verify your version’s capabilities by checking
curl -Vfor theEarlyDatafeature.
Post-quantum
Using post-quantum cryptography (PQC) with curl is primarily handled through the underlying TLS library rather than with a dedicated flag. Because most PQC implementations currently use hybrid key exchanges - which combine a classical algorithm like X25519 with a quantum-resistant one like ML-KEM - you can enable them explicitly by specifying the desired group or curve.
As long as the TLS library curl is built to use and the server you instruct curl to speak to, both are PQC-ready and compatible, they can negotiate and agree to a post-quantum-resistant algorithm without any extra options or actions being needed.
--curves
The most direct way to force a post-quantum handshake in curl is using the
--curves option. Modern versions of curl linked against PQC-ready libraries
recognize hybrid identifiers. For example, to request a connection using the
NIST-standardized ML-KEM (formerly Kyber) hybrid, you would run:
curl -v --curves X25519MLKEM768 https://example.com
In the verbose output, you should see a line confirming the key exchange algorithm:
* SSL connection using TLSv1.3 / ... / X25519MLKEM768
Debugging
Since PQC algorithms (like ML-DSA for signatures and ML-KEM for key
encapsulation) have much larger keys and signatures than classical RSA or ECC,
you might notice a slight increase in handshake latency. If a connection
fails, it is often due to "jumbo" TLS packets being blocked by older
middleboxes or firewalls that are not yet PQC-aware. Using curl -v is your
friend to see if the handshake hangs after the "Client Hello" is sent with the
larger PQC extension etc.
SCP and SFTP
curl supports the SCP and SFTP protocols if built with a prerequisite 3rd party library: libssh2 or libssh.
SCP and SFTP are both protocols that are built on top of SSH, a secure and encrypted data protocol that is similar to TLS but differs in a few important ways. For example, SSH does not use certificates of any sort but instead it uses public and private keys. Both SSH and TLS provide strong crypto and secure transfers when used correctly.
The SCP protocol is generally considered to be the black sheep of the two since it is not portable and usually only works between Unix systems.
URLs
SFTP and SCP URLs are similar to other URLs and you download files using these protocols the same as with others:
curl sftp://example.com/file.zip -u user
and:
curl scp://example.com/file.zip -u user
SFTP (but not SCP) supports getting a file listing back when the URL ends with a trailing slash:
curl sftp://example.com/ -u user
Note that both these protocols work with "users" and you do not ask for a file anonymously or with a standard generic name. Most systems require that users authenticate, as outlined below.
When requesting a file from an SFTP or SCP URL, the file path given is
considered to be the absolute path on the remote server unless you
specifically ask for the path relative to the user's home directory. You do that by
making sure the path starts with /~/. This is quite the opposite to how FTP
URLs work and is a common cause for confusion among users.
For user daniel to transfer todo.txt from his home directory, it would
look similar to this:
curl sftp://example.com/~/todo.txt -u daniel
or for SCP
curl scp://example.com/~/todo.txt -u daniel:secret
Authentication
Authentication with curl against an SSH server (when you specify an SCP or SFTP URL) is done like this:
- curl connects to the server and learns which authentication methods that this server offers
- curl then tries the offered methods one by one until one works or they all failed
curl attempts to use your public key as found in the .ssh subdirectory in
your home directory if the server offers public key authentication. When doing
so, you still need to tell curl which username to use on the server. For
example, the user 'john' lists the entries in his home directory on the remote
SFTP server called 'sftp.example.com':
curl -u john: sftp://sftp.example.com/
If curl cannot authenticate with the public key for any reason, it instead attempts to use the username + password if the server allows it and the credentials are passed on the command line.
For example, the same user from above has the password RHvxC6wUA on a remote
system and can download a file via SCP like this:
curl -u john:RHvxC6wUA -O scp://ssh.example.com/file.tar.gz
Known hosts
A secure network client needs to make sure that the remote host is exactly the host that it thinks it is communicating with. With TLS based protocols, it is done by the client verifying the server's certificate.
With SSH protocols there are no server certificates, but instead each server can provide its unique key. Unlike TLS, SSH has no certificate authorities or anything so the client has to make sure that the host's key matches what it already knows (via other means) it should look like.
The matching of keys is typically done using hashes of the key and the file
that the client stores the hashes for known servers is often called
known_hosts and is put in a dedicated SSH directory. On Linux systems that
is usually called ~/.ssh.
When curl connects to a SFTP and SCP host, it makes sure that the host's key
hash is already present in the known hosts file or it denies continued
operation because it cannot trust that the server is the right one. Once the
correct hash exists in known_hosts curl can perform transfers.
To force curl to skip checking and obeying to the known_hosts file, you can
use the -k / --insecure command-line option. You must use this option with
extreme care since it makes it possible for man-in-the-middle attacks not to
be detected.
Public key verification
The --hostpubsha256 and --hostpubmd5 options in curl are security features
used specifically for SFTP or SCP transfers to verify the identity of
the remote host, as an alternative to using known_hosts.
When you connect to a server via SSH-based protocols, the server presents a public key to identify itself. These options allow you to provide a fingerprint of that public key. curl then calculates the hash of the key received from the server and compares it against the string you provided; if they do not match, the connection is terminated immediately.
--hostpubmd5 is the older legacy option for this, which uses the known weak
algorithm MD5.
--hostpubsha256 is the appropriate and more secure option for this purpose.
Unfortunately it does not work yet if curl is built to use the libssh
backend, only the libssh2 version supports this.
Why Use It?
The primary purpose of these flags is to prevent man-in-the-middle (MITM)
attacks. In a typical SSH environment, host verification usually relies on a
known_hosts file. However, in automated scripts or environments where you do
not want to maintain a persistent state or a known_hosts file, the
--hostpub* options allow you to "pin" the expected fingerprint directly
within the command. This ensures that you are communicating with the specific
server you intended, even if you have never connected to it from that
particular machine before.
Usage
To use it, you pass the hash as a string:
For MD5:
curl --hostpubmd5 "[32 hex chars]" sftp://example.com/file.txt
For SHA256:
curl --hostpubsha256 "[base64 text]" sftp://example.com/file.txt
Protocol
These options only work for SFTP and SCP transfers.
DICT
DICT is a protocol for dictionary lookups.
Usage
For fun try
curl dict://dict.org/m:curl
curl dict://dict.org/d:heisenbug:jargon
curl dict://dict.org/d:daniel:gcide
Aliases for 'm' are 'match' and 'find', and aliases for 'd' are 'define' and 'lookup'. For example,
curl dict://dict.org/find:curl
Commands that break the URL description of the RFC (but not the DICT protocol) are
curl dict://dict.org/show:db
curl dict://dict.org/show:strat
IMAP
There are two dominant protocols on the Internet for reading/downloading email from servers (at least if we do not count web based reading), and they are IMAP and POP3. The former is the slightly more modern alternative. curl supports both.
Basics
Get the mail using the UID 57 from mailbox 'stuff':
curl imap://server.example.com/stuff;UID=57
Instead, get the mail with index 57 from the mailbox 'fun':
curl imap://server.example.com/fun;MAILINDEX=57
List the mails in the mailbox 'boring':
curl imap://server.example.com/boring
List the mails in the mailbox 'boring' and provide user and password:
curl imap://server.example.com/boring -u user:password
TLS for IMAP
IMAP can be done over a secure connection and it can be done using either
explicit or implicit TLS. The explicit method is probably the most common
approach and it means that the client connects to the server using an insecure
connection and upgrades it to TLS as it goes, using the STARTTLS command.
You tell curl to use this upgrade approach with --ssl-reqd. It says that the
upgrade is required to work or curl fails the transfer. There is also the
not-recommended insecure alternative --ssl that attempts to use TLS but
that continues even if the upgrade fails.
Implicit SSL means that the connection gets secured already at first
connect, which you make curl attempt by specifying a scheme in the URL that
uses SSL. In the case of secure IMAP that means imaps://. For such
connections, curl insists on connecting and negotiating a TLS connection
already from the start, or it fails its operation.
The previous explicit examples done with implicit SSL:
curl imaps://mail.example.com/inbox
IPFS
IPFS is the Inter-Planetary File System. curl supports IPFS only via an HTTP gateway. It means that it understands IPFS URLs when given to it, but you must also provide a working gateway URL for curl to use to retrieve the content. curl does not speak IPFS natively.
Gateway
The --ipfs-gateway lets the user specify the IPFS HTTP gateway URL. Like this:
curl --ipfs-gateway http://localhost:8080 ipfs://bafybeigagd5nmnn2iys2f3d/
If you opt to go for a remote gateway you should be aware that you completely trust the gateway. This is fine in local gateways as you host it yourself. With remote gateways there could potentially be a malicious actor returning you data that does not match the request you made, inspect or even interfere with the request. You might not notice this when getting IPFS using curl.
If the --ipfs-gateway option is not used, curl checks the IPFS_GATEWAY
environment variable for guidance and if not set, the ~/.ipfs/gateway file
that can be used to identify the gateway.
IPFS support was first added to curl in version 8.4.0.
MQTT
A plain GET subscribes to the topic and prints all published messages. Doing a POST publishes the post data to the topic and exits.
Subscribe to the temperature in the home/bedroom topic published by
example.com:
curl mqtt://example.com/home/bedroom/temp
Send the value 75 to the home/bedroom/dimmer topic hosted by the
example.com server:
curl -d 75 mqtt://example.com/home/bedroom/dimmer
What does curl deliver as a response to a subscribe
It outputs two bytes topic length (MSB | LSB), the topic followed by the payload.
Caveats
Remaining limitations in curl's MQTT support:
- Only QoS level 0 is implemented for publish
- No way to set retain flag for publish
POP3
There are two dominant protocols on the Internet for reading/downloading email from servers (at least if we do not count web based reading), and they are IMAP and POP3. The former is the slightly more modern alternative. curl supports both.
Basics
To list message numbers and sizes:
curl pop3://mail.example.com/
To download message 1:
curl pop3://mail.example.com/1
To delete message 1:
curl --request DELE pop3://mail.example.com/1
TLS for POP3
POP3 can be done over a secure connection and it can be done using either
explicit or implicit TLS. The explicit method is probably the most common
approach and it means that the client connects to the server using an insecure
connection and upgrades it to TLS as it goes, using the STARTTLS command.
You tell curl to use this upgrade approach with --ssl-reqd. It says that the
upgrade is required to work or curl fails the transfer. There is also the
not-recommended insecure alternative --ssl that attempts to use TLS but
that continues even if the upgrade fails.
Like this:
curl pop3://mail.example.com/ --ssl-reqd
or the insecure and opportunistic approach:
curl --ssl pop3://mail.example.com/
Implicit SSL means that the connection gets secured already at first
connect, which you make curl do by specifying a scheme in the URL that uses
SSL. In the case of secure POP3 that means pop3s://. For such connections,
curl insists on connecting and negotiating a TLS connection already from the
start, or it fails its operation.
The previous explicit examples done with implicit SSL:
curl pop3s://mail.example.com/
SMTP
Sending email with curl is done with the SMTP protocol. SMTP stands for Simple Mail Transfer Protocol.
curl supports sending data to an SMTP server, which combined with the right set of command line options makes an email get sent to a set of receivers of your choice.
When sending SMTP with curl, there are two necessary command line options that must be used.
-
You need to tell the server at least one recipient with
--mail-rcpt. You can use this option several times and then curl tells the server that all those email addresses should receive the email. -
You need to tell the server which email address that is the sender of the email with
--mail-from. It is important to realize that this email address is not necessarily the same as is shown in theFrom:line of the email text.
Then, you need to provide the actual email data. This is a (text) file
formatted according to RFC
5322. It is a set of headers
and a body. Both the headers and the body need to be correctly encoded. The
headers typically include To:, From:, Subject:, Date: etc.
A basic command to send an email:
curl smtp://mail.example.com --mail-from myself@example.com --mail-rcpt \
receiver@example.com --upload-file email.txt
An example email.txt could look like this:
From: John Smith <john@example.com>
To: Joe Smith <smith@example.com>
Subject: an example.com example email
Date: Mon, 7 Nov 2016 08:45:16

Dear Joe,
Welcome to this example email. What a lovely day.
Secure mail transfer
Some mail providers allow or require using SSL for SMTP. They may use a dedicated port for SSL or allow SSL upgrading over a clear-text connection.
If your mail provider has a dedicated SSL port you can use smtps:// instead of smtp://, which uses the SMTP SSL port of 465 by default and requires the entire connection to be SSL. For example smtps://smtp.gmail.com/.
However, if your provider allows upgrading from clear-text to secure transfers you can use one of these options:
--ssl           Try SSL/TLS (FTP, IMAP, POP3, SMTP)
--ssl-reqd      Require SSL/TLS (FTP, IMAP, POP3, SMTP)
You can tell curl to try but not require upgrading to secure transfers by
adding --ssl to the command:
curl --ssl smtp://mail.example.com --mail-from myself@example.com \
     --mail-rcpt receiver@example.com --upload-file email.txt \
     --user 'user@your-account.com:your-account-password'
You can tell curl to require upgrading to using secure transfers by adding
--ssl-reqd to the command:
curl --ssl-reqd smtp://mail.example.com --mail-from myself@example.com \
     --mail-rcpt receiver@example.com --upload-file email.txt \
     --user 'user@your-account.com:your-account-password'
The SMTP URL
The path part of a SMTP request specifies the hostname to present during communication with the mail server. If the path is omitted then curl attempts to figure out the local computer's hostname and use that. However, this may not return the fully qualified domain name that is required by some mail servers and specifying this path allows you to set an alternative name, such as your machine's fully qualified domain name, which you might have obtained from an external function such as gethostname or getaddrinfo.
To connect to the mail server at mail.example.com and send your local
computer's hostname in the HELO or EHLO command:
curl smtp://mail.example.com
You can of course as always use the -v option to get to see the
client-server communication.
To instead have curl send client.example.com in the HELO / EHLO command
to the mail server at mail.example.com, use:
curl smtp://mail.example.com/client.example.com
No MX lookup
When you send email with an ordinary mail client, it first checks for an MX
record for the particular domain you want to send email to. If you send an
email to joe@example.com, the client gets the MX records for example.com
to learn which mail server(s) to use when sending email to example.com users.
curl does no MX lookups by itself. If you want to figure out which server to send an email to for a particular domain, we recommend you figure that out first and then call curl to use those servers. Useful command line tools to get MX records include 'dig' and 'nslookup'.
TELNET
Telnet is an ancient application protocol for bidirectional clear-text communication. It was designed for interactive text-oriented communications and there is no encrypted or secure version of Telnet.
TELNET is not a perfect match for curl. The protocol is not done to handle plain uploads or downloads so the usual curl paradigms have had to be stretched somewhat to make curl deal with it appropriately.
curl sends received data to stdout and it reads input to send on stdin. The transfer is complete when the connection is dropped or when the user presses control-c.
Historic TELNET
Once upon the time, systems provided telnet access for login. Then you could connect to a server and login to it, much like how you would do it with SSH today. That practice has fortunately now mostly been moved into the museum cabinets due to the insecure nature of the protocol.
The default port number for telnet is 23.
Debugging with TELNET
The fact that TELNET is a simple clear-text TCP connection to the target host and port makes it somewhat useful to debug other protocols and services at times.
Example, connect to your local HTTP server on port 80 and send a (broken)
request to it by manually entering GET / and press return twice:
curl telnet://localhost:80
Your web server most probably returns something like this back:
HTTP/1.1 400 Bad Request
Date: Tue, 07 Dec 2021 07:41:16 GMT
Server: softeare/7.8.9
Content-Length: 31
Connection: close
Content-Type: text/html

[message]
Options
When curl sets up a TELNET connection to a server, you can ask it to pass on
options. You do this with --telnet-option (or -t), and there are three
options available to use:
TTYPE=<term>sets the "terminal type" for the session to be<term>.XDISPLOC=<X display>sets the X display locationNEW_ENV=<var,val>sets the environment variablevarto the valuevalin the remote session
Login to your local machine's telnet server and tell it you use a vt100
terminal:
curl --telnet-option TTYPE=vt100 telnet://localhost
You need to manually enter your name and password when prompted.
TFTP
Trivial File Transfer Protocol (TFTP) is a simple clear-text protocol that allows a client to get a file from or put a file onto a remote host.
Primary use cases for this protocol have been to get the boot image over a local network. TFTP also stands out a little next to many other protocols by the fact that it is done over UDP as opposed to TCP which most other protocols use.
There is no secure version or flavor of TFTP.
Download
Download a file from the TFTP server of choice:
curl -O tftp://localserver/file.boot
Upload
Upload a file to the TFTP server of choice:
curl -T file.boot tftp://localserver/
TFTP options
The TFTP protocols transmits data to the other end of the communication using "blocks". When a TFTP transfer is setup, both parties either agree on using the default block size of 512 bytes or negotiate a different one. curl supports block sizes between 8 to 65464 bytes.
You ask curl to use a different size than the default with
--tftp-blksize. Ask for 8192 bytes blocks like this:
curl --tftp-blksize 8192 tftp://localserver/file
It has been shown that there are server implementations that do not handle option negotiation at all, so curl also has the ability to completely switch off all attempts of setting options. If you are in the unfortunate of working with such a server, use the flag like this:
curl --tftp-no-options tftp://localserver/file
Command line HTTP
In all user surveys and during all curl's lifetime, HTTP has been the most important and most frequently used protocol that curl supports. This chapter explains how to do effective HTTP transfers and general fiddling with curl.
This mostly works the same way for HTTPS, as they are really the same thing under the hood, as HTTPS is HTTP with an extra security TLS layer. See also the specific HTTPS section.
- Method
- Responses
- Authentication
- HTTP versions
- HTTP POST
- Redirects
- Customize your HTTP
- HTTP PUT
- Cookies
- HTTPS
- Scripting browser-like tasks
Method
In every HTTP request, there is a method. Sometimes called a verb. The most
commonly used ones are GET, POST, HEAD and PUT.
Normally however you do not specify the method in the command line, but
instead the exact method used depends on the specific options you use. GET
is default, using -d or -F makes it a POST, -I generates a HEAD and
-T sends a PUT.
More about this in the Modify the HTTP request section.
Responses
When an HTTP client talks HTTP to a server, the server responds with an HTTP
response message or curl considers it an error and returns 52 with the error
message Empty reply from server.
Size of an HTTP response
An HTTP response has a certain size and curl needs to figure it out. There are
several different ways to signal the end of an HTTP response but the most
basic way is to use the Content-Length: header in the response and with that
specify the exact number of bytes in the response body.
Some early HTTP server implementations had problems with file sizes greater
than 2GB and wrongly managed to send Content-Length: headers with negative
sizes or otherwise plain wrong data. curl can be told to ignore the
Content-Length: header completely with --ignore-content-length. Doing so may
have some other negative side-effects but should at least let you get the
data.
HTTP response codes
An HTTP transfer gets a 3 digit response code back in the first response line. The response code is the server's way of giving the client a hint about how the request was handled.
It is important to note that curl does not consider it an error even if the response code would indicate that the requested document could not be delivered (or similar). curl considers a successful sending and receiving of HTTP to be good.
The first digit of the HTTP response code is a kind of error class:
- 1xx: transient response, more is coming
- 2xx: success
- 3xx: a redirect
- 4xx: the client asked for something the server could not or would not deliver
- 5xx: there is a problem in the server
Remember that you can use curl's --write-out option to extract the response
code. See the --write-out section.
To make curl return an error for response codes >= 400, you need to use
--fail or --fail-with-body. Then curl exits with error code 22 for such
occurrences.
CONNECT response codes
Since there can be an HTTP request and a separate CONNECT request in the same curl transfer, we often separate the CONNECT response (from the proxy) from the remote server's HTTP response.
The CONNECT is also an HTTP request so it gets response codes in the same
numeric range and you can use --write-out to extract that code as well.
Chunked transfer encoding
An HTTP 1.1 server can decide to respond with a chunked encoded response, a feature that was not present in HTTP 1.0.
When receiving a chunked response, there is no Content-Length: for the
response to indicate its size. Instead, there is a Transfer-Encoding: chunked header that tells curl there is chunked data coming and then in the
response body, the data comes in a series of chunks. Every individual chunk
starts with the size of that particular chunk (in hexadecimal), then a newline
and then the contents of the chunk. This is repeated over and over until the
end of the response, which is signaled with a zero sized chunk. The point of
this response encoding is for the client to be able to figure out when the
response has ended even though the server did not know the full size before it
started to send it. This is usually the case when the response is dynamic and
generated at the point when the request comes.
Clients like curl decode the chunks and do not show the chunk sizes to users.
Gzipped transfers
Responses over HTTP can be sent in compressed format. This is most commonly
done by the server when it includes a Content-Encoding: gzip in the response
as a hint to the client. Compressed responses make a lot of sense when either
static resources are sent (that were compressed previously) or even in runtime
when there is more CPU power available than bandwidth. Sending a much smaller
amount of data is often preferred.
You can ask curl to both ask for compressed content and automatically and
transparently uncompress gzipped data when receiving content encoded gzip (or
in fact any other compression algorithm that curl understands) by using
--compressed:
curl --compressed http://example.com/
Transfer encoding
A less common feature used with transfer encoding is compression.
Compression in itself is common. Over time the dominant and web compatible way
to do compression for HTTP has become to use Content-Encoding as described
in the section above. HTTP was originally intended and specified to allow
transparent compression as a transfer encoding, and curl supports this
feature.
The client then asks the server to do compression transfer encoding and if
acceptable, it responds with a header indicating that it does and curl then
transparently decompresses that data on arrival. A curl user asks for a
compressed transfer encoding with --tr-encoding:
curl --tr-encoding http://example.com/
It should be noted that not many HTTP servers in the wild support this.
Pass on transfer encoding
In some situations you may want to use curl as a proxy or other in-between software. In those cases, curl's way to deal with transfer-encoding headers and then decoding the actual data transparently may not be desired, if the end receiver also expects to do the same.
You can then ask curl to pass on the received data, without decoding it. That means passing on the sizes in the chunked encoding format or the compressed format when compressed transfer encoding is used etc.
curl --raw http://example.com/
Authentication
Each HTTP request can be made authenticated. If a server or a proxy want the user to provide proof that they have the correct credentials to access a URL or perform an action, it can send an HTTP response code that informs the client that it needs to provide a correct HTTP authentication header in the request to be allowed.
A server that requires authentication sends back a 401 response code and an
associated WWW-Authenticate: header that lists all the authentication
methods that the server supports.
An HTTP proxy that requires authentication sends back a 407 response code and
an associated Proxy-Authenticate: header that lists all the authentication
methods that the proxy supports.
It might be worth to note that most websites of today do not require HTTP authentication for login etc, but they instead ask users to login on webpages and then the browser issues a POST with the user and password etc, and then subsequently maintain cookies for the session.
To tell curl to do an authenticated HTTP request, you use the -u, --user
option to provide username and password (separated with a colon). Like this:
curl --user daniel:secret http://example.com/
This makes curl use the default Basic HTTP authentication method. Yes, it is
actually called Basic and it is truly basic. To explicitly ask for the basic
method, use --basic.
The Basic authentication method sends the username and password in clear text over the network (base64 encoded) and should be avoided for HTTP transport.
When asking to do an HTTP transfer using a single (specified or implied), authentication method, curl inserts the authentication header already in the first request on the wire.
If you would rather have curl first test if the authentication is really
required, you can ask curl to figure that out and then automatically use the
most safe method it knows about with --anyauth. This makes curl try the
request unauthenticated, and then switch over to authentication if necessary:
curl --anyauth --user daniel:secret http://example.com/
and the same concept works for HTTP operations that may require authentication:
curl --proxy-anyauth --proxy-user daniel:secret http://example.com/ \
     --proxy http://proxy.example.com:80/
curl typically (a little depending on how it was built) speaks several other authentication methods as well, including Digest, Negotiate and NTLM. You can ask for those methods too specifically:
curl --digest --user daniel:secret http://example.com/
curl --negotiate --user daniel:secret http://example.com/
curl --ntlm --user daniel:secret http://example.com/
AWS SigV4
The defacto authentication standard AWS SigV4 is a little different than the other HTTP authentication mechanisms and thus you also use it differently.
This option takes an additional string argument where you provide one or more data fields for the operation, separated by colons: provider 1, provider 2, region and service.
-
provider are strings used by the algorithm when creating outgoing authentication headers.
-
region is a name that points to a geographic area of a resource collection (region-code) when the region name is omitted from the endpoint.
-
service is a string that points to a function provided by a cloud (service-code) when the service name is omitted from the endpoint.
Only the provider 1 is mandatory to provide. The others are otherwise extracted from the hostname used in the URL.
Example:
curl --aws-sigv4 "aws:amz:us-east-2:es" --user "key:secret" \
    https://example.com
HTTP versions
As any other Internet protocol, the HTTP protocol has kept evolving over the years and now there are clients and servers distributed over the world and over time that speak different versions with varying levels of success. In order to get curl to work with your URLs, curl offers ways for you to specify which HTTP version a request and transfer should use. curl is designed in a way so that it tries to use the most common, the most sensible if you want, default values first but sometimes that is not enough and then you may need to instruct curl on what to do.
curl defaults to HTTP/1.1 for HTTP servers but if you connect to HTTPS and you have a curl that has HTTP/2 abilities built-in, it attempts to negotiate HTTP/2 automatically or falls back to 1.1 in case the negotiation failed. Non-HTTP/2 capable curls get 1.1 over HTTPS by default.
| Option | Description |
|---|---|
| --http1.0 | HTTP/1.0 |
| --http1.1 | HTTP/1.1 |
| --http2 | HTTP/2 |
| --http2-prior-knowledge | HTTP/2 |
| --http3 | HTTP/3 |
HTTP/0.9
The HTTP version used before HTTP/1.0 was made available is often referred to as HTTP/0.9. Back in those days, HTTP responses had no headers as they would only return a response body and then immediately close the connection.
curl can be told to support such responses but by default it does not recognize them, for security reasons. Almost anything bad looks like an HTTP/0.9 response to curl so the option needs to be used with caution.
The HTTP/0.9 option to curl is different than the other HTTP command line options for HTTP versions mentioned above as this controls what response to accept, while the others are about what HTTP protocol version to try to use.
Tell curl to accept an HTTP/0.9 response like this:
curl --http0.9 https://example.com/
HTTP/2
curl supports HTTP/2 for both HTTP:// and HTTPS:// URLs assuming that curl was built with the proper prerequisites. It even defaults to using HTTP/2 when given an HTTPS URL since doing so implies no penalty and when curl is used with sites that do not support HTTP/2 the request instead negotiates HTTP/1.1.
With HTTP:// URLs however, the upgrade to HTTP/2 is done with an Upgrade:
header that may cause an extra round-trip and perhaps even more troublesome, a
sizable share of old servers returns a 400 response when seeing such a header.
It should also be noted that some (most?) servers that support HTTP/2 for
HTTP:// (which in itself is not all servers) do not acknowledge the
Upgrade: header on POST, for example.
To ask a server to use HTTP/2:
curl --http2 http://example.com/
If your curl does not support HTTP/2, that command line tool returns an error
saying so. Running curl -V shows if your version of curl supports it.
If you by some chance already know that your server speaks HTTP/2 (for
example, within your own controlled environment where you know exactly what
runs in your machines) you can shortcut the HTTP/2 negotiation with
--http2-prior-knowledge.
Multiplexing
A primary feature in the HTTP/2 protocol, is the ability to multiplex several logical streams over the same physical connection. The curl command-line tool can take advantage of this feature when doing parallel transfers.
HTTP/3
HTTP/3 is different than its predecessors in several ways. Maybe most noticeably, HTTP/3 cannot be negotiated on the same connection like HTTP/2 can. Due to HTTP/3 using a different transport protocol, it has to set up and negotiate a dedicated connection for it.
QUIC
HTTP/3 is the HTTP version that is designed to communicate over QUIC. QUIC can for most particular purposes be considered a TCP+TLS replacement.
All transfers that use HTTP/3 therefore do not use TCP. They use QUIC. QUIC is a reliable transport protocol built over UDP. HTTP/3 implies use of QUIC.
HTTPS only
HTTP/3 is performed over QUIC which is always using TLS, so HTTP/3 is by
definition always encrypted and secure. Therefore, curl only uses HTTP/3 for
HTTPS:// URLs.
Enable
As a shortcut straight to HTTP/3, to make curl attempt a QUIC connect directly
to the given hostname and port number, use --http3. Like this:
curl --http3 https://example.com/
Normally, without the --http3 option, an HTTPS:// URL implies that a
client needs to connect to it using TCP (and TLS).
Multiplexing
A primary feature in the HTTP/3 protocol, is the ability to multiplex several logical streams over the same physical connection. The curl command-line tool can take advantage of this feature when doing parallel transfers.
Alt-svc:
The alt-svc method of changing to HTTP/3 is the official way to bootstrap into HTTP/3 for a server.
Note that you need that feature built-in and that it does not switch to HTTP/3 for the current request unless the alt-svc cache is already populated, but it rather stores the info for use in the next request to the host.
When QUIC is denied
A certain amount of QUIC connection attempts fail, partly because many networks and hosts block or throttle the traffic.
When --http3 is used, curl starts a second transfer attempt a few hundred
milliseconds after the QUIC connection is initiated which is using HTTP/2 or
HTTP/1, so that if the connection attempt over QUIC fails or turns out to be
unbearably slow, the connection using an older HTTP version can still succeed
and perform the transfer. This allows users to use --http3 with some amount
of confidence that the operation works.
--http3-only is provided to explicitly not try any older version in
parallel, but thus makes the transfer fail immediately if no QUIC connection
can be established.
HTTP POST
POST is the HTTP method that was invented to send data to a receiving web application, and it is how most common HTML forms on the web work. It usually sends a chunk of relatively small amounts of data to the receiver.
- Simple POST
- Content-Type
- Posting binary
- JSON
- URL encoding
- Convert to GET
- Expect 100-continue
- Chunked encoded POSTs
- Hidden form fields
- Figure out what a browser sends
- JavaScript and forms
- Multipart formposts
- -d vs -F
Simple POST
To send form data, a browser URL encodes it as a series of name=value pairs
separated by ampersand (&) symbols. The resulting string is sent as the body
of a POST request. To do the same with curl, use the -d (or --data)
argument, like this:
curl -d 'name=admin&shoesize=12' http://example.com/
When specifying multiple -d options on the command line, curl concatenates
them and insert ampersands in between, so the above example could also be
written like this:
curl -d name=admin -d shoesize=12 http://example.com/
If the amount of data to send is too large for a mere string on the command line, you can also read it from a filename in standard curl style:
curl -d @filename http://example.com
While the server might assume that the data is encoded in some special way,
curl does not encode or change the data you tell it to send. curl sends
exactly the bytes you give it (except that when reading from a file. -d
skips over the carriage returns and newlines so you need to use
--data-binary if you rather intend them to be included in the data.).
To send a POST body that starts with a @ symbol, to avoid that curl tries to
load that as a filename, use --data-raw instead. This option has no file
loading capability:
curl --data-raw '@string' https://example.com
Content-Type
POSTing with curl's -d option makes it include a default header that looks
like Content-Type: application/x-www-form-urlencoded. That is what your
typical browser uses for a plain POST.
Many receivers of POST data do not care about or check the Content-Type header.
If that header is not good enough for you, you should, of course, replace that and instead provide the correct one. Such as if you POST JSON to a server and want to more accurately tell the server about what the content is:
curl -d '{json}' -H 'Content-Type: application/json' https://example.com
Posting binary
When reading data to post from a file, -d strips out carriage returns and
newlines. Use --data-binary if you want curl to read and use the given file
in binary exactly as given:
curl --data-binary @filename http://example.com/
JSON
curl 7.82.0 introduced the --json option as a new way to send JSON formatted
data to HTTP servers using POST. This option works as a shortcut and provides
a single option that replaces these three:
--data-binary [arg]
--header "Content-Type: application/json"
--header "Accept: application/json"
This option does not make curl actually understand or know about the JSON data it sends, but it makes it easier to send it. curl does not touch or parse the data that it sends, so you need to make sure it is valid JSON yourself.
Send a basic JSON object to a server:
curl --json '{"tool": "curl"}' https://example.com/
Send JSON from a local file:
curl --json @json.txt https://example.com/
Send JSON passed to curl on stdin:
echo '{"a":"b"}' | curl --json @- https://example.com/
You can use multiple --json options on the same command line. This makes
curl concatenate the contents from the options and send all data in one go to
the server. Note that the concatenation is plain text based and it does not
merge the JSON objects as per JSON.
Send JSON from a file and concatenate a string to the end:
curl --json @json.txt --json ', "end": "true"}' https://example.com/
Crafting JSON to send
The quotes used in JSON data sometimes makes it a bit difficult and cumbersome to write and use in shells and scripts.
Using a separate tool for this purpose might make things easier for you, and one tool in particular that might help you accomplish this is jo.
Send a basic JSON object to a server with jo and --json
jo name=jo n=17 parser=false | curl --json @- https://example.com/
Receiving JSON
curl itself does not know or understand the contents it sends or receives, including when the server returns JSON in its response.
Using a separate tool for the purpose of parsing or pretty-printing JSON responses might make things easier for you, and one tool in particular that might help you accomplish this is jq.
Send a basic JSON object to a server, and pretty-print the JSON response:
curl --json '{"tool": "curl"}' https://example.com/ | jq
Send the JSON with jo, print the response with jq:
jo name=jo n=17 | curl --json @- https://example.com/ | jq
jq is a powerful and capable tool for extracting, filtering and managing JSON content that goes way beyond pretty-printing.
URL encode data
Percent-encoding, also known as URL encoding, is technically a mechanism for
encoding data so that it can appear in URLs. This encoding is typically used
when sending POSTs with the application/x-www-form-urlencoded content type,
such as the ones curl sends with --data and --data-binary etc.
The command-line options mentioned above all require that you provide properly encoded data, data you need to make sure already exists in the right format. While that gives you a lot of freedom, it is also a bit inconvenient at times.
To help you send data you have not already encoded, curl offers the
--data-urlencode option. This option offers several different ways to URL
encode the data you give it.
You use it like --data-urlencode data in the same style as the other --data
options. To be CGI-compliant, the data part should begin with a name
followed by a separator and a content specification. The data part can be
passed to curl using one of the following syntaxes:
-
content: URL encode the content and pass that on. Be careful so that the content does not contain any=or@symbols, as that then makes the syntax match one of the other cases below. -
=content: URL encode the content and pass that on. The initial=symbol is not included in the data. -
name=content: URL encode the content part and pass that on. Note that the name part is expected to be URL encoded already. -
@filename: load data from the given file (including any newlines), URL encode that data and pass it on in the POST. -
name@filename: load data from the given file (including any newlines), URL encode that data and pass it on in the POST. The name part gets an equal sign appended, resulting inname=urlencoded-file-content. Note that the name is expected to be URL encoded already.
As an example, you could POST a name to have it encoded by curl:
curl --data-urlencode "name=John Doe (Junior)" http://example.com
…which would send the following data in the actual request body:
name=John%20Doe%20%28Junior%29
If you store the string John Doe (Junior) in a file named contents.txt,
you can tell curl to send that contents URL encoded using the field name
'user' like this:
curl --data-urlencode user@contents.txt http://example.com
In both these examples above, the field name is not URL encoded but is passed
on as-is. If you want to URL encode the field name as well, like if you want
to pass on a field name called user name, you can ask curl to encode the
entire string by prefixing it with an equals sign (that does not get sent):
curl --data-urlencode "=user name=John Doe (Junior)" http://example.com
Convert to GET
A little convenience feature that could be suitable to mention in this context
is the -G or --get option, which takes all data you have specified with
the different -d variants and appends that data to the inputted URL
e.g. http://example.com separated with a '?' and then makes curl send a
GET instead.
This option makes it easy to switch between POSTing and GETing a form, for example.
An example that adds an encoded piece of data as a query in the URL:
curl -G --data-urlencode "name=daniel stenberg" https://example.com/
Expect 100-continue
HTTP/1 has no proper way to stop an ongoing transfer (in any direction) and still maintain the connection. Thus, if we figure out that the transfer had better stop after the transfer has started, there are only two ways to proceed: cut the connection and pay the price of reestablishing the connection again for the next request, or keep the transfer going and waste bandwidth but be able to reuse the connection next time.
One example of when this can happen is when you send a large file over HTTP, only to discover that the server requires authentication and immediately sends back a 401 response code.
The mitigation that exists to make this scenario less frequent is to have curl
pass on an extra header, Expect: 100-continue, which gives the server a
chance to deny the request before a lot of data is sent off. curl sends this
Expect: header by default if the POST it does is known or suspected to be
larger than one megabyte. curl also does this for PUT requests.
When a server gets a request with an 100-continue and deems the request fine, it responds with a 100 response that makes the client continue. If the server does not like the request, it sends back response code for the error it thinks it is.
Unfortunately, lots of servers in the world do not properly support the Expect: header or do not handle it correctly, so curl only waits 1000 milliseconds for that first response before it continues anyway.
You can change the amount of time curl waits for a response to Expect by using
--expect100-timeout <seconds>. You can avoid the wait entirely by using
-H Expect: to remove the header:
curl -H Expect: -d "payload to send" http://example.com
In some situations, curl inhibits the use of the Expect header if the
content it is about to send is small (below one megabyte), as having to waste
such a small chunk of data is not considered much of a problem.
HTTP/2 and later
HTTP/2 and later versions of HTTP can stop an ongoing transfer without
shutting down the connection, which makes Expect: pointless.
Chunked encoded POSTs
When talking to an HTTP 1.1 server, you can tell curl to send the request body
without a Content-Length: header upfront that specifies exactly how big the
POST is. By insisting on curl using chunked Transfer-Encoding, curl sends the
POST chunked piece by piece in a special style that also sends the size for
each such chunk as it goes along.
You send a chunked POST with curl like this:
curl -H "Transfer-Encoding: chunked" -d @file http://example.com
Caveats
This assumes that you know you do this against an HTTP/1.1 server. Before 1.1, there was no chunked encoding, and after version 1.1 chunked encoding has been deprecated.
Hidden form fields
Sending a post with -d is the equivalent of what a browser does when an HTML
form is filled in and submitted.
Submitting such forms is a common operation with curl; effectively, to have curl fill in a web form in an automated fashion.
If you want to submit a form with curl and make it look as if it has been done with a browser, it is important to provide all the input fields from the form. A common method for webpages is to set a few hidden input fields to the form and have them assigned values directly in the HTML. A successful form submission, of course, also includes those fields and in order to do that automatically you may be forced to first download the HTML page that holds the form, parse it, and extract the hidden field values so that you can send them off with curl.
Figure out what a browser sends
A common shortcut is to fill in the form with your browser and submit it and check in the browser's network development tools exactly what it sent.
A slightly different way is to save the HTML page containing the form, and then edit that HTML page to redirect the 'action=' part of the form to your own server or a test server that outputs exactly what it gets. Completing that form submission shows you exactly how a browser sends it.
A third option is, of course, to use a network capture tool such as Wireshark to check exactly what is sent over the wire. If you are working with HTTPS, you cannot see form submissions in clear text on the wire but instead you need to make sure you can have Wireshark extract your TLS private key from your browser. See the SSLKEYLOGFILE section for details on doing that.
JavaScript and forms
A common mitigation against automated agents or scripts using curl is to have the page with the HTML form use JavaScript to set values of some input fields, usually one of the hidden ones. Often, there is some JavaScript code that executes on page load or when the submit button is pressed which sets a magic value that the server then can verify before it considers the submission to be valid.
You can usually work around that by reading the JavaScript code and redoing that logic in your script. Using the tricks in Figure out what a browser sends to check exactly what a browser sends is then also a good help.
Multipart formposts
A multipart formpost is what an HTTP client sends when an HTML form is
submitted with enctype set to multipart/form-data. It is an HTTP POST
request sent with the request body specially formatted as a series of parts,
separated with MIME boundaries.
An example piece of HTML would look like this:
<form action="submit.cgi" method="post" enctype="multipart/form-data">
  Name: <input type="text" name="person"><br>
  File: <input type="file" name="secret"><br>
  <input type="submit" value="Submit">
</form>
Which could look something like this in a web browser:
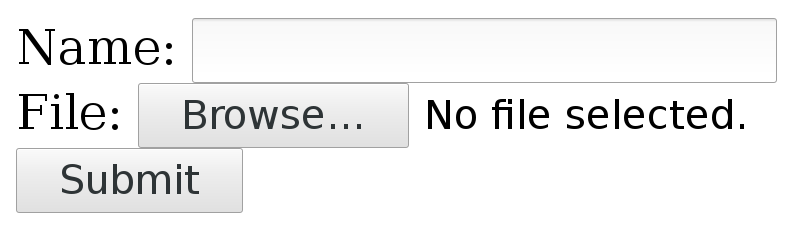
A user can fill in text in the 'Name' field and by pressing the Browse
button a local file can be selected that is uploaded when Submit is pressed.
Sending such a form with curl
With curl, you add each separate multipart with one -F (or --form) flag
and you then continue and add one -F for every input field in the form that
you want to send.
The above small example form has two parts, one named 'person' that is a plain text field and one named 'secret' that is a file.
Send your data to that form like this:
curl -F person=anonymous -F secret=@file.txt http://example.com/submit.cgi
The HTTP this generates
The action specifies where the POST is sent. method says it is a POST and enctype tells us it is a multipart formpost.
With the fields filled in as shown above, curl generates and sends these HTTP request headers to the host example.com:
POST /submit.cgi HTTP/1.1
Host: example.com
User-Agent: curl/7.46.0
Accept: */*
Content-Length: 313
Expect: 100-continue
Content-Type: multipart/form-data; boundary=------------d74496d66958873e
Content-Length, of course, tells the server how much data to expect. This example's 313 bytes is really small.
The Expect header is explained in the Expect 100 continue chapter.
The Content-Type header is a bit special. It tells that this is a
multipart formpost and then it sets the boundary string. The boundary string
is a line of characters with a bunch of random digits somewhere in it, that
serves as a separator between the different parts of the form that is
submitted. The particular boundary you see in this example has the random part
d74496d66958873e but you, of course, get something different when you run
curl (or when you submit such a form with a browser).
After that initial set of headers follows the request body
--------------------------d74496d66958873e
Content-Disposition: form-data; name="person"

anonymous
--------------------------d74496d66958873e
Content-Disposition: form-data; name="secret"; filename="file.txt"
Content-Type: text/plain

contents of the file
--------------------------d74496d66958873e--
Here you clearly see the two parts sent, separated with the boundary strings. Each part starts with one or more headers describing the individual part with its name and possibly some more details. Then after the part's headers come the actual data of the part, without any sort of encoding.
The last boundary string has two extra dashes -- appended to signal the end.
Content-Type
POSTing with curl's -F option makes it include a default Content-Type
header in its request, as shown in the above example. This says
multipart/form-data and then specifies the MIME boundary string. That
Content-Type is the default for multipart formposts but you can, of course,
still modify that for your own commands and if you do, curl is clever enough
to still append the boundary magic to the replaced header. You cannot really
alter the boundary string, since curl needs that for producing the POST
stream.
To replace the header, use -H like this:
curl -F 'name=Dan' -H 'Content-Type: multipart/magic' https://example.com
Converting a web form
There are a few different ways to figure out how to write a curl command line to submit a multipart form as seen in HTML.
-
Save the HTML locally, run
nclocally to listen on a chosen port number, change theactionURL to submit the POST to your localncinstance. Submit the form and watch howncshows it. Then translate into a curl command line. -
Use the development tools in your favorite browser and inspect the POST request in the network tab after you have submitted it. Then convert that HTTP data to a curl command line. Unfortunately, the copy as curl feature in the browsers usually do not actually do multipart formposts particularly well.
-
Inspect the source HTML and convert into a curl command line directly from that.
From <form> to -F
In a <form> that uses enctype="multipart/form-data", the first step is to
find the action= property as that tells the target for the POST. You need to
convert that into a full URL for your curl command line.
An example action looks like this:
<form action="submit.cgi" method="post" enctype="multipart/form-data">
If the form is found in a webpage hosted on a URL like for example
https://example.com/user/login the action=submit.cgi is a relative path
within the same directory as the form itself. The full URL to submit this form
thus becomes https://example.com/user/submit.cgi. That is the URL to use in
the curl command line.
Next, you must identify every <input> tag used within the form, including
the ones that are marked as hidden. The hidden property on tags means that
they are not shown in the webpage, but they should still be sent in the POST.
For every <input> in the form there should be a corresponding -F in the
command line.
text input
A regular tag using type text in the style like
<input type="text" name="person">
should then set the field name with content like this:
curl -F "person=Mr Smith" https://example.com/
file input
When the input type is set to a file, like in:
<input type="file" name="image">
You provide a file for this part by specifying the filename and use @ and
the path to the file to include:
curl -F image=@funnycat.gif https://example.com/
hidden input
A common technique to pass on state from a form is to set a number of
<input> tags as type="hidden". This is the same thing as an already filled
in form field, so you convert this to a command line by using the name and
value. For example:
<input type="hidden" name="username" value="bob123">
This is converted like for the normal text field, and here you know what the content should be:
curl -F "username=bob123" https://example.com/
All fields at once
If we toy with the idea that all the three different <input> tags showed in
the examples above were used in the same <form>, then a complete curl
command line to send, including the correct URL as extracted above, would look
like:
curl -F "person=Mr Smith" -F image=@funnycat.gif -F "username=bob123" \
  https://example.com/user/submit.cgi
-d vs -F
Previous chapters talked about regular POST and
multipart formpost, and in your typical command lines you do
them with -d or -F.
When do you use which of them?
As described in the chapters mentioned above, both these options send the specified data to the server. The difference is in how the data is formatted over the wire. Most of the time, the receiving end is written to expect a specific format and it expects that the sender formats and sends the data correctly. A client cannot pick a format of its own choice.
HTML web forms
When we are talking browsers and HTML, the standard way is to offer a form to
the user that sends off data when the form has been filled in. The <form>
tag is what makes one of those appear on the webpage. The tag instructs the
browser how to format its POST. If the form tag includes
enctype=multipart/form-data, it tells the browser to send the data as a
multipart formpost which you make with curl's -F
option. This method is typically used when the form includes a <input type=file> tag, for file uploads.
The default enctype used by forms, which is rarely spelled out in HTML since
it is default, is application/x-www-form-urlencoded. It makes the browser
URL encode the input as name=value pairs with the data encoded to avoid unsafe
characters. We often refer to that as a regular POST, and you
perform one with curl's -d and friends.
POST outside of HTML
POST is a regular HTTP method and there is no requirement that it be triggered by HTML or involve a browser. Lots of services, APIs and other systems allow you to pass in data these days in order to get things done.
If these services expect plain raw data or perhaps data formatted as JSON or
similar, you want the regular POST approach. curl's -d option
does not alter or encode the data at all but sends exactly what you tell it
to. Pay attention that -d sets a default Content-Type: that might not be
what you want.
HTTP PUT
The difference between a PUT and a POST is subtle. They are virtually identical transmissions except for the different method strings. Where POST is meant to pass on data to a remote resource, PUT is supposed to be the new version of that resource.
In that aspect, PUT is similar to good old standard file upload found in other protocols. You upload a new version of the resource with PUT. The URL identifies the resource and you point out the local file to put there:
curl -T localfile http://example.com/new/resource/file
-T implies a PUT and tell curl which file to send off. The similarities
between POST and PUT also allows you to send a PUT with a string by using the
regular curl POST mechanism using -d but asking for it to use a PUT instead:
curl -d "data to PUT" -X PUT http://example.com/new/resource/file
Redirects
The “redirect” is a fundamental part of the HTTP protocol. The concept was present and is documented already in the first spec (RFC 1945), published in 1996, and it has remained well-used ever since.
A redirect is exactly what it sounds like. It is the server sending back an instruction to the client instead of giving back the contents the client wanted. The server says “go look over here instead for that thing you asked for“.
Redirects are not all alike. How permanent is the redirect? What request method should the client use in the next request?
All redirects also need to send back a Location: header with the new URI to
ask for, which can be absolute or relative.
Permanent and temporary
Is the redirect meant to last or is it temporary? If you want a GET to permanently redirect users to resource B with another GET, send back a 301. It also means that the user-agent (browser) is meant to cache this and keep going to the new URI from now on when the original URI is requested.
The temporary alternative is 302. Right now the server wants the client to send a GET request to B, but it should not cache this but keep trying the original URI when directed to it next time.
Note that both 301 and 302 make browsers do a GET in the next request, which possibly means changing the method if it started with a POST (and only if POST). This changing of the HTTP method to GET for 301 and 302 responses is said to be “for historical reasons”, but that’s still what browsers do so most of the public web behaves this way.
In practice, the 303 code is similar to 302. It is not be cached and it makes the client issue a GET in the next request. The differences between a 302 and 303 are subtle, but 303 seems to be more designed for an “indirect response” to the original request rather than a redirect.
These three codes were the only redirect codes in the HTTP/1.0 spec.
curl however, does not remember or cache any redirects at all so to it, there is really no difference between permanent and temporary redirects.
Tell curl to follow redirects
In curl's tradition of only doing the basics unless you tell it differently,
it does not follow HTTP redirects by default. Use the -L, --location option
to tell it to do that.
When following redirects is enabled, curl follows up to 30 redirects by
default. There is a maximum limit mostly to avoid the risk of getting caught
in endless loops. If 30 is not sufficient for you, you can change the maximum
number of redirects to follow with the --max-redirs option.
GET or POST?
All three of these response codes, 301 and 302/303, assume that the client sends a GET to get the new URI, even if the client might have sent a POST in the first request. This is important, at least if you do something that does not use GET.
If the server instead wants to redirect the client to a new URI and wants it to send the same method in the second request as it did in the first, like if it first sent POST it’d like it to send POST again in the next request, the server would use different response codes.
To tell the client “the URI you sent a POST to, is permanently redirected to B where you should instead send your POST now and in the future”, the server responds with a 308. To complicate matters, the 308 code is only recently defined (the spec was published in June 2014) so older clients may not treat it correctly. If so, then the only response code left for you is…
The (older) response code to tell a client to send a POST also in the next request but temporarily is 307. This redirect is not be cached by the client though, so it’ll again post to A if requested to again. The 307 code was introduced in HTTP/1.1.
Oh, and redirects work the same way in HTTP/2 as they do in HTTP/1.1.
| Permanent | Temporary | |
|---|---|---|
| Switch to GET | 301 | 302 and 303 |
| Keep original method | 308 | 307 |
Decide what method to use in redirects
It turns out that there are web services out there in the world that want a POST sent to the original URL, but are responding with HTTP redirects that use a 301, 302 or 303 response codes and still want the HTTP client to send the next request as a POST. As explained above, browsers won’t do that and neither does curl by default.
Since these setups exist, and they’re actually not terribly rare, curl offers options to alter its behavior.
You can tell curl to not change the non-GET request method to GET after a 30x
response by using the dedicated options for that: --post301, --post302 and
--post303. If you are instead writing a libcurl based application, you
control that behavior with the CURLOPT_POSTREDIR option.
Redirecting to other hostnames
When you use curl you may provide credentials like username and password for a particular site, but since an HTTP redirect might move away to a different host curl limits what it sends away to other hosts than the original within the same transfer.
If you want the credentials to also get sent to the following hostnames even
though they are not the same as the original—presumably because you trust them
and know that there is no harm in doing that—you can tell curl that it is fine
to do so by using the --location-trusted option.
Non-HTTP redirects
Browsers support more ways to do redirects that sometimes make life complicated to a curl user as these methods are not supported or recognized by curl.
HTML redirects
If the above was not enough, the web world also provides a method to redirect
browsers by plain HTML. See the example <meta> tag below. This is somewhat
complicated with curl since curl never parses HTML and thus has no knowledge
of these kinds of redirects.
<meta http-equiv="refresh" content="0; url=http://example.com/">
JavaScript redirects
The modern web is full of JavaScript and as you know, JavaScript is a language and a full runtime that allows code to execute in the browser when visiting websites.
JavaScript also provides means for it to instruct the browser to move on to another site - a redirect, if you will.
Customize your HTTP
As described earlier, each HTTP transfer starts with curl sending a request. This request consists of a request line and a number of request headers, and this chapter details how you can customize those.
- Request method
- Request target
- Fragment
- Customize headers
- Referer
- User-agent
- Ranges
- Conditionals
- Compression
Of course, changing the HTTP version is another way to alter the request.
Request method
The first line of an HTTP request includes the method - sometimes also referred to as the verb. When doing a simple GET request as this command line would do:
curl http://example.com/file
…the initial request line looks like this:
GET /file HTTP/1.1
You can tell curl to change the method into something else by using the -X
or --request command-line options followed by the actual method name. You
can, for example, send a DELETE instead of GET like this:
curl http://example.com/file -X DELETE
This command-line option only changes the text in the outgoing request, it
does not change any behavior. This is particularly important if you, for
example, ask curl to send a HEAD with -X, as HEAD is specified to send all
the headers a GET response would get but never send a response body, even if
the headers otherwise imply that one would come. Thus, adding -X HEAD to a
command line that would otherwise do a GET causes curl to hang, waiting for a
response body that does not come.
When asking curl to perform HTTP transfers, it picks the correct method based
on the option so you should only rarely have to explicitly ask for it with
-X. It should also be noted that when curl follows redirects like asked to
with -L, the request method set with -X is sent even on the subsequent
redirects.
Request target
When given an input URL such as http://example.com/file, the path section of
the URL gets extracted and is turned into /file in the HTTP request line.
That item in the protocol is called the request target in HTTP. That is the
resource this request interacts with. Normally this request target is
extracted from the URL and then used in the request and as a user you do not
need to think about it.
In some rare circumstances, user may want to go creative and change this
request target in ways that the URL does not really allow. For example, the
HTTP OPTIONS method has a specially define request target for magic that
concerns the server and not a specific path, and it uses * for that. Yes,
a single asterisk. There is no way to specify a URL for this, so if you want to
pass a single asterisk in the request target to a server, like for OPTIONS,
you have to do it like this:
curl -X OPTIONS --request-target "*" http://example.com/
That example command line makes the first line of the outgoing HTTP request to look like this:
OPTIONS * HTTP/1.1
--path-as-is
The path part of the URL is the part that starts with the first slash after the hostname and ends either at the end of the URL or at a '?' or '#' (roughly speaking).
If you include substrings including /../ or /./ in the path, curl
automatically squashes them before the path is sent to the server, as is
dictated by standards and how such strings tend to work in local file systems.
The /../ sequence removes the previous section so that /hello/sir/../ ends
up /hello/ and /./ is removed so that /hello/./sir/ becomes
/hello/sir/.
To prevent curl from squashing those magic sequences before they are sent to
the server and thus allow them through, the --path-as-is option exists.
Lame attempt to trick the server to deliver its /etc/passwd file:
curl --path-as-is https://example.com/../../etc/passwd
Fragment
A URL may contain an anchor, also known as a fragment, which is written with a
pound sign and string at the end of the URL. Like for example
http://example.com/foo.html#here-it-is. That fragment part, everything from
the pound/hash sign to the end of the URL, is only intended for local use and
is not sent over the network. curl strips that data off and discards it.
A range trick
A practical way to exploit the fact that the fragment is not sent over the wire, is to use that field for ranges if you want to use the same URL many times on the command line.
For example, download this URL twenty times:
curl "https://example.com/#[1-20]"
Customize headers
In an HTTP request, after the initial request-line, there typically follows a
number of request headers. That is a set of name: value pairs that ends with
a blank line that separates the headers from the following request body (that
sometimes is empty).
curl passes on a few default headers by default on its own account in
requests, like for example Host:, Accept:, User-Agent: and a few others
that may depend on what the user asks curl to do.
All headers set by curl itself can be replaced, by the user. You then tell
curl's -H or --header the new header to use and it then replaces the
internal one if the header field matches one of those headers, or it adds the
specified header to the list of headers to send in the request.
To change the Host: header, do this:
curl -H "Host: test.example" http://example.com/
To add a Elevator: floor-9 header, do this:
curl -H "Elevator: floor-9" http://example.com/
If you want to delete an internally generated header, give it to curl without a value, nothing on the right side of the colon.
To switch off the User-Agent: header, do this:
curl -H "User-Agent:" http://example.com/
Finally, if you then truly want to add a header with no contents on the right side of the colon (which is a rare thing), the magic marker for that is to instead end the header field name with a semicolon. Like this:
curl -H "Empty;" http://example.com
Referer
When a user clicks on a link on a webpage and the browser takes the user away
to the next URL, it sends the new URL a Referer: header in the new request
telling it where it came from. That is the referer header. The Referer: is
misspelled but that is how it is supposed to be.
With curl you set the referer header with -e or --referer, like this:
curl --referer http://comes-from.example.com https://www.example.com/
User-agent
The User-Agent is a header that each client can set in the request to inform the server which user-agent it is. Sometimes servers look at this header and determine how to act based on its contents.
The default header value is 'curl/[version]', as in User-Agent: curl/7.54.1
for curl version 7.54.1.
You can set any value you like, using the option -A or --user-agent plus
the string to use or, as it is a normal header: -H "User-Agent: foobar/2000".
As comparison, a test version of Firefox on a Linux machine once sent this User-Agent header:
User-Agent: Mozilla/5.0 (X11; Linux x86_64; rv:58.0) Gecko/20100101 Firefox/58.0
Ranges
What if the client only wants the first 200 bytes out of a remote resource or perhaps 300 bytes somewhere in the middle? The HTTP protocol allows a client to ask for only a specific data range. The client asks the server for the specific range with a start offset and an end offset. It can even combine things and ask for several ranges in the same request by listing a bunch of pieces next to each other. When a server sends back multiple independent pieces to answer such a request, you get them separated with mime boundary strings and it is up to the user application to handle that accordingly. curl does not further separate such a response.
However, a byte range is only a request to the server. It does not have to respect the request and in many cases, like when the server automatically generates the contents on the fly when it is being asked, it refuses to do it and it then instead responds with the full contents anyway.
You can make curl ask for a range with -r or --range. If you want the
first 200 bytes out of something:
curl -r 0-199 http://example.com
Or everything in the file starting from index 200:
curl -r 200- http://example.com
Get 200 bytes from index 0 and 200 bytes from index 1000:
curl -r 0-199,1000-1199 http://example.com/
Conditionals
Sometimes users want to avoid downloading a file again if the same file maybe already has been downloaded the day before. This can be done by making the HTTP transfer conditioned on something. curl supports two different conditions: the file timestamp and etag.
Check by modification date
Download the file only if it is newer than a specific date with the use of the
-z or --time-cond option:
curl -z "Jan 10, 2017" https://example.com/file -O
Or the reverse, get the file only if it is older than the specific time by prefixing the date with a dash:
curl --time-cond "-Jan 10, 2017" https://example.com/file -O
The date parser is liberal and accepts most formats you can write the date with, and you can also specify it complete with a time:
curl --time-cond "Sun, 12 Sep 2004 15:05:58 -0700" \
  https://www.example.org/file.html
The -z option can also extract and use the timestamp from a local file,
which is handy to only download a file if it has been updated remotely:
curl -z file.html https://example.com/file.html -O
It is often useful to combine the use of -z with the --remote-time flag,
which sets the time of the locally created file to the same timestamp as the
remote file had:
curl -z file.html -o file.html --remote-time https://example.com/file.html
Check by modification of content
HTTP servers can return a specific ETag for a given resource version. If the resource at a given URL changes, a new Etag value must be generated, so a client knows that as long as the ETag remains the same, the content has not changed.
Using ETags, curl can check for remote updates without having to rely on times or file dates. It also then makes the check able to detect sub-second changes, which the timestamp based checks cannot.
Using curl you can download a remote file and save its ETag (if it provides
any) in a separate cache by using the --etag-save command line option. Like
this:
curl --etag-save etag.txt https://example.com/file -o output
A subsequent command line can then use that previously saved etag and make sure to only download the file again if it has changed, like this:
curl --etag-compare etag.txt https://example.com/file -o output
The two etag options can also be combined in the same command line, so that if the file actually was updated, curl would save the update ETag again in the file:
curl --etag-compare etag.txt --etag-save etag.txt \
  https://example.com/file -o output
Compression
curl supports asking HTTP and HTTPS servers to provide compressed versions of the data and then perform automatic decompression of it on arrival. In situations where bandwidth is more limited than CPU this helps you receive more data in a shorter amount of time.
HTTP compression can be done using two different mechanisms, one which might
be considered "The Right Way" and the other that is the way that everyone
actually uses and is the widespread and popular way to do it. The common way
to compress HTTP content is using the Content-Encoding header. You ask
curl to use this with the --compressed option:
curl --compressed http://example.com/
With this option enabled (and if the server supports it) it delivers the data in a compressed way and curl decompresses it before saving it or sending it to stdout. This usually means that as a user you do not really see or experience the compression other than possibly noticing a faster transfer.
The --compressed option asks for Content-Encoding compression using one of
the supported compression algorithms. There is also the rare
Transfer-Encoding method, which is the request header that was created for
this automated method but was never really widely adopted. You can tell curl
to ask for Transfer-Encoded compression with --tr-encoding:
curl --tr-encoding http://example.com/
In theory, there is nothing that prevents you from using both in the same command line, although in practice, you may experience that some servers get a little confused when asked to compress in two different ways. It is generally safer to pick one.
HTTP headers
HTTP/1.x headers cannot be compressed. HTTP/2 and HTTP/3 headers on the other hands are always compressed and cannot be sent uncompressed. However, as a convenience to users, curl always shows the headers uncompressed in a style similar to how they look for HTTP/1.x to make the output and look consistent.
HTTP uploads
For HTTP uploads with POST or PUT there is no standard way to do compression. The above mentioned HTTP compression methods only work for downloads.
You can of course still compress the data locally before sending it to the server.
Cookies
HTTP cookies are key/value pairs that a client stores on the behalf of a server. They are sent back in subsequent requests to allow clients to keep state between requests. Remember that the HTTP protocol itself has no state but instead the client has to resend all data in subsequent requests that it wants the server to be aware of.
Cookies are set by the server with the Set-Cookie: header and with each
cookie the server sends a bunch of extra properties that need to match for the
client to send the cookie back. Like domain name and path and perhaps most
important for how long the cookie should live on.
The expiry of a cookie is either set to a fixed time in the future (or to live a number of seconds) or it gets no expiry at all. A cookie without an expire time is called a session cookie and is meant to live during the session but not longer. A session in this aspect is typically thought to be the life time of the browser used to view a site. When you close the browser, you end your session. Doing HTTP operations with a command-line client that supports cookies begs the question of when a session really ends…
- Cookie engine
- Reading cookies from file
- Writing cookies to file
- New cookie session
- Cookie file format
Cookie engine
The general concept of curl only doing the bare minimum unless you tell it differently makes it not acknowledge cookies by default. You need to switch on the cookie engine to make curl keep track of cookies it receives and then subsequently send them out on requests that have matching cookies.
You enable the cookie engine by asking curl to read or write cookies. If you tell curl to read cookies from blank named file, you only switch on the engine but start off with an empty internal cookie store:
curl -b "" http://example.com
Switching on the cookie engine, getting a single resource and then quitting would be pointless as curl would have no chance to actually send any cookies it received. Assuming the site in this example would set cookies and then do a redirect we would do:
curl -L -b "" http://example.com
Reading cookies from file
Starting off with a blank cookie store may not be desirable. Why not start off with cookies you stored in a previous fetch or that you otherwise acquired? The file format curl uses for cookies is called the Netscape cookie format because it was once the file format used by browsers and then you could easily tell curl to use the browser's cookies.
As a convenience, curl also supports a cookie file being a set of HTTP headers that set cookies. It is an inferior format but may be the only thing you have.
Tell curl which file to read the initial cookies from:
curl -L -b cookies.txt http://example.com
Remember that this only reads from the file. If the server would update the cookies in its response, curl would update that cookie in its in-memory store but then eventually throw them all away when it exits and a subsequent invocation of the same input file would use the original cookie contents again.
Writing cookies to file
The place where cookies are stored is sometimes referred to as the cookie jar. When you enable the cookie engine in curl and it has received cookies, you can instruct curl to write down all its known cookies to a file, the cookie jar, before it exits. It is important to remember that curl only updates the output cookie jar on exit and not during its lifetime, no matter how long the handling of the given input takes.
You point out the cookie jar output with -c:
curl -c cookie-jar.txt http://example.com
-c is the instruction to write cookies to a file, -b is the instruction
to read cookies from a file. Oftentimes you want both.
When curl writes cookies to this file, it saves all known cookies including those that are session cookies (without a given lifetime). curl itself has no notion of a session and it does not know when a session ends so it does not flush session cookies unless you tell it to.
New cookie session
A cookie as set by the server can be a session cookie, that is meant to be kept around only for as long as the session lasts. curl has no idea how long a session is or when it ends.
Instead of telling curl when a session ends, curl features an option that lets the user decide when a new session begins.
A new cookie session means that all the old session cookies are be thrown away. It is the equivalent of closing a browser and starting it up again.
Tell curl a new cookie session starts by using -j, --junk-session-cookies:
curl -j -b cookies.txt http://example.com/
Cookie file format
Netscape once created a file format for storing cookies on disk so that they would survive browser restarts. curl adopted that file format to allow sharing the cookies with browsers, only to soon watch the browsers move away from that format. Modern browsers no longer use it, while curl still does.
The Netscape cookie file format stores one cookie per physical line in the file with a bunch of associated meta data, each field separated with TAB. That file is called the cookiejar in curl terminology.
When libcurl saves a cookiejar, it creates a file header of its own in which there is a URL mention that links to the web version of this document.
File format
The cookie file format is text based and stores one cookie per line. Lines
that start with # are treated as comments.
Each line that specifies a single cookie consists of seven text fields separated with TAB characters (ASCII octet 9). A valid line must end with a newline character.
Fields in the file
Field number, what type and example data and the meaning of it:
- string
example.com- the domain name - boolean
FALSE- include subdomains - string
/foobar/- path - boolean
TRUE- send/receive over HTTPS only - number
1462299217- expires at - seconds since Jan 1st 1970, or 0 - string
person- name of the cookie - string
daniel- value of the cookie
HTTPS
HTTPS is in effect Secure HTTP. The secure part means that the TCP transport layer is enhanced to provide authentication, privacy (encryption) and data integrity by the use of TLS.
See the Using TLS section for in-depth details on how to modify and tweak the TLS details in an HTTPS transfer.
HSTS
Automatic use of HTTPS.
HTTP Strict Transport Security, HSTS, is a protocol mechanism that helps to protect HTTPS servers against man-in-the-middle attacks such as protocol downgrade attacks and cookie hijacking. It allows an HTTPS server to declare that clients should automatically interact with this hostname using only HTTPS connections going forward - and explicitly not use clear text protocols with it.
HSTS cache
The HSTS status for a certain server name is set in a response header and has an expire time. The status for every HSTS hostname needs to be saved in a file for curl to pick it up and to update the status and expire time.
Invoke curl and tell it which file to use as a hsts cache:
curl --hsts hsts.txt https://example.com
curl only updates the hsts info if the header is read over a secure transfer, so not when done over a clear text protocol.
Use HSTS to update insecure protocols
If the cache file now contains an entry for the given hostname, it automatically switches over to a secure protocol even if you try to connect to it with an insecure one:
curl --hsts hsts.txt http://example.com
Alternative Services
RFC 7838 defines an HTTP header
which lets a server tell a client that there is one or more alternatives for
that server at another place with the use of the Alt-Svc: response header.
The alternatives the server suggests can include a server running on another port on the same host, on another completely different hostname and it can even perhaps offer the service over another protocol.
Enable
To make curl consider offered alternatives, tell curl to use a specific alt-svc cache file like this:
curl --alt-svc altcache.txt https://example.com/
then curl loads existing alternative service entries from the file at start-up
and consider those when doing HTTP requests, and if the servers sends new or
updated Alt-Svc: headers, curl stores those in the cache at exit.
The alt-svc cache
The alt-svc cache is similar to a cookie jar. It is a text based file that stores one alternative per line and each entry also has an expiry time for which duration that particular alternative is valid.
HTTPS only
Alt-Svc: is only trusted and parsed from servers when connected to over
HTTPS.
HTTP/3
The use of Alt-Svc: headers is as of August 2019 the only defined way to
bootstrap a client and server into using HTTP/3. The server then hints to the
client over HTTP/1 or HTTP/2 that it also is available over HTTP/3 and then
curl can connect to it using HTTP/3 in the subsequent request if the alt-svc
cache says so.
Scripting browser-like tasks
curl can do almost every HTTP operation and transfer your favorite browser can. It can actually do a lot more than so as well, but in this chapter we focus on the fact that you can use curl to reproduce, or script, what you would otherwise have to do manually with a browser.
Here are some tricks and advice on how to proceed when doing this.
Figure out what the browser does
This is really a necessary first step. Second-guessing what it does risks having you chase down the wrong problem rat-hole. The scientific approach to this problem pretty much requires that you first understand what the browser does.
To learn what the browser does to perform a certain task, you can either read the HTML pages that you operate on and with a deep enough knowledge you can see what a browser would do to accomplish it and then start trying to do the same with curl.
The slightly more effective way, that also works even for the cases when the page is shock-full of obfuscated JavaScript, is to run the browser and monitor what HTTP operations it performs.
The Copy as curl section describes how you can record a browser's request and easily convert that to a curl command line.
Those copied curl command lines are often not good enough though since they tend to copy exactly that request, while you probably want to be a tad bit more dynamic so that you can reproduce the same operation and not resend the verbatim request.
Cookies
A lot of the web today works with a username and password login prompt somewhere. In many cases you even logged in a while ago with your browser but it has kept the state and keeps you logged in.
The logged-in state is almost always done by using cookies. A common operation would be to first login and save the returned cookies in a file, and then let the site update the cookies in the subsequent command lines when you traverse the site with curl.
Web logins and sessions
The site at https://example.com/ features a login prompt. The login on the web site is an HTML form to which you send a HTTP POST to. Save the response cookies and the response (HTML) output.
Although the login page is visible (if you would use a browser) on
https://example.com/, the HTML form tag on that page informs you about which
exact URL to send the POST to, using the action parameter.
In our imaginary case, the form tag looks like this:
<form action="login.cgi" method="POST">
  <input type="text" name="user">
  <input type="password" name="secret">
  <input type="hidden" name="id" value="bc76">
</form>
There are three fields of importance. user, secret and id. The
last one, the id, is marked hidden which means that it does not show up in
the browser and it is not a field that a user fills in. It is generated by the
site itself, and for your curl login to succeed, you need extract that value
and use that in your POST submission together with the rest of the data.
Send correct contents to the fields to the correct destination URL:
curl -d user=daniel -d secret=qwerty -d id=bc76 \
  https://example.com/login.cgi -o out
Many login pages even send you a session cookie already when presenting the
login, and since you often need to extract the hidden fields from the <form>
tag anyway, you could do something like this first:
curl -c cookies https://example.com/ -o loginform
You would often need an HTML parser or some scripting language to extract the id field from there and then you can proceed and login as mentioned above, but with the added cookie loading (I am splitting the line into two lines to make it more readable):
curl -d user=daniel -d secret=qwerty -d id=bc76 \
  https://example.com/login.cgi -b cookies -c cookies -o out
You can see that it uses both -b for reading cookies from the file and -c
to store cookies again, for when the server sends back updated cookies.
Always, always, add -v to the command lines when working out the
details. See also the verbose section for more
details on that.
Redirects
It is common for servers to use redirects when responding to a login POST. It is so common I would probably say it is rare that it is not solved with a redirect.
You then need to remember that curl does not follow redirects automatically.
You need to instruct it to do this by adding the -L command line option.
Adding that to the previous command line then makes the full one look like:
curl -d user=daniel -d secret=qwerty -d id=bc76 \
  https://example.com/login.cgi -b cookies -c cookies -L -o out
Post-login
In the above example command lines, we save the login response output in a file named 'out' and in your script you should probably verify that it contains some text or something that confirms that the login is successful.
Once successfully logged in, get the files or perform the HTTP operations you
need and remember to keep using both -b and -c on the command lines to use
and update the cookies.
Referer
Some sites verify that the Referer: is actually identifying the legitimate
parent URL when you request something or when you login or similar. You can
then inform the server from which URL you arrived by using -e https://example.com/ etc. Appending that to the previous login attempt then
makes it:
curl -d user=daniel -d secret=qwerty -d id=bc76 \
  https://example.com/login.cgi \
  -b cookies -c cookies -L -e "https://example.com/" -o out
TLS fingerprinting
Anti-bot detections nowadays use TLS fingerprinting to figure out whether a request is coming from a browser. curl's fingerprint can vary depending on your environment and most likely is different from those of browsers. curl's CLI does not have options to change all the various parts of the fingerprint, however an advanced user can customize the fingerprint through the use of libcurl and by compiling curl from source themselves.
Command line FTP
FTP, the File Transfer Protocol, is probably the oldest network protocol that curl supports—it was created in the early 1970s. The official spec that still is the go-to documentation is RFC 959, from 1985, published well over a decade before the first curl release.
FTP was created in a different era of the Internet and computers and as such it works a little bit differently than most other protocols. These differences can often be ignored and things just works, but they are also important to know at times when things do not run as planned.
Ping-pong
The FTP protocol is a command and response protocol; the client sends a
command and the server responds. If you use curl's -v option you get to see
all the commands and responses during a transfer.
For an ordinary transfer, there are something like 5 to 8 commands necessary to send and as many responses to wait for and read. Perhaps needlessly to say, if the server is in a remote location there is a lot of time waiting for the ping pong to go through before the actual file transfer can be set up and get started. For small files, the initial commands can take longer time than the actual data transfer.
Transfer mode
When an FTP client is about to transfer data, it specifies to the server which transfer mode it would like the upcoming transfer to use. The two transfer modes curl supports are 'ASCII' and 'BINARY'. Ascii is for text and usually means that the server sends the files with converted newlines while binary means sending the data unaltered and assuming the file is not text.
curl defaults to binary transfer mode for FTP, and you ask for ascii mode
instead with -B, --use-ascii or by making sure the URL ends with ;type=A.
Authentication
FTP is one of the protocols you normally do not access without a user name and
password. It just happens that for systems that allow anonymous FTP access you
can login with pretty much any name and password you like. When curl is used
on an FTP URL to do transfer without any given user name or password, it uses
the name anonymous with the password ftp@example.com.
If you want to provide another user name and password, you can pass them on to
curl either with the -u, --user option or embed the info in the URL:
curl --user daniel:secret ftp://example.com/download

curl ftp://daniel:secret@example.com/download
- FTP Directory listing
- Uploading with FTP
- Custom FTP commands
- Two connections
- Directory traversing
- FTPS
FTP Directory listing
You can list a remote FTP directory with curl by making sure the URL ends with a trailing slash. If the URL ends with a slash, curl presumes that it is a directory you want to list. If it is not actually a directory, you are likely to instead get an error.
curl ftp://ftp.example.com/directory/
With FTP there is no standard syntax for the directory output that is returned
for this sort of command that uses the standard FTP command LIST. The
listing is usually humanly readable and perfectly understandable but different
servers can return the listing using slightly different layouts.
One way to get a listing of all the names in a directory and thus to avoid the
special formatting of the regular directory listings is to tell curl to
--list-only (or -l). curl then issues the NLST FTP command instead:
curl --list-only ftp://ftp.example.com/directory/
NLST has its own quirks though, as some FTP servers list only actual files in their response to NLST; they do not include directories and symbolic links.
Uploading with FTP
To upload to an FTP server, you specify the entire target file path and name
in the URL, and you specify the local filename to upload with -T, --upload-file. Optionally, you end the target URL with a slash and then the
file component from the local path is appended by curl and used as the remote
filename.
Like:
curl -T localfile ftp://ftp.example.com/dir/path/remote-file
or to use the local filename as the remote name:
curl -T localfile ftp://ftp.example.com/dir/path/
Append the local file to the target file when uploading instead of
overwriting, with the --append option:
curl -T uploadthis --append ftp://example.com/directory/remotename
curl also supports globbing in the -T
argument so you can opt to easily upload a range of files:
curl -T 'image[1-99].jpg' ftp://ftp.example.com/upload/
or a series of files:
curl -T '{file1,file2}' ftp://ftp.example.com/upload/
or
curl -T '{Huey,Dewey,Louie}.jpg' ftp://ftp.example.com/nephews/
Custom FTP commands
The FTP protocol offers a wide variety of different commands that allow the client to perform actions, other than the plain file transfers that curl is focused on.
A curl user can pass on such extra (custom) commands to the server as a step in the file transfer sequence. curl even offers to have those commands run at different points in the process.
Quote
In the old days the standard old ftp client had a command called quote. It
was used to send commands verbatim to the server. curl uses the same name for
virtually the same functionality: send the specified command verbatim to the
server. Actually one or more commands. -Q or --quote.
To know what commands that are available and possible to send to a server, you need to know a little about the FTP protocol, and possibly read up a bit on RFC 959 on the details.
To send a simple NOOP to the server (which does nothing) before the
transfer starts, provide it to curl like this:
curl -Q NOOP ftp://example.com/file
To instead send the same command immediately after the transfer, prefix the FTP command with a dash:
curl -Q -NOOP ftp://example.com/file
curl also offers to send commands after it changes the working directory, before the commands that kick off the transfer are sent. To send command then, prefix the command with a '+' (plus).
A series of commands
You can in fact send commands in all three different times by using multiple
-Q on the command line. You can also send multiple commands in the same
position by using more -Q options.
By default, if any of the given commands returns an error from the server, curl stops its operations, abort the transfer (if it happens before transfer has started) and not send any more of the custom commands.
Example, rename a file then do a transfer:
curl -Q "RNFR original" -Q "RNTO newname" ftp://example.com/newname
Fallible commands
You can opt to send individual quote commands that are allowed to fail, to get an error returned from the server without causing everything to stop.
You make the command fallible by prefixing it with an asterisk (*). For
example, send a delete (DELE) after a transfer and allow it to fail:
curl -Q "-*DELE file" ftp://example.com/moo
Two connections
FTP uses two TCP connections. The first connection is setup by the client when it connects to an FTP server, and is called the control connection. As the initial connection, it gets to handle authentication and changing to the correct directory on the remote server, etc. When the client then is ready to transfer a file, a second TCP connection is established and the data is transferred over that.
This setting up of a second connection causes nuisances and headaches for several reasons.
Active connections
The client can opt to ask the server to connect to the client to set it up, a
so-called active connection. This is done with the PORT or EPRT commands.
Allowing a remote host to connect back to a client on a port that the client
opens up requires that there is no firewall or other network appliance in
between that refuses that to go through and that is far from always the case.
You ask for an active transfer using curl -P [arg] (also known as
--ftp-port in long form) and while the option allows you to specify exactly
which address to use, setting the same as you come from is almost always the
correct choice and you do that with -P -, like this way to ask for a file:
curl -P - ftp://example.com/foobar.txt
You can also explicitly ask curl to not use EPRT (which is a slightly newer
command than PORT) with the --no-eprt command-line option.
Passive connections
curl defaults to asking for a passive connection, which means it sends a PASV or EPSV command to the server and then the server opens up a new port for the second connection that then curl connects to. Outgoing connections to a new port are generally easier and less restricted for end users and clients but requires that the network in the server's end allows it.
Passive connections are enabled by default, but if you have switched on active
before, you can switch back to passive with --ftp-pasv.
You can also explicitly ask curl not to use EPSV (which is a slightly newer
command than PASV) with the --no-epsv command-line option.
Sometimes the server is running a funky setup so that when curl issues the
PASV command and the server responds with an IP address for curl to connect
to, that address is wrong and then curl fails to setup the data
connection. For this (rare) situation, you can ask curl to ignore the IP
address mentioned in the PASV response (--ftp-skip-pasv-ip) and instead use
the same IP address it has for the control connection even for the second
connection.
Firewall issues
Using either active or passive transfers, any existing firewalls in the network path pretty much have to have stateful inspection of the FTP traffic to figure out the new port to open that up and accept it for the second connection.
Directory traversing
When doing FTP commands to traverse the remote file system, there are a few different ways curl can proceed to reach the target file, the file the user wants to transfer.
multicwd
curl can do one change directory (CWD) command for every individual directory
down the file tree hierarchy. If the full path is one/two/three/file.txt,
that method means doing three CWD commands before asking for the file.txt
file to get transferred. This method thus creates quite a large number of
commands if the path is many levels deep. This method is mandated by an early
spec (RFC 1738) and is how curl acts by default:
curl --ftp-method multicwd ftp://example.com/one/two/three/file.txt
This then equals this FTP command/response sequence (simplified):
> CWD one
< 250 OK. Current directory is /one
> CWD two
< 250 OK. Current directory is /one/two
> CWD three
< 250 OK. Current directory is /one/two/three
> RETR file.txt
nocwd
The opposite to doing one CWD for each directory part is to not change the directory at all. This method asks the server using the entire path at once and is thus fast. Occasionally servers have a problem with this and it is not purely standards-compliant:
curl --ftp-method nocwd ftp://example.com/one/two/three/file.txt
This then equals this FTP command/response sequence (simplified):
> RETR one/two/three/file.txt
singlecwd
This is the in-between the other two FTP methods. This makes a single CWD
command to the target directory and then it asks for the given file:
curl --ftp-method singlecwd ftp://example.com/one/two/three/file.txt
This then equals this FTP command/response sequence (simplified):
> CWD one/two/three
< 250 OK. Current directory is /one/two/three
> RETR file.txt
FTPS
FTPS is FTP secure by TLS. It negotiates fully secured TLS connections where plain FTP uses clear text unsafe connections.
There are two ways to do FTPS with curl. The implicit way and the explicit way. (These terms originate from the FTPS RFC). Usually the server you work with dictates which of these methods you can and shall use against it.
Implicit FTPS
The implicit way is when you use ftps:// in your URL. This makes curl
connect to the host and do a TLS handshake immediately, without doing anything
in the clear. If no port number is specified in the URL, curl uses port 990
for this. This is usually not how FTPS is done.
Explicit FTPS
The explicit way of doing FTPS is to keep using an ftp:// URL, but
instruct curl to upgrade the connection into a secure one using the AUTH TLS
FTP command.
You can tell curl to either attempt an upgrade and continue as usual if the
upgrade fails with --ssl, or you can force curl to either upgrade or fail
the whole thing hard if the upgrade fails by using --ssl-reqd. We strongly
recommend using the latter, so that you can be sure that a secure transfer is
done - if any.
Common FTPS problems
The single most common problem with FTPS comes from the fact that the FTP protocol (that FTPS transfers lean on) uses a separate connection setup for the data transfer. This connection is done to another port and when FTP is done over clear text (non-FTPS), firewalls and network inspectors etc can figure out that this is FTP in progress and they can adapt things and rules for the new connection.
When the FTP control channel is encrypted with TLS, firewalls cannot see what is going on and no outsider can dynamically adapt network rules or permission based on this.
libcurl
The engine in the curl command-line tool is libcurl. libcurl is also the engine in thousands of tools, services and applications out there today, performing their Internet data transfers.
C API
libcurl is a library of functions that are provided with a C API, for applications written in C. You can easily use it from C++ too, with only a few considerations (see libcurl for C++ programmers). For other languages, there exist bindings that work as intermediate layers between libcurl the library and corresponding functions for the particular language you like.
Transfer oriented
We have designed libcurl to be transfer oriented usually without forcing users to be protocol experts or in fact know much at all about networking or the protocols involved. You setup a transfer with as many details and specific information as you can and want, and then you tell libcurl to perform that transfer.
That said, networking and protocols are areas with lots of pitfalls and special cases so the more you know about these things, the more you are able to understand about libcurl's options and ways of working. Not to mention, such knowledge is invaluable when you are debugging and need to understand what to do next when things do not go as you intended.
The most basic libcurl using application can be as small as just a couple of lines of code, but most applications do, of course, need more code than that.
Simple by default, more on demand
libcurl generally does the simple and basic transfer by default, and if you want to add more advanced features, you add that by setting the correct options. For example, libcurl does not support HTTP cookies by default but it does once you tell it.
This makes libcurl's behaviors easier to guess and depend on, and also it makes it easier to maintain old behavior and add new features. Only applications that actually ask for and use the new features get that behavior.
- Header files
- Global initialization
- API compatibility
- --libcurl
- multi-threading
- CURLcode return codes
- Verbose operations
- Caches
- Performance
- for C++ programmers
Header files
There is only ever one header your libcurl using application needs to include:
#include <curl/curl.h>
That file in turn includes a few other public header files but you can pretend they do not exist. (Historically speaking, we started out slightly different but over time we have stabilized around this form of only using a single one for includes.)
Global initialization
Before you do anything libcurl related in your program, you should do a global
libcurl initialize call with curl_global_init(). This is necessary because
some underlying libraries that libcurl might be using need a call ahead to get
setup and initialized properly.
curl_global_init() is, unfortunately, not thread-safe, so you must ensure that
you only do it once and never simultaneously with another call. It initializes
global state so you should only call it once, and once your program is
completely done using libcurl you can call curl_global_cleanup() to free and
clean up the associated global resources the init call allocated.
libcurl is built to handle the situation where you skip the
curl_global_init() call, but it does so by calling it itself instead (if you
did not do it before any actual file transfer starts) and it then uses its own
defaults. Beware that it is still not thread-safe even then, so it might cause
some "interesting" side effects for you. It is much better to call
curl_global_init() yourself in a controlled manner.
API compatibility
libcurl promises API stability and guarantees that your program written today remains working in the future. We do not break compatibility.
Over time, we add features, new options and new functions to the APIs but we do not change behavior in a non-compatible way or remove functions.
The last time we changed the API in an non-compatible way was for 7.16.0 in 2006 and we plan to never do it again.
Version numbers
curl and libcurl are individually versioned, but they mostly follow each other rather closely.
The version numbering is always built up using the same system:
X.Y.Z
- X is main version number
- Y is release number
- Z is patch number
Bumping numbers
One of these X.Y.Z numbers gets bumped in every new release. The numbers to the right of a bumped number are reset to zero.
The main version number X is bumped when really big, world colliding changes are made. The release number Y is bumped when changes are performed or things/features are added. The patch number Z is bumped when the changes are mere bugfixes.
It means that after a release 1.2.3, we can release 2.0.0 if something really big has been made, 1.3.0 if not that big changes were made or 1.2.4 if mostly bugs were fixed.
Bumping, as in increasing the number with 1, is unconditionally only affecting one of the numbers (and the ones to the right of it are set to zero). 1 becomes 2, 3 becomes 4, 9 becomes 10, 88 becomes 89 and 99 becomes 100. Thus, after 1.2.9 comes 1.2.10. After 3.99.3, 3.100.0 might come.
All original curl source release archives are named according to the libcurl version (not according to the curl client version that, as said before, might differ).
Which libcurl version
As a service to any application that might want to support new libcurl
features while still being able to build with older versions, all releases
have the libcurl version stored in the curl/curlver.h file using a static
numbering scheme that can be used for comparison. The version number is
defined as:
#define LIBCURL_VERSION_NUM 0xXXYYZZ
Where XX , YY and ZZ are the main version, release and patch numbers in
hexadecimal. All three number fields are always represented using two digits
(eight bits each). 1.2.0 would appear as 0x010200 while version 9.11.7
appears as 0x090b07.
This 6-digit hexadecimal number is always a greater number in a more recent release. It makes comparisons with greater than and less than work.
This number is also available as three separate defines:
LIBCURL_VERSION_MAJOR, LIBCURL_VERSION_MINOR and LIBCURL_VERSION_PATCH.
These defines are, of course, only suitable to figure out the version number built now and do not help you figuring out which libcurl version that is used at runtime three years from now.
Which libcurl version runs
To figure out which libcurl version that your application is using right
now, curl_version_info() is there for you.
Applications should use this function to judge if things are possible to do or not, instead of using compile-time checks, as dynamic/DLL libraries can be changed independent of applications.
curl_version_info() returns a pointer to a struct with information about
version numbers and various features and in the running version of
libcurl. You call it by giving it a special age counter so that libcurl knows
the age of the libcurl that calls it. The age is a define called
CURLVERSION_NOW and is a counter that is increased at irregular intervals
throughout the curl development. The age number tells libcurl what struct set
it can return.
You call the function like this:
curl_version_info_data *version = curl_version_info( CURLVERSION_NOW );
The data then points to struct that has or at least can have the following layout:
struct {
  CURLversion age;          /* see description below */

  /* when 'age' is 0 or higher, the members below also exist: */
  const char *version;      /* human readable string */
  unsigned int version_num; /* numeric representation */
  const char *host;         /* human readable string */
  int features;             /* bitmask, see below */
  char *ssl_version;        /* human readable string */
  long ssl_version_num;     /* not used, always zero */
  const char *libz_version; /* human readable string */
  const char * const *protocols; /* protocols */

  /* when 'age' is 1 or higher, the members below also exist: */
  const char *ares;         /* human readable string */
  int ares_num;             /* number */

  /* when 'age' is 2 or higher, the member below also exists: */
  const char *libidn;       /* human readable string */

  /* when 'age' is 3 or higher (7.16.1 or later), the members below also
     exist  */
  int iconv_ver_num;       /* '_libiconv_version' if iconv enabled */

  const char *libssh_version; /* human readable string */

  /* when 'age' is 4 or higher, the member below also exists: */
  unsigned int brotli_ver_num; /* Numeric Brotli version
                                  (MAJOR << 24) | (MINOR << 12) | PATCH */
  const char *brotli_version; /* human readable string. */

  /* when 'age' is 5 or higher, the member below also exists: */
  unsigned int nghttp2_ver_num; /* Numeric nghttp2 version
                                   (MAJOR << 16) | (MINOR << 8) | PATCH */
  const char *nghttp2_version; /* human readable string. */
  const char *quic_version;    /* human readable quic (+ HTTP/3) library +
                                  version or NULL */

  /* when 'age' is 6 or higher, the member below also exists: */
  const char *cainfo;          /* built-in default CURLOPT_CAINFO, might
                                  be NULL */
  const char *capath;          /* built-in default CURLOPT_CAPATH, might
                                  be NULL */

  /* when 'age' is 7 or higher, the member below also exists: */
  unsigned int zstd_ver_num; /* Numeric Zstd version
                                  (MAJOR << 24) | (MINOR << 12) | PATCH */
  const char *zstd_version; /* human readable string. */

  /* when 'age' is 8 or higher, the member below also exists: */
  const char *hyper_version; /* human readable string. */

} curl_version_info_data;
--libcurl
We actively encourage users to first try out the transfer they want to do with
the curl command-line tool, and once it works roughly the way you want it to,
you append the --libcurl [filename] option to the command line and run it
again.
The --libcurl command-line option creates a C program in the provided file
name. That C program is an application that uses libcurl to run the transfer
you had the curl command-line tool do. There are some exceptions and it is not
always a 100% match, but you might find that it can serve as an excellent
inspiration source for what libcurl options you want or can use and what
additional arguments to provide to them.
If you specify the filename as a single dash, as in --libcurl - you get the
program written to stdout instead of a file.
As an example, we run a command to get http://example.com:
curl http://example.com --libcurl example.c
This creates example.c in the current directory, looking similar to this:
/********* Sample code generated by the curl command-line tool **********
 * All curl_easy_setopt() options are documented at:
 * https://curl.se/libcurl/c/curl_easy_setopt.html
 ************************************************************************/
#include <curl/curl.h>

int main(int argc, char *argv[])
{
  CURLcode ret;
  CURL *hnd;

  hnd = curl_easy_init();
  curl_easy_setopt(hnd, CURLOPT_URL, "http://example.com");
  curl_easy_setopt(hnd, CURLOPT_NOPROGRESS, 1L);
  curl_easy_setopt(hnd, CURLOPT_USERAGENT, "curl/7.45.0");
  curl_easy_setopt(hnd, CURLOPT_MAXREDIRS, 50L);
  curl_easy_setopt(hnd, CURLOPT_SSH_KNOWNHOSTS,
                   "/home/daniel/.ssh/known_hosts");
  curl_easy_setopt(hnd, CURLOPT_TCP_KEEPALIVE, 1L);

  /* Here is a list of options the curl code used that cannot get
     generated as source easily. You may select to either not use them or
     implement them yourself.

  CURLOPT_WRITEDATA set to a objectpointer
  CURLOPT_WRITEFUNCTION set to a functionpointer
  CURLOPT_READDATA set to a objectpointer
  CURLOPT_READFUNCTION set to a functionpointer
  CURLOPT_SEEKDATA set to a objectpointer
  CURLOPT_SEEKFUNCTION set to a functionpointer
  CURLOPT_ERRORBUFFER set to a objectpointer
  CURLOPT_STDERR set to a objectpointer
  CURLOPT_HEADERFUNCTION set to a functionpointer
  CURLOPT_HEADERDATA set to a objectpointer

  */

  ret = curl_easy_perform(hnd);

  curl_easy_cleanup(hnd);
  hnd = NULL;

  return (int)ret;
}
/**** End of sample code ****/
multi-threading
libcurl is thread-safe but has no internal thread synchronization. You may have to provide your own locking or change options to properly use libcurl threaded. Exactly what is required depends on how libcurl was built. Please refer to the libcurl thread safety webpage, which contains the latest information.
CURLcode return codes
Many libcurl functions return a CURLcode. That is a special libcurl typedefed
variable for error codes. It returns CURLE_OK (which has the value zero) if
everything is fine and dandy and it returns a non-zero number if a problem was
detected. There are almost one hundred CURLcode errors in use, and you can
find them all in the curl/curl.h header file and documented in the
libcurl-errors man page.
You can convert a CURLcode into a human readable string with the
curl_easy_strerror() function—but be aware that these errors are rarely
phrased in a way that is suitable for anyone to expose in a UI or to an end
user:
const char *str = curl_easy_strerror( error );
printf("libcurl said %s\n", str);
Another way to get a slightly better error text in case of errors is to set
the CURLOPT_ERRORBUFFER option to point out a buffer in your program and
then libcurl stores a related error message there before it returns an error:
char error[CURL_ERROR_SIZE]; /* needs to be at least this big */
CURLcode ret = curl_easy_setopt(handle, CURLOPT_ERRORBUFFER, error);
Verbose operations
Okay, we previously showed how to get the error as a human readable text as that is an excellent help to figure out what went wrong in a particular transfer and often explains why it can be done like that or what the problem is for the moment.
The next lifesaver when writing libcurl applications that everyone needs to
know about and needs to use extensively, at least while developing libcurl
applications or debugging libcurl itself, is to enable verbose mode with
CURLOPT_VERBOSE:
CURLcode ret = curl_easy_setopt(handle, CURLOPT_VERBOSE, 1L);
When libcurl is told to be verbose it outputs transfer-related details and
information to stderr while the transfer is ongoing. This is awesome to figure
out why things fail and to learn exactly what libcurl does when you ask it
different things. You can redirect the output elsewhere by changing stderr
with CURLOPT_STDERR or you can get even more info in a fancier way with the
debug callback (explained further in a later section).
Trace everything
Verbose is certainly fine, but sometimes you need more. libcurl also offers a trace callback that in addition to showing you all the stuff the verbose mode does, it also passes on all data sent and received so that your application gets a full trace of everything.
The sent and received data passed to the trace callback is given to the callback in its unencrypted form, which can be handy when working with TLS or SSH based protocols when capturing the data off the network for debugging is not practical.
When you set the CURLOPT_DEBUGFUNCTION option, you still need to have
CURLOPT_VERBOSE enabled but with the trace callback set libcurl uses that
callback instead of its internal handling.
The trace callback should match a prototype like this:
int my_trace(CURL *handle, curl_infotype type, char *data, size_t size,
             void *user);
handle is the easy handle it concerns, type describes the particular
data passed to the callback (data in/out, header in/out, TLS data in/out and
text), data is a pointer pointing to the data being size number of
bytes. user is the custom pointer you set with CURLOPT_DEBUGDATA.
The data pointed to by data is not null-terminated, but is exactly of the size as told by the size argument.
The callback must return 0 or libcurl considers it an error and aborts the transfer.
On the curl website, we host an example called debug.c that includes a simple trace function to get inspiration from.
There are also additional details in the CURLOPT_DEBUGFUNCTION man page.
Transfer and connection identifiers
As the trace information flow passed to the debug callback is a continuous stream even though your application might make libcurl use a large number of separate connections and different transfers, there are times when you want to see to which specific transfers or connections the various information belong to. To better understand the trace output.
You can then get the transfer and connection identifiers from within the callback:
curl_off_t conn_id;
curl_off_t xfer_id;
res = curl_easy_getinfo(curl, CURLINFO_CONN_ID, &conn_id);
res = curl_easy_getinfo(curl, CURLINFO_XFER_ID, &xfer_id);
They are two separate identifiers because connections can be reused and multiple transfers can use the same connection. Using these identifiers (numbers really), you can see which logs are associated with which transfers and connections.
Trace more
If the default amount of tracing data passed to the debug callback is not
enough. Like when you suspect and want to debug a problem in a more
fundamental lower protocol level, libcurl provides the curl_global_trace()
function for you.
With this function you tell libcurl to also include detailed logging about components that it otherwise does not include by default. Such as details about TLS, HTTP/2 or HTTP/3 protocol bits.
The curl_global_trace() functions takes an argument where you specify a
string holding a comma-separated list with the areas you want it to trace. For
example, include TLS and HTTP/2 details:
/* log details of HTTP/2 and SSL handling */
curl_global_trace("http/2,ssl");
The exact set of options varies, but here are some ones to try:
| area | description |
|---|---|
all | show everything possible |
tls | TLS protocol exchange details |
http/2 | HTTP/2 frame information |
http/3 | HTTP/3 frame information |
* | additional ones in future versions |
Doing a quick run with all is often a good way to get to see which specific
areas that are shown, as then you can do follow-up runs with more specific
areas set.
Caches
libcurl caches different information in order to help subsequent transfers to perform faster. There are four key caches: DNS, connections, TLS sessions and CA certs.
When the multi interface is used, these caches are by default shared among all the easy handles that are added to that single multi handle, and when the easy interface is used they are kept within that handle.
You can instruct libcurl to share some of the caches with the share interface.
DNS cache
When libcurl resolves a hostname to one or more IP addresses, that is stored in the DNS cache so that subsequent transfers in the near term do not have to redo the same resolve again. A name resolve can easily take several hundred milliseconds and sometimes even much longer.
By default, each such hostname is stored in the cache for 60 seconds
(changeable with CURLOPT_DNS_CACHE_TIMEOUT).
libcurl does in fact not usually know what the TTL (Time To Live) value is for DNS entries, as that is generally not exposed in the system function calls it uses for this purpose, so increasing this value come with a risk that libcurl keeps using stale addresses longer periods than necessary.
Connection cache
Also sometimes referred to as the connection pool. This is a collection of previously used connections that instead of being closed after use, are kept around alive so that subsequent transfers that are targeting the same host name and have several other checks also matching, can use them instead of creating a new connection.
A reused connection usually saves having to a DNS lookup, setting up a TCP connection, do a TLS handshake and more.
Connections are only reused if the name is identical. Even if two different hostnames resolve to the same IP addresses, they still always use two separate connections with libcurl.
Since the connection reuse is based on the hostname and the DNS resolve phase is entirely skipped when a connection is reused for a transfer, libcurl does not know the current state of the hostname in DNS as it can in fact change IP over time while the connection might survive and continue to get reused over the original IP address.
The size of the connection cache - the number of live connections to keep
there - can be set with CURLOPT_MAXCONNECTS (default is 5) for easy handles
and CURLMOPT_MAXCONNECTS for multi handles. The default size for multi
handles is 4 times the number of easy handles added.
TLS session cache
TLS session IDs and tickets are special TLS mechanisms that a client can pass to a server to shortcut subsequent TLS handshakes to a server it previously established a connection to.
libcurl caches session IDs and tickets associated with hostnames and port numbers, so if a subsequent connection attempt is made to a host for which libcurl has a cached ID or ticket, using that can greatly decrease the TLS handshake process and therefore the time needed until completion.
CA cert cache
With some of the TLS backends curl supports, it builds a CA cert store cache in memory and keeps it there for subsequent transfers to use. This lets transfers skip unnecessary loading and parsing time that comes from loading and handling the sometimes rather big CA cert bundles.
Since the CA cert bundle might be updated, the life-time of the cache is by default set to 24 hours so that long-running applications flush the cache and reload the file at least once every day - to be able to load and use a new version of the store.
Applications can change the CA cert cache timeout with the
CURLOPT_CA_CACHE_TIMEOUT option in case this default is not good enough.
Performance
This section collects general advice on what you can do as an application author to get the maximum performance out of libcurl.
libcurl is designed and intended to run as fast as possible by default. You are expected to get top performance already without doing anything extra in particular. There are however some common things to look at or perhaps mistakes to avoid.
reuse handles
This is a general mantra whenever libcurl is discussed. If you use the easy interface, the primary key to high performance is to reuse the handles when doing subsequent transfers. That lets libcurl reuse connections, reuse TLS sessions, use its DNS cache as much as possible and more.
buffer sizes
If you download data, set the CURLOPT_BUFFERSIZE to a suitable size. It is
on the smaller size from start and especially on high speed transfers, you
might be able to get more out of libcurl by increasing its size. We encourage
you to try out a few sizes in a benchmark with your use case.
Similarly, if you upload data you might want to adjust the
CURLOPT_UPLOAD_BUFFERSIZE for the same reasons.
pool size
The number of live connections kept in the connection pool that you set with
CURLOPT_MAXCONNECTS can be interesting to tweak. Depending of course how
your application uses connections, but if it for example iterates over N
hostnames in a short period of time, it could make sense for you to make sure
that libcurl can keep all those connections alive.
CA store caching
For every new connection done using TLS, libcurl needs to access the CA store to verify the remote server's certificate. If your applications do many connections, make sure you take advantage of libcurl's CA caching so that libcurl can avoid loading and parsing several hundred kilobytes from disk over and over. This is however not yet supported by all TLS backends.
make callbacks as fast as possible
In high speed data downloads, the write callback is called many times. If this function is not written to execute the fastest possible way, there is a risk that this function alone makes all transfers slower than they otherwise could be.
The same of course goes for the read callback for uploads.
Avoid doing complicated logic or use locks/mutexes in your libcurl callbacks.
share data
If you use multiple easy handles, you can still share data and caches between them in order to increase performance. Take a closer look at the share API.
threads
If your transfer thread ends up consuming 100% CPU, then you might benefit from distributing the load onto multiple threads to increase bandwidth.
Normally then, you want to make each thread do transfers as independently as possible to avoid them interfering with each other's performance or risk getting into thread-safe problems due to shared handles. Try to make the same hostnames get transferred on the same thread so that connection reuse can be optimized.
curl_multi_socket_action
If your application performs many parallel transfers, like more than a hundred
concurrent ones or so, then you must consider switching to the
curl_multi_socket_action() and the event based API instead of the "regular"
multi API. That allows and pushes you to use an event based approach which
lets your application avoid both poll() and select(), which is key to high
performance combined with a high degree of parallelism.
for C++ programmers
libcurl provides a C API. C and C++ are similar but not the same. There are a few things to keep in mind when using libcurl in C++.
Strings are C strings, not C++ string objects
When you pass strings to libcurl's APIs that accept char * that means you
cannot pass in C++ strings or objects to those functions.
For example, if you build a string with C++ and then want that string used as a URL:
std::string url = "https://example.com/foo.asp?name=" + i;
curl_easy_setopt(curl, CURLOPT_URL, url.c_str());
Callback considerations
Since libcurl is a C library, it does not know anything about C++ member functions or objects. You can overcome this limitation with relative ease using for a static member function that is passed a pointer to the class.
Here's an example of a write callback using a C++ method as callback:
// f is the pointer to your object.
static size_t YourClass::func(void *buffer, size_t sz, size_t n, void *f)
{
  // Call non-static member function.
  static_cast<YourClass*>(f)->nonStaticFunction();
}

// This is how you pass pointer to the static function:
curl_easy_setopt(hcurl, CURLOPT_WRITEFUNCTION, YourClass::func);
curl_easy_setopt(hcurl, CURLOPT_WRITEDATA, this);
libcurl transfers
In this chapter we go through the steps on how to make Internet transfers with libcurl. The core function.
- Easy handle
- curl easy options
- Drive transfers
- Callbacks
- Connection control
- Transfer control
- Authentication
- Cleanup
- Post transfer info
Easy handle
The fundamentals you need to learn with libcurl:
First you create an "easy handle", which is your handle to a transfer, really:
CURL *easy_handle = curl_easy_init();
You then set options in that handle to control the upcoming transfer. This example sets the URL:
/* set URL to operate on */
res = curl_easy_setopt(easy_handle, CURLOPT_URL, "http://example.com/");
If curl_easy_setopt() returns CURLE_OK, we know it stored the option fine.
Creating the easy handle and setting options on it does not make any transfer
happen, and usually do not even make much more happen other than libcurl
storing your wish to be used later when the transfer actually occurs. Lots of
syntax checking and validation of the input may also be postponed, so because
curl_easy_setopt did not complain, it does not mean that the input was
correct and valid; you may get an error returned later.
Read more on easy options in its separate section.
When you are done setting options to your easy handle, you can fire off the actual transfer.
The actual performing of the transfer can be done using different methods and function calls, depending on what kind of behavior you want in your application and how libcurl is best integrated into your architecture. Those are further described later in this chapter.
While the transfer is ongoing, libcurl calls your specified functions—known as callbacks — to deliver data, to read data and to do a variety of things.
After the transfer has completed, you can figure out if it succeeded or not and you can extract statistics and other information that libcurl gathered during the transfer from the easy handle. See Post transfer information.
Reuse
Easy handles are meant and designed to be reused. When you have done a single transfer with the easy handle, you can immediately use it again for your next transfer. There are lots of gains to be had by this.
All options are "sticky". If you make a second transfer with the same handle,
the same options are used. They remain set in the handle until you change them
again, or call curl_easy_reset() on the handle.
Reset
By calling curl_easy_reset(), all options for the given easy handle are
reset and restored to their default values. The same values the options had
when the handle was initially created. The caches remain intact.
Duplicate
An easy handle, with all its currently set options, can be duplicated using
curl_easy_duphandle(). It returns a copy of the handle passed in to it.
The caches and other state information are not carried over.
curl easy options
You set options in the easy handle to control how that transfer is going to be
done, or in some cases you can actually set options and modify the transfer's
behavior while it is in progress. You set options with curl_easy_setopt()
and you provide the handle, the option you want to set and the argument to the
option. All options take exactly one argument and you must always pass exactly
three parameters to the curl_easy_setopt() calls.
Since the curl_easy_setopt() call accepts several hundred different options
and the various options accept a variety of different types of arguments, it
is important to read up on the specifics and provide exactly the argument
type the specific option supports and expects. Passing in the wrong type can
lead to unexpected side-effects or hard to understand hiccups.
The perhaps most important option that every transfer needs, is the URL.
libcurl cannot perform a transfer without knowing which URL it concerns so you
must tell it. The URL option name is CURLOPT_URL as all options are prefixed
with CURLOPT_ and then the descriptive name — all using uppercase
letters. An example line setting the URL to get the http://example.com HTTP
contents could look like:
CURLcode ret = curl_easy_setopt(easy, CURLOPT_URL, "http://example.com");
Again: this only sets the option in the handle. It does not do the actual transfer or anything. It just tells libcurl to copy the given string and if that works it returns OK.
It is, of course, good form to check the return code to see that nothing went wrong.
Get options
There is no way to extract the values previously set with
curl_easy_setopt(). If you need to be able to extract the information again
that you set earlier, we encourage you to keep track of that data yourself in
your application.
Set numerical options
Since curl_easy_setopt() is a vararg function where the 3rd argument can use
different types depending on the situation, normal C language type conversion
cannot be done. You must make sure that you truly pass a long and not an
int if the documentation tells you so. On architectures where they are the
same size, you may not get any problems but not all work like that. Similarly,
for options that accept a curl_off_t type, it is crucial that you pass
in an argument using that type and no other.
Enforce a long:
curl_easy_setopt(handle, CURLOPT_TIMEOUT, 5L); /* 5 seconds timeout */
Enforce a curl_off_t:
curl_off_t no_larger_than = 0x50000;
curl_easy_setopt(handle, CURLOPT_MAXFILESIZE_LARGE, no_larger_than);
Set string options
There are currently over 80 options for curl_easy_setopt() that accept a
string as its third argument.
When a string is set in a handle, libcurl immediately copies that data so that
the application does not have to keep the data around for the time the
transfer is being done - with one notable exception: CURLOPT_POSTFIELDS.
Set a URL in the handle:
curl_easy_setopt(handle, CURLOPT_URL, "https://example.com");
CURLOPT_POSTFIELDS
The exception to the rule that libcurl always copies data,
CURLOPT_POSTFIELDS only stores the pointer to the data, meaning an
application using this option must keep the memory around for the entire
duration of the associated transfer.
If that is problematic, an alternative is to instead use
CURLOPT_COPYPOSTFIELDS which copies the data. If the data is binary and does
not stop at the first presence of a null byte, make sure that
CURLOPT_POSTFIELDSIZE is set before this option is used.
Why?
The reason CURLOPT_POSTFIELDS is an exception is due to legacy. Originally
(before curl 7.17.0), libcurl did not copy any string arguments and when
this current behavior was introduced, this option could not be converted over
without breaking behavior so it had to keep working like before. Which now
sticks out, as no other option does...
C++
If you use libcurl from a C++ program, it is important to remember that you
cannot pass in a string object where libcurl expects a string. It has to be a
null-terminated C string. Usually you can make this happen with the c_str()
method.
For example, keep the URL in a string object and set that in the handle:
std::string url("https://example.com/");
curl_easy_setopt(curl, CURLOPT_URL, url.c_str());
TLS options
At the time of writing this, there are no less than forty different options for curl_easy_setopt that are dedicated for controlling how libcurl does SSL and TLS.
Transfers done using TLS use safe defaults but since curl is used in many different scenarios and setups, chances are you end up in situations where you want to change those behaviors.
Protocol version
With CURLOPT_SSLVERSION' and CURLOPT_PROXY_SSLVERSION`you can specify which
SSL or TLS protocol range that is acceptable to you. Traditionally SSL and TLS
protocol versions have been found detect and unsuitable for use over time and
even if curl itself raises its default lower version over time you might want
to opt for only using the latest and most security protocol versions.
These options take a lowest acceptable version and optionally a maximum. If the server cannot negotiate a connection with that condition, the transfer fails.
Example:
curl_easy_setopt(easy, CURLOPT_SSLVERSION, CURL_SSLVERSION_TLSv1_2);
Protocol details and behavior
You can select what ciphers to use by setting CURLOPT_SSL_CIPHER_LIST and
CURLOPT_PROXY_SSL_CIPHER_LIST.
You can ask to enable SSL "False Start" with CURLOPT_SSL_FALSESTART, and
there are a few other behavior changes to tweak using CURLOPT_SSL_OPTIONS.
Verification
A TLS-using client needs to verify that the server it speaks to is the correct and trusted one. This is done by verifying that the server's certificate is signed by a Certificate Authority (CA) for which curl has a public key for and that the certificate contains the server's name. Failing any of these checks cause the transfer to fail.
For development purposes and for experimenting, curl allows an application to switch off either or both of these checks for the server or for an HTTPS proxy.
-
CURLOPT_SSL_VERIFYPEERcontrols the check that the certificate is signed by a trusted CA. -
CURLOPT_SSL_VERIFYHOSTcontrols the check for the name within the certificate. -
CURLOPT_PROXY_SSL_VERIFYPEERis the proxy version ofCURLOPT_SSL_VERIFYPEER. -
CURLOPT_PROXY_SSL_VERIFYHOSTis the proxy version ofCURLOPT_SSL_VERIFYHOST.
Optionally, you can tell curl to verify the certificate's public key against a
known hash using CURLOPT_PINNEDPUBLICKEY or CURLOPT_PROXY_PINNEDPUBLICKEY.
Here too, a mismatch causes the transfer to fail.
Authentication
TLS Client certificates
When using TLS and the server asks the client to authenticate using
certificates, you typically specify the private key and the corresponding
client certificate using CURLOPT_SSLKEY and CURLOPT_SSLCERT. The password
for the key is usually also required to be set, with CURLOPT_SSLKEYPASSWD.
Again, the same set of options exist separately for connections to HTTPS
proxies: CURLOPT_PROXY_SSLKEY, CURLOPT_PROXY_SSLCERT etc.
TLS auth
TLS connections offer a (rarely used) feature called Secure Remote
Passwords. Using this, you authenticate the connection for the server using a
name and password and the options are called CURLOPT_TLSAUTH_USERNAME and
CURLOPT_TLSAUTH_PASSWORD.
STARTTLS
For protocols that are using the STARTTLS method to upgrade the connection to
TLS (FTP, IMAP, POP3, and SMTP), you usually tell curl to use the non-TLS
version of the protocol when specifying a URL and then ask curl to enable TLS
with the CURLOPT_USE_SSL option.
This option allows a client to let curl continue if it cannot upgrade to TLS, but that is not a recommend path to walk as then you might be using an insecure protocol without properly noticing.
/* require use of SSL for this, or fail */
curl_easy_setopt(curl, CURLOPT_USE_SSL, CURLUSESSL_ALL);
All options
This is a table of available options for curl_easy_setopt().
| Option | Purpose |
|---|---|
CURLOPT_ABSTRACT_UNIX_SOCKET | abstract Unix domain socket |
CURLOPT_ACCEPT_ENCODING | automatic decompression of HTTP downloads |
CURLOPT_ACCEPTTIMEOUT_MS | timeout waiting for FTP server to connect back |
CURLOPT_ADDRESS_SCOPE | scope id for IPv6 addresses |
CURLOPT_ALTSVC_CTRL | control alt-svc behavior |
CURLOPT_ALTSVC | alt-svc cache filename |
CURLOPT_APPEND | append to the remote file |
CURLOPT_AUTOREFERER | automatically update the referer header |
CURLOPT_AWS_SIGV4 | V4 signature |
CURLOPT_BUFFERSIZE | receive buffer size |
CURLOPT_CA_CACHE_TIMEOUT | life-time for cached certificate stores |
CURLOPT_CAINFO_BLOB | Certificate Authority (CA) bundle in PEM format |
CURLOPT_CAINFO | path to Certificate Authority (CA) bundle |
CURLOPT_CAPATH | directory holding CA certificates |
CURLOPT_CERTINFO | request SSL certificate information |
CURLOPT_CHUNK_BGN_FUNCTION | callback before a transfer with FTP wildcardmatch |
CURLOPT_CHUNK_DATA | pointer passed to the FTP chunk callbacks |
CURLOPT_CHUNK_END_FUNCTION | callback after a transfer with FTP wildcardmatch |
CURLOPT_CLOSESOCKETDATA | pointer passed to the socket close callback |
CURLOPT_CLOSESOCKETFUNCTION | callback to socket close replacement |
CURLOPT_CONNECT_ONLY | stop when connected to target server |
CURLOPT_CONNECT_TO | connect to a specific host and port instead of the URL's host and port |
CURLOPT_CONNECTTIMEOUT_MS | timeout for the connect phase |
CURLOPT_CONNECTTIMEOUT | timeout for the connect phase |
CURLOPT_CONV_FROM_NETWORK_FUNCTION | convert data from network to host encoding |
CURLOPT_CONV_FROM_UTF8_FUNCTION | convert data from UTF8 to host encoding |
CURLOPT_CONV_TO_NETWORK_FUNCTION | convert data to network from host encoding |
CURLOPT_COOKIE | HTTP Cookie header |
CURLOPT_COOKIEFILE | filename to read cookies from |
CURLOPT_COOKIEJAR | filename to store cookies to |
CURLOPT_COOKIELIST | add to or manipulate cookies held in memory |
CURLOPT_COOKIESESSION | start a new cookie session |
CURLOPT_COPYPOSTFIELDS | have libcurl copy data to POST |
CURLOPT_CRLF | CRLF conversion |
CURLOPT_CRLFILE | Certificate Revocation List file |
CURLOPT_CURLU | URL in CURLU * format |
CURLOPT_CUSTOMREQUEST | custom request method |
CURLOPT_DEBUGDATA | pointer passed to the debug callback |
CURLOPT_DEBUGFUNCTION | debug callback |
CURLOPT_DEFAULT_PROTOCOL | default protocol to use if the URL is missing a |
CURLOPT_DIRLISTONLY | ask for names only in a directory listing |
CURLOPT_DISALLOW_USERNAME_IN_URL | disallow specifying username in the URL |
CURLOPT_DNS_CACHE_TIMEOUT | life-time for DNS cache entries |
CURLOPT_DNS_INTERFACE | interface to speak DNS over |
CURLOPT_DNS_LOCAL_IP4 | IPv4 address to bind DNS resolves to |
CURLOPT_DNS_LOCAL_IP6 | IPv6 address to bind DNS resolves to |
CURLOPT_DNS_SERVERS | DNS servers to use |
CURLOPT_DNS_SHUFFLE_ADDRESSES | shuffle IP addresses for hostname |
CURLOPT_DNS_USE_GLOBAL_CACHE | global DNS cache |
CURLOPT_DOH_SSL_VERIFYHOST | verify the hostname in the DoH SSL certificate |
CURLOPT_DOH_SSL_VERIFYPEER | verify the DoH SSL certificate |
CURLOPT_DOH_SSL_VERIFYSTATUS | verify the DoH SSL certificate's status |
CURLOPT_DOH_URL | provide the DNS-over-HTTPS URL |
CURLOPT_EGDSOCKET | EGD socket path |
CURLOPT_ERRORBUFFER | error buffer for error messages |
CURLOPT_EXPECT_100_TIMEOUT_MS | timeout for Expect: 100-continue response |
CURLOPT_FAILONERROR | request failure on HTTP response >= 400 |
CURLOPT_FILETIME | get the modification time of the remote resource |
CURLOPT_FNMATCH_DATA | pointer passed to the fnmatch callback |
CURLOPT_FNMATCH_FUNCTION | wildcard match callback |
CURLOPT_FOLLOWLOCATION | follow HTTP 3xx redirects |
CURLOPT_FORBID_REUSE | make connection get closed at once after use |
CURLOPT_FRESH_CONNECT | force a new connection to be used |
CURLOPT_FTP_ACCOUNT | account info for FTP |
CURLOPT_FTP_ALTERNATIVE_TO_USER | command to use instead of USER with FTP |
CURLOPT_FTP_CREATE_MISSING_DIRS | create missing dirs for FTP and SFTP |
CURLOPT_FTP_FILEMETHOD | select directory traversing method for FTP |
CURLOPT_FTP_RESPONSE_TIMEOUT | time allowed to wait for FTP response |
CURLOPT_FTP_SKIP_PASV_IP | ignore the IP address in the PASV response |
CURLOPT_FTP_SSL_CCC | switch off SSL again with FTP after auth |
CURLOPT_FTP_USE_EPRT | use EPRT for FTP |
CURLOPT_FTP_USE_EPSV | use EPSV for FTP |
CURLOPT_FTP_USE_PRET | use PRET for FTP |
CURLOPT_FTPPORT | make FTP transfer active |
CURLOPT_FTPSSLAUTH | order in which to attempt TLS vs SSL |
CURLOPT_GSSAPI_DELEGATION | allowed GSS-API delegation |
CURLOPT_HAPPY_EYEBALLS_TIMEOUT_MS | head start for ipv6 for happy eyeballs |
CURLOPT_HAPROXY_CLIENT_IP | set HAProxy PROXY protocol client IP |
CURLOPT_HAPROXYPROTOCOL | send HAProxy PROXY protocol v1 header |
CURLOPT_HEADER | pass headers to the data stream |
CURLOPT_HEADERDATA | pointer to pass to header callback |
CURLOPT_HEADERFUNCTION | callback that receives header data |
CURLOPT_HEADEROPT | send HTTP headers to both proxy and host or separately |
CURLOPT_HSTS_CTRL | control HSTS behavior |
CURLOPT_HSTS | HSTS cache filename |
CURLOPT_HSTSREADDATA | pointer passed to the HSTS read callback |
CURLOPT_HSTSREADFUNCTION | read callback for HSTS hosts |
CURLOPT_HSTSWRITEDATA | pointer passed to the HSTS write callback |
CURLOPT_HSTSWRITEFUNCTION | write callback for HSTS hosts |
CURLOPT_HTTP09_ALLOWED | allow HTTP/0.9 response |
CURLOPT_HTTP200ALIASES | alternative matches for HTTP 200 OK |
CURLOPT_HTTP_CONTENT_DECODING | HTTP content decoding control |
CURLOPT_HTTP_TRANSFER_DECODING | HTTP transfer decoding control |
CURLOPT_HTTP_VERSION | HTTP protocol version to use |
CURLOPT_HTTPAUTH | HTTP server authentication methods to try |
CURLOPT_HTTPGET | ask for an HTTP GET request |
CURLOPT_HTTPHEADER | set of HTTP headers |
CURLOPT_HTTPPOST | multipart formpost content |
CURLOPT_HTTPPROXYTUNNEL | tunnel through HTTP proxy |
CURLOPT_IGNORE_CONTENT_LENGTH | ignore content length |
CURLOPT_INFILESIZE_LARGE | size of the input file to send off |
CURLOPT_INFILESIZE | size of the input file to send off |
CURLOPT_INTERFACE | source interface for outgoing traffic |
CURLOPT_INTERLEAVEDATA | pointer passed to RTSP interleave callback |
CURLOPT_INTERLEAVEFUNCTION | callback for RTSP interleaved data |
CURLOPT_IOCTLDATA | pointer passed to I/O callback |
CURLOPT_IOCTLFUNCTION | callback for I/O operations |
CURLOPT_IPRESOLVE | IP protocol version to use |
CURLOPT_ISSUERCERT_BLOB | issuer SSL certificate from memory blob |
CURLOPT_ISSUERCERT | issuer SSL certificate filename |
CURLOPT_KEEP_SENDING_ON_ERROR | keep sending on early HTTP response >= 300 |
CURLOPT_KEYPASSWD | passphrase to private key |
CURLOPT_KRBLEVEL | FTP kerberos security level |
CURLOPT_LOCALPORT | local port number to use for socket |
CURLOPT_LOCALPORTRANGE | number of additional local ports to try |
CURLOPT_LOGIN_OPTIONS | login options |
CURLOPT_LOW_SPEED_LIMIT | low speed limit in bytes per second |
CURLOPT_LOW_SPEED_TIME | low speed limit time period |
CURLOPT_MAIL_AUTH | SMTP authentication address |
CURLOPT_MAIL_FROM | SMTP sender address |
CURLOPT_MAIL_RCPT_ALLOWFAILS | allow RCPT TO command to fail for some recipients |
CURLOPT_MAIL_RCPT | list of SMTP mail recipients |
CURLOPT_MAX_RECV_SPEED_LARGE | rate limit data download speed |
CURLOPT_MAX_SEND_SPEED_LARGE | rate limit data upload speed |
CURLOPT_MAXAGE_CONN | max idle time allowed for reusing a connection |
CURLOPT_MAXCONNECTS | maximum connection cache size |
CURLOPT_MAXFILESIZE_LARGE | maximum file size allowed to download |
CURLOPT_MAXFILESIZE | maximum file size allowed to download |
CURLOPT_MAXLIFETIME_CONN | max lifetime (since creation) allowed for reusing a connection |
CURLOPT_MAXREDIRS | maximum number of redirects allowed |
CURLOPT_MIME_OPTIONS | set MIME option flags |
CURLOPT_MIMEPOST | send data from mime structure |
CURLOPT_NETRC_FILE | filename to read .netrc info from |
CURLOPT_NETRC | enable use of .netrc |
CURLOPT_NEW_DIRECTORY_PERMS | permissions for remotely created directories |
CURLOPT_NEW_FILE_PERMS | permissions for remotely created files |
CURLOPT_NOBODY | do the download request without getting the body |
CURLOPT_NOPROGRESS | switch off the progress meter |
CURLOPT_NOPROXY | disable proxy use for specific hosts |
CURLOPT_NOSIGNAL | skip all signal handling |
CURLOPT_OPENSOCKETDATA | pointer passed to open socket callback |
CURLOPT_OPENSOCKETFUNCTION | callback for opening socket |
CURLOPT_PASSWORD | password to use in authentication |
CURLOPT_PATH_AS_IS | do not handle dot dot sequences |
CURLOPT_PINNEDPUBLICKEY | pinned public key |
CURLOPT_PIPEWAIT | wait for pipelining/multiplexing |
CURLOPT_PORT | remote port number to connect to |
CURLOPT_POST | make an HTTP POST |
CURLOPT_POSTFIELDS | data to POST to server |
CURLOPT_POSTFIELDSIZE_LARGE | size of POST data pointed to |
CURLOPT_POSTFIELDSIZE | size of POST data pointed to |
CURLOPT_POSTQUOTE | (S)FTP commands to run after the transfer |
CURLOPT_POSTREDIR | how to act on an HTTP POST redirect |
CURLOPT_PRE_PROXY | pre-proxy host to use |
CURLOPT_PREQUOTE | commands to run before an FTP transfer |
CURLOPT_PREREQDATA | pointer passed to the pre-request callback |
CURLOPT_PREREQFUNCTION | user callback called when a connection has been |
CURLOPT_PRIVATE | store a private pointer |
CURLOPT_PROGRESSDATA | pointer passed to the progress callback |
CURLOPT_PROGRESSFUNCTION | progress meter callback |
CURLOPT_PROTOCOLS_STR | allowed protocols |
CURLOPT_PROTOCOLS | allowed protocols |
CURLOPT_PROXY_CAINFO_BLOB | proxy Certificate Authority (CA) bundle in PEM format |
CURLOPT_PROXY_CAINFO | path to proxy Certificate Authority (CA) bundle |
CURLOPT_PROXY_CAPATH | directory holding HTTPS proxy CA certificates |
CURLOPT_PROXY_CRLFILE | HTTPS proxy Certificate Revocation List file |
CURLOPT_PROXY_ISSUERCERT_BLOB | proxy issuer SSL certificate from memory blob |
CURLOPT_PROXY_ISSUERCERT | proxy issuer SSL certificate filename |
CURLOPT_PROXY_KEYPASSWD | passphrase for the proxy private key |
CURLOPT_PROXY_PINNEDPUBLICKEY | pinned public key for https proxy |
CURLOPT_PROXY_SERVICE_NAME | proxy authentication service name |
CURLOPT_PROXY_SSL_CIPHER_LIST | ciphers to use for HTTPS proxy |
CURLOPT_PROXY_SSL_OPTIONS | HTTPS proxy SSL behavior options |
CURLOPT_PROXY_SSL_VERIFYHOST | verify the proxy certificate's name against host |
CURLOPT_PROXY_SSL_VERIFYPEER | verify the proxy's SSL certificate |
CURLOPT_PROXY_SSLCERT_BLOB | SSL proxy client certificate from memory blob |
CURLOPT_PROXY_SSLCERT | HTTPS proxy client certificate |
CURLOPT_PROXY_SSLCERTTYPE | type of the proxy client SSL certificate |
CURLOPT_PROXY_SSLKEY_BLOB | private key for proxy cert from memory blob |
CURLOPT_PROXY_SSLKEY | private keyfile for HTTPS proxy client cert |
CURLOPT_PROXY_SSLKEYTYPE | type of the proxy private key file |
CURLOPT_PROXY_SSLVERSION | preferred HTTPS proxy TLS version |
CURLOPT_PROXY_TLS13_CIPHERS | ciphers suites for proxy TLS 1.3 |
CURLOPT_PROXY_TLSAUTH_PASSWORD | password to use for proxy TLS authentication |
CURLOPT_PROXY_TLSAUTH_TYPE | HTTPS proxy TLS authentication methods |
CURLOPT_PROXY_TLSAUTH_USERNAME | username to use for proxy TLS authentication |
CURLOPT_PROXY_TRANSFER_MODE | append FTP transfer mode to URL for proxy |
CURLOPT_PROXY | proxy to use |
CURLOPT_PROXYAUTH | HTTP proxy authentication methods |
CURLOPT_PROXYHEADER | set of HTTP headers to pass to proxy |
CURLOPT_PROXYPASSWORD | password to use with proxy authentication |
CURLOPT_PROXYPORT | port number the proxy listens on |
CURLOPT_PROXYTYPE | proxy protocol type |
CURLOPT_PROXYUSERNAME | username to use for proxy authentication |
CURLOPT_PROXYUSERPWD | username and password to use for proxy authentication |
CURLOPT_PUT | make an HTTP PUT request |
CURLOPT_QUICK_EXIT | allow to exit quickly |
CURLOPT_QUOTE | (S)FTP commands to run before transfer |
CURLOPT_RANDOM_FILE | file to read random data from |
CURLOPT_RANGE | byte range to request |
CURLOPT_READDATA | pointer passed to the read callback |
CURLOPT_READFUNCTION | read callback for data uploads |
CURLOPT_REDIR_PROTOCOLS_STR | protocols allowed to redirect to |
CURLOPT_REDIR_PROTOCOLS | protocols allowed to redirect to |
CURLOPT_REFERER | the HTTP referer header |
CURLOPT_REQUEST_TARGET | alternative target for this request |
CURLOPT_RESOLVE | provide custom hostname to IP address resolves |
CURLOPT_RESOLVER_START_DATA | pointer passed to the resolver start callback |
CURLOPT_RESOLVER_START_FUNCTION | callback called before a new name resolve is started |
CURLOPT_RESUME_FROM_LARGE | offset to resume transfer from |
CURLOPT_RESUME_FROM | offset to resume transfer from |
CURLOPT_RTSP_CLIENT_CSEQ | RTSP client CSEQ number |
CURLOPT_RTSP_REQUEST | RTSP request |
CURLOPT_RTSP_SERVER_CSEQ | RTSP server CSEQ number |
CURLOPT_RTSP_SESSION_ID | RTSP session ID |
CURLOPT_RTSP_STREAM_URI | RTSP stream URI |
CURLOPT_RTSP_TRANSPORT | RTSP Transport: header |
CURLOPT_SASL_AUTHZID | authorization identity (identity to act as) |
CURLOPT_SASL_IR | send initial response in first packet |
CURLOPT_SEEKDATA | pointer passed to the seek callback |
CURLOPT_SEEKFUNCTION | user callback for seeking in input stream |
CURLOPT_SERVER_RESPONSE_TIMEOUT | time in seconds allowed to wait for server response |
CURLOPT_SERVER_RESPONSE_TIMEOUT_MS | time in milliseconds allowed to wait for server response |
CURLOPT_SERVICE_NAME | authentication service name |
CURLOPT_SHARE | share handle to use |
CURLOPT_SOCKOPTDATA | pointer to pass to sockopt callback |
CURLOPT_SOCKOPTFUNCTION | callback for setting socket options |
CURLOPT_SOCKS5_AUTH | methods for SOCKS5 proxy authentication |
CURLOPT_SOCKS5_GSSAPI_NEC | socks proxy gssapi negotiation protection |
CURLOPT_SOCKS5_GSSAPI_SERVICE | SOCKS5 proxy authentication service name |
CURLOPT_SSH_AUTH_TYPES | auth types for SFTP and SCP |
CURLOPT_SSH_COMPRESSION | enable SSH compression |
CURLOPT_SSH_HOST_PUBLIC_KEY_MD5 | MD5 checksum of SSH server public key |
CURLOPT_SSH_HOST_PUBLIC_KEY_SHA256 | SHA256 hash of SSH server public key |
CURLOPT_SSH_HOSTKEYDATA | pointer to pass to the SSH host key callback |
CURLOPT_SSH_HOSTKEYFUNCTION | callback to check host key |
CURLOPT_SSH_KEYDATA | pointer passed to the SSH key callback |
CURLOPT_SSH_KEYFUNCTION | callback for known host matching logic |
CURLOPT_SSH_KNOWNHOSTS | filename holding the SSH known hosts |
CURLOPT_SSH_PRIVATE_KEYFILE | private key file for SSH auth |
CURLOPT_SSH_PUBLIC_KEYFILE | public key file for SSH auth |
CURLOPT_SSL_CIPHER_LIST | ciphers to use for TLS |
CURLOPT_SSL_CTX_DATA | pointer passed to ssl_ctx callback |
CURLOPT_SSL_CTX_FUNCTION | SSL context callback for OpenSSL, wolfSSL or mbedTLS |
CURLOPT_SSL_EC_CURVES | key exchange curves |
CURLOPT_SSL_ENABLE_ALPN | Application Layer Protocol Negotiation |
CURLOPT_SSL_ENABLE_NPN | use NPN |
CURLOPT_SSL_FALSESTART | TLS false start |
CURLOPT_SSL_OPTIONS | SSL behavior options |
CURLOPT_SSL_SESSIONID_CACHE | use the SSL session-ID cache |
CURLOPT_SSL_VERIFYHOST | verify the certificate's name against host |
CURLOPT_SSL_VERIFYPEER | verify the peer's SSL certificate |
CURLOPT_SSL_VERIFYSTATUS | verify the certificate's status |
CURLOPT_SSLCERT_BLOB | SSL client certificate from memory blob |
CURLOPT_SSLCERT | SSL client certificate |
CURLOPT_SSLCERTTYPE | type of client SSL certificate |
CURLOPT_SSLENGINE_DEFAULT | make SSL engine default |
CURLOPT_SSLENGINE | SSL engine identifier |
CURLOPT_SSLKEY_BLOB | private key for client cert from memory blob |
CURLOPT_SSLKEY | private keyfile for TLS and SSL client cert |
CURLOPT_SSLKEYTYPE | type of the private key file |
CURLOPT_SSLVERSION | preferred TLS/SSL version |
CURLOPT_STDERR | redirect stderr to another stream |
CURLOPT_STREAM_DEPENDS_E | stream this transfer depends on exclusively |
CURLOPT_STREAM_DEPENDS | stream this transfer depends on |
CURLOPT_STREAM_WEIGHT | numerical stream weight |
CURLOPT_SUPPRESS_CONNECT_HEADERS | suppress proxy CONNECT response headers from user callbacks |
CURLOPT_TCP_FASTOPEN | TCP Fast Open |
CURLOPT_TCP_KEEPALIVE | TCP keep-alive probing |
CURLOPT_TCP_KEEPIDLE | TCP keep-alive idle time wait |
CURLOPT_TCP_KEEPINTVL | TCP keep-alive interval |
CURLOPT_TCP_NODELAY | the TCP_NODELAY option |
CURLOPT_TELNETOPTIONS | set of telnet options |
CURLOPT_TFTP_BLKSIZE | TFTP block size |
CURLOPT_TFTP_NO_OPTIONS | send no TFTP options requests |
CURLOPT_TIMECONDITION | select condition for a time request |
CURLOPT_TIMEOUT_MS | maximum time the transfer is allowed to complete |
CURLOPT_TIMEOUT | maximum time the transfer is allowed to complete |
CURLOPT_TIMEVALUE_LARGE | time value for conditional |
CURLOPT_TIMEVALUE | time value for conditional |
CURLOPT_TLS13_CIPHERS | ciphers suites to use for TLS 1.3 |
CURLOPT_TLSAUTH_PASSWORD | password to use for TLS authentication |
CURLOPT_TLSAUTH_TYPE | TLS authentication methods |
CURLOPT_TLSAUTH_USERNAME | username to use for TLS authentication |
CURLOPT_TRAILERDATA | pointer passed to trailing headers callback |
CURLOPT_TRAILERFUNCTION | callback for sending trailing headers |
CURLOPT_TRANSFER_ENCODING | ask for HTTP Transfer Encoding |
CURLOPT_TRANSFERTEXT | request a text based transfer for FTP |
CURLOPT_UNIX_SOCKET_PATH | Unix domain socket |
CURLOPT_UNRESTRICTED_AUTH | send credentials to other hosts too |
CURLOPT_UPKEEP_INTERVAL_MS | connection upkeep interval |
CURLOPT_UPLOAD_BUFFERSIZE | upload buffer size |
CURLOPT_UPLOAD | data upload |
CURLOPT_URL | URL for this transfer |
CURLOPT_USE_SSL | request using SSL / TLS for the transfer |
CURLOPT_USERAGENT | HTTP user-agent header |
CURLOPT_USERNAME | username to use in authentication |
CURLOPT_USERPWD | username and password to use in authentication |
CURLOPT_VERBOSE | verbose mode |
CURLOPT_WILDCARDMATCH | directory wildcard transfers |
CURLOPT_WRITEDATA | pointer passed to the write callback |
CURLOPT_WRITEFUNCTION | callback for writing received data |
CURLOPT_WS_OPTIONS | WebSocket behavior options |
CURLOPT_XFERINFODATA | pointer passed to the progress callback |
CURLOPT_XFERINFOFUNCTION | progress meter callback |
CURLOPT_XOAUTH2_BEARER | OAuth 2.0 access token |
Get option information
libcurl offers an API, a set of functions really, that allow applications to get information about all currently support easy options. It does not return the values for the options, but it rather informs about name, ID and type of the option.
Iterate over all options
Modern libcurl supports over 300 different options. With the use of
curl_easy_option_by_next() an application can iterate over all the known
options and return a pointer to a struct curl_easyoption for them.
This function only returns information about options that this exact libcurl build knows about. Other options may exist in newer libcurl builds, or in builds that enable/disable options differently at build-time.
Example, iterate over all available options:
const struct curl_easyoption *opt;
opt = curl_easy_option_by_next(NULL);
while(opt) {
  printf("Name: %s\n", opt->name);
  opt = curl_easy_option_by_next(opt);
}
Find a specific option by name
Given a specific easy option name, you can ask libcurl to return a pointer to
a struct curl_easyoption for it. The name should be provided without the
CURLOPT_ prefix.
As an example, an application can ask libcurl about the CURLOPT_VERBOSE
option like this:
const struct curl_easyoption *opt = curl_easy_option_by_name("VERBOSE");
if(opt) {
  printf("This option wants CURLoption %x\n", (int)opt->id);
}
Find a specific option by ID
Given a specific easy option ID, you can ask libcurl to return a pointer to a
struct curl_easyoption for it. The "ID" is the CURLOPT_-prefixed symbol as
provided in the public curl/curl.h header file.
An application can ask libcurl for the name of the CURLOPT_VERBOSE option
like this:
const struct curl_easyoption *opt =
  curl_easy_option_by_id(CURLOPT_VERBOSE);
if(opt) {
  printf("This option has the name: %s\n", opt->name);
}
The curl_easyoption struct
struct curl_easyoption {
  const char *name;
  CURLoption id;
  curl_easytype type;
  unsigned int flags;
};
There is only one bit with a defined meaning in 'flags': if
CURLOT_FLAG_ALIAS is set, it means that that option is an "alias". A name
provided for backwards compatibility that is nowadays rather served by an
option with another name. If you lookup the ID for an alias, you get the new
canonical name for that option.
Drive transfers
libcurl provides three different ways to perform the transfer. Which way to use in your case is entirely up to you and what you need.
-
The 'easy' interface lets you do a single transfer in a synchronous fashion. libcurl does the entire transfer and return control back to your application when it is completed—successful or failed.
-
The 'multi' interface is for when you want to do more than one transfer at the same time, or you just want a non-blocking transfer.
-
The 'multi_socket' interface is a slight variation of the regular multi one, but is event-based and is really the suggested API to use if you intend to scale up the number of simultaneous transfers to hundreds or thousands or so.
Let's look at each one a little closer…
Drive with easy
The name 'easy' was picked because this is really the easy way to use libcurl, and with easy, of course, comes a few limitations. Like, for example, that it can only do one transfer at a time and that it does the entire transfer in a single function call and returns once it is completed:
res = curl_easy_perform( easy_handle );
If the server is slow, if the transfer is large or if you have some unpleasant timeouts in the network or similar, this function call can end up taking a long time. You can, of course, set timeouts to not allow it to spend more than N seconds, but it could still mean a substantial amount of time depending on the particular conditions.
If you want your application to do something else while libcurl is transferring with the easy interface, you need to use multiple threads. If you want to do multiple simultaneous transfers when using the easy interface, you need to perform each of the transfers in its own thread.
Drive with multi
The name 'multi' is for multiple, as in multiple parallel transfers, all done in the same single thread. The multi API is non-blocking so it can also make sense to use it for single transfers.
The transfer is still set in an "easy" CURL * handle as described
above, but with the multi interface you also need a
multi CURLM * handle created and use that to drive all the individual
transfers. The multi handle can "hold" one or many easy handles:
CURLM *multi_handle = curl_multi_init();
A multi handle can also get certain options set, which you do with
curl_multi_setopt(), but in the simplest case you might not have anything to
set there.
To drive a multi interface transfer, you first need to add all the individual easy handles that should be transferred to the multi handle. You can add them to the multi handle at any point and you can remove them again whenever you like. Removing an easy handle from a multi handle removes the association and that particular transfer stops immediately.
Adding an easy handle to the multi handle is easy:
curl_multi_add_handle( multi_handle, easy_handle );
Removing one is as easily done:
curl_multi_remove_handle( multi_handle, easy_handle );
Having added the easy handles representing the transfers you want to perform,
you write the transfer loop. With the multi interface, you do the looping so
you can ask libcurl for a set of file descriptors and a timeout value and do
the select() call yourself, or you can use the slightly simplified version
which does that for us, with curl_multi_wait. The simplest loop could look
like this: (note that a real application would check return codes)
int transfers_running;
do {
   curl_multi_wait ( multi_handle, NULL, 0, 1000, NULL);
   curl_multi_perform ( multi_handle, &transfers_running );
} while (transfers_running);
The fourth argument to curl_multi_wait, set to 1000 in the example above, is
a timeout in milliseconds. It is the longest time the function waits for any
activity before it returns anyway. You do not want to lock up for too long
before calling curl_multi_perform again as there are timeouts, progress
callbacks and more that may lose precision if you do so.
To instead do select() on our own, we extract the file descriptors and timeout value from libcurl like this (note that a real application would check return codes):
int transfers_running;
do {
  fd_set fdread;
  fd_set fdwrite;
  fd_set fdexcep;
  int maxfd = -1;
  long timeout;

  /* extract timeout value */
  curl_multi_timeout(multi_handle, &timeout);
  if (timeout < 0)
    timeout = 1000;

  /* convert to struct usable by select */
  timeout.tv_sec = timeout / 1000;
  timeout.tv_usec = (timeout % 1000) * 1000;

  FD_ZERO(&fdread);
  FD_ZERO(&fdwrite);
  FD_ZERO(&fdexcep);

  /* get file descriptors from the transfers */
  mc = curl_multi_fdset(multi_handle, &fdread, &fdwrite,
                        &fdexcep, &maxfd);

  if (maxfd == -1) {
    SHORT_SLEEP;
  }
  else
   select(maxfd+1, &fdread, &fdwrite, &fdexcep, &timeout);

  /* timeout or readable/writable sockets */
  curl_multi_perform(multi_handle, &transfers_running);
} while ( transfers_running );
Both these loops let you use one or more file descriptors of your own on which to wait, like if you read from your own sockets or a pipe or similar.
Again: you can add and remove easy handles to the multi handle at any point during the looping. Removing a handle mid-transfer aborts that transfer.
When is a single transfer done?
As the examples above show, a program can detect when an individual transfer
completes by seeing that the transfers_running variable decreases.
It can also call curl_multi_info_read(), which returns a pointer to a struct
(a "message") if a transfer has ended and you can then find out the result of
that transfer using that struct.
When you do multiple parallel transfers, more than one transfer can of course
complete in the same curl_multi_perform invocation and then you might need
more than one call to curl_multi_info_read to get info about each completed
transfer.
Drive with multi_socket
multi_socket is the extra spicy version of the regular multi interface and is designed for event-driven applications. Make sure you read the Drive with multi interface section first.
multi_socket supports multiple parallel transfers—all done in the same single thread—and have been used to run several tens of thousands of transfers in a single application. It is usually the API that makes the most sense if you do a large number (>100 or so) of parallel transfers.
Event-driven in this case means that your application uses a system level library or setup that subscribes to a number of sockets and it lets your application know when one of those sockets are readable or writable and it tells you exactly which one.
This setup allows clients to scale up the number of simultaneous transfers much higher than with other systems, and still maintain good performance. The regular APIs otherwise waste far too much time scanning through lists of all the sockets.
Pick one
There are numerous event based systems to select from out there, and libcurl is completely agnostic to which one you use. libevent, libev and libuv are three popular ones but you can also go directly to your operating system's native solutions such as epoll, kqueue, /dev/poll, pollset or Event Completion.
Many easy handles
Like with the regular multi interface, you add easy handles to a multi handle
with curl_multi_add_handle(). One easy handle for each transfer you want to
perform.
You can add them at any time while the transfers are running and you can also
similarly remove easy handles at any time using the curl_multi_remove_handle
call. Typically though, you remove a handle only after its transfer is
completed.
multi_socket callbacks
As explained above, this event-based mechanism relies on the application to know which sockets that are used by libcurl and what activities libcurl waits for on those sockets: if it waits for the socket to become readable, writable or both.
The application also needs to tell libcurl when the timeout time has expired, as it is control of driving everything libcurl cannot do it itself. libcurl informs the application updated timeout values as soon as it needs to.
socket_callback
libcurl informs the application about socket activity to wait for with a callback called CURLMOPT_SOCKETFUNCTION. Your application needs to implement such a function:
int socket_callback(CURL *easy,      /* easy handle */
                    curl_socket_t s, /* socket */
                    int what,        /* what to wait for */
                    void *userp,     /* private callback pointer */
                    void *socketp)   /* private socket pointer */
{
   /* told about the socket 's' */
}

/* set the callback in the multi handle */
curl_multi_setopt(multi_handle, CURLMOPT_SOCKETFUNCTION, socket_callback);
Using this, libcurl sets and removes sockets your application should monitor. Your application tells the underlying event-based system to wait for the sockets. This callback is called multiple times if there are multiple sockets to wait for, and it is called again when the status changes and perhaps you should switch from waiting for a writable socket to instead wait for it to become readable.
When one of the sockets that the application is monitoring on libcurl's behalf
registers that it becomes readable or writable, as requested, you tell libcurl
about it by calling curl_multi_socket_action() and passing in the affected
socket and an associated bitmask specifying which socket activity that was
registered:
int running_handles;
ret = curl_multi_socket_action(multi_handle,
                               sockfd, /* the socket with activity */
                               ev_bitmask, /* the specific activity */
                               &running_handles);
timer_callback
The application is in control and waits for socket activity. Even without socket activity there are things libcurl needs to do. Timeout things, calling the progress callback, starting over a retry or failing a transfer that takes too long, etc. To make that work, the application must also make sure to handle a single-shot timeout that libcurl sets.
libcurl sets the timeout with the timer_callback CURLMOPT_TIMERFUNCTION:
int timer_callback(multi_handle,   /* multi handle */
                   timeout_ms,     /* milliseconds to wait */
                   userp)          /* private callback pointer */
{
  /* the new time-out value to wait for is in 'timeout_ms' */
}

/* set the callback in the multi handle */
curl_multi_setopt(multi_handle, CURLMOPT_TIMERFUNCTION, timer_callback);
There is only one timeout for the application to handle for the entire multi handle, no matter how many individual easy handles that have been added or transfers that are in progress. The timer callback gets updated with the current nearest-in-time period to wait. If libcurl gets called before the timeout expiry time because of socket activity, it may update the timeout value again before it expires.
When the event system of your choice eventually tells you that the timer has expired, you need to tell libcurl about it:
curl_multi_socket_action(multi, CURL_SOCKET_TIMEOUT, 0, &running);
…in many cases, this makes libcurl call the timer_callback again and set a new timeout for the next expiry period.
How to start everything
When you have added one or more easy handles to the multi handle and set the socket and timer callbacks in the multi handle, you are ready to start the transfer.
To kick it all off, you tell libcurl it timed out (because all easy handles start out with a short timeout) which make libcurl call the callbacks to set things up and from then on you can let your event system drive:
/* all easy handles and callbacks are setup */

curl_multi_socket_action(multi, CURL_SOCKET_TIMEOUT, 0, &running);

/* now the callbacks should have been called and we have sockets to wait
   for and possibly a timeout, too. Make the event system do its magic */

event_base_dispatch(event_base); /* libevent2 has this API */

/* at this point we have exited the event loop */
When is it done?
The 'running_handles' counter returned by curl_multi_socket_action holds the
number of current transfers not completed. When that number reaches zero, we
know there are no transfers going on.
Each time the 'running_handles' counter changes, curl_multi_info_read()
returns info about the specific transfers that completed.
Callbacks
Lots of operations within libcurl are controlled with the use of callbacks. A callback is a function pointer provided to libcurl that libcurl then calls at some point to get a particular job done.
Each callback has its specific documented purpose and it requires that you write it with the exact function prototype to accept the correct arguments and return the documented return code and return value so that libcurl performs the way you want it to.
Each callback option also has a companion option that sets the associated user pointer. This user pointer is a pointer that libcurl does not touch or care about, but just passes on as an argument to the callback. This allows you to, for example, pass in pointers to local data all the way through to your callback function.
Unless explicitly stated in a libcurl function documentation, it is not legal to invoke libcurl functions from within a libcurl callback.
- Write data
- Read data
- Progress information
- Header data
- Debug
- sockopt
- SSL context
- Seek and ioctl
- Network data conversion
- Opensocket and closesocket
- SSH key
- RTSP interleaved data
- FTP wildcard matching
- Resolver start
- Sending trailers
- HSTS
- Prereq
Write data
The write callback is set with CURLOPT_WRITEFUNCTION:
curl_easy_setopt(handle, CURLOPT_WRITEFUNCTION, write_callback);
The write_callback function must match this prototype:
size_t write_callback(char *ptr, size_t size, size_t nmemb,
                      void *userdata);
This callback function gets called by libcurl as soon as there is data received that needs to be saved. ptr points to the delivered data, and the size of that data is size multiplied with nmemb.
If this callback is not set, libcurl instead uses 'fwrite' by default.
The write callback is passed as much data as possible in all invokes, but it
must not make any assumptions. It may be one byte, it may be thousands. The
maximum amount of body data that is passed to the write callback is defined in
the curl.h header file: CURL_MAX_WRITE_SIZE (the usual default is 16KB). If
CURLOPT_HEADER is enabled for this transfer, which makes header data get
passed to the write callback, you can get up to CURL_MAX_HTTP_HEADER bytes
of header data passed into it. This usually means 100KB.
This function may be called with zero bytes data if the transferred file is empty.
The data passed to this function is not be null-terminated. You cannot, for
example, use printf's %s operator to display the contents nor strcpy to copy
it.
This callback should return the number of bytes actually taken care of. If
that number differs from the number passed to your callback function, it
signals an error condition to the library. This causes the transfer to get
aborted and the libcurl function used returns CURLE_WRITE_ERROR.
The user pointer passed in to the callback in the userdata argument is set
with CURLOPT_WRITEDATA:
curl_easy_setopt(handle, CURLOPT_WRITEDATA, custom_pointer);
Store in memory
A popular demand is to store the retrieved response in memory, and the callback explained above supports that. When doing this, recall that the response can potentially be enormous.
You implement the callback in a manner similar to:
struct response {
  char *memory;
  size_t size;
};

static size_t
mem_cb(void *contents, size_t size, size_t nmemb, void *userp)
{
  size_t realsize = size * nmemb;
  struct response *mem = (struct response *)userp;

  char *ptr = realloc(mem->memory, mem->size + realsize + 1);
  if(!ptr) {
    /* out of memory! */
    printf("not enough memory (realloc returned NULL)\n");
    return 0;
  }

  mem->memory = ptr;
  memcpy(&(mem->memory[mem->size]), contents, realsize);
  mem->size += realsize;
  mem->memory[mem->size] = 0;

  return realsize;
}

int main()
{
  struct response chunk = {.memory = malloc(0),
                           .size = 0};

  /* send all data to this function  */
  curl_easy_setopt(curl_handle, CURLOPT_WRITEFUNCTION, mem_cb);

  /* we pass our 'chunk' to the callback function */
  curl_easy_setopt(curl_handle, CURLOPT_WRITEDATA, (void *)&chunk);

  free(chunk.memory);
}
Read data
The read callback is set with CURLOPT_READFUNCTION:
curl_easy_setopt(handle, CURLOPT_READFUNCTION, read_callback);
The read_callback function must match this prototype:
size_t read_callback(char *buffer, size_t size, size_t nitems,
                     void *stream);
This callback function gets called by libcurl when it wants to send data to the server. This is a transfer that you have set up to upload data or otherwise send it off to the server. This callback is called over and over until all data has been delivered or the transfer failed.
The stream pointer points to the private data set with CURLOPT_READDATA:
curl_easy_setopt(handle, CURLOPT_READDATA, custom_pointer);
If this callback is not set, libcurl instead uses 'fread' by default.
The data area pointed at by the pointer buffer should be filled up with at most size multiplied with nitems number of bytes by your function. The callback should then return the number of bytes that it stored in that memory area, or 0 if we have reached the end of the data. The callback can also return a few "magic" return codes to cause libcurl to return failure immediately or to pause the particular transfer. See the CURLOPT_READFUNCTION man page for details.
Progress information
The progress callback is what gets called regularly and repeatedly for each
transfer during the entire lifetime of the transfer. The old callback was set
with CURLOPT_PROGRESSFUNCTION but the modern and preferred callback is set
with CURLOPT_XFERINFOFUNCTION:
curl_easy_setopt(handle, CURLOPT_XFERINFOFUNCTION, xfer_callback);
The xfer_callback function must match this prototype:
int xfer_callback(void *clientp, curl_off_t dltotal, curl_off_t dlnow,
                  curl_off_t ultotal, curl_off_t ulnow);
If this option is set and CURLOPT_NOPROGRESS is set to 0 (zero), this
callback function gets called by libcurl with a frequent interval. While data
is being transferred it gets called frequently, and during slow periods like
when nothing is being transferred it can slow down to about one call per
second.
The clientp pointer points to the private data set with
CURLOPT_XFERINFODATA:
curl_easy_setopt(handle, CURLOPT_XFERINFODATA, custom_pointer);
The callback gets told how much data libcurl is about to transfer and has transferred, in number of bytes:
dltotalis the total number of bytes libcurl expects to download in this transfer.dlnowis the number of bytes downloaded so far.ultotalis the total number of bytes libcurl expects to upload in this transfer.ulnowis the number of bytes uploaded so far.
Unknown/unused argument values passed to the callback are set to zero (like if you only download data, the upload size remains zero). Many times the callback is called one or more times first, before it knows the data sizes, so a program must be made to handle that.
Returning a non-zero value from this callback causes libcurl to abort the
transfer and return CURLE_ABORTED_BY_CALLBACK.
If you transfer data with the multi interface, this function is not called during periods of idleness unless you call the appropriate libcurl function that performs transfers.
(The deprecated callback CURLOPT_PROGRESSFUNCTION worked identically but
instead of taking arguments of type curl_off_t, it used double.)
Header data
The header callback is set with CURLOPT_HEADERFUNCTION:
curl_easy_setopt(handle, CURLOPT_HEADERFUNCTION, header_callback);
The header_callback function must match this prototype:
size_t header_callback(char *ptr, size_t size, size_t nmemb,
                       void *userdata);
This callback function gets called by libcurl as soon as a header has been received. ptr points to the delivered data, and the size of that data is size multiplied with nmemb. libcurl buffers headers and delivers only "full" headers, one by one, to this callback.
The data passed to this function is not be null-terminated. You cannot, for
example, use printf's %s operator to display the contents nor strcpy to copy
it.
This callback should return the number of bytes actually taken care of. If
that number differs from the number passed to your callback function, it
signals an error condition to the library. This causes the transfer to abort
and the libcurl function used returns CURLE_WRITE_ERROR.
The user pointer passed in to the callback in the userdata argument is set
with CURLOPT_HEADERDATA:
curl_easy_setopt(handle, CURLOPT_HEADERDATA, custom_pointer);
Debug
The debug callback is set with CURLOPT_DEBUGFUNCTION:
curl_easy_setopt(handle, CURLOPT_DEBUGFUNCTION, debug_callback);
The debug_callback function must match this prototype:
int debug_callback(CURL *handle,
                   curl_infotype type,
                   char *data,
                   size_t size,
                   void *userdata);
This callback function replaces the default verbose output function in the library and gets called for all debug and trace messages to aid applications to understand what's going on. The type argument explains what sort of data that is provided: header, data or SSL data and in which direction it flows.
A common use for this callback is to get a full trace of all data that libcurl sends and receives. The data sent to this callback is always the unencrypted version, even when, for example, HTTPS or other encrypted protocols are used.
This callback must return zero or cause the transfer to stop with an error code.
The user pointer passed in to the callback in the userdata argument is set
with CURLOPT_DEBUGDATA:
curl_easy_setopt(handle, CURLOPT_DEBUGDATA, custom_pointer);
sockopt
The sockopt callback is set with CURLOPT_SOCKOPTFUNCTION:
curl_easy_setopt(handle, CURLOPT_SOCKOPTFUNCTION, sockopt_callback);
The sockopt_callback function must match this prototype:
int sockopt_callback(void *clientp,
                     curl_socket_t curlfd,
                     curlsocktype purpose);
This callback function gets called by libcurl when a new socket has been created but before the connect call, to allow applications to change specific socket options.
The clientp pointer points to the private data set with
CURLOPT_SOCKOPTDATA:
curl_easy_setopt(handle, CURLOPT_SOCKOPTDATA, custom_pointer);
This callback should return:
- CURL_SOCKOPT_OK on success
- CURL_SOCKOPT_ERROR to signal an unrecoverable error to libcurl
- CURL_SOCKOPT_ALREADY_CONNECTED to signal success but also that the socket is in fact already connected to the destination
SSL context
libcurl offers a special TLS related callback called
CURLOPT_SSL_CTX_FUNCTION. This option only works for libcurl powered by
OpenSSL, wolfSSL or mbedTLS and it does nothing if libcurl is built with
another TLS backend.
This callback gets called by libcurl immediately before the initialization of
a TLS connection after having processed all other TLS related options to give
a last chance to an application to modify the behavior of the TLS
initialization. The ssl_ctx parameter passed to the callback in the second
argument is actually a pointer to the SSL library's SSL_CTX for OpenSSL or
wolfSSL, and a pointer to mbedtls_ssl_config for mbedTLS. If an error is
returned from the callback no attempt to establish a connection is made and
the operation returns the callback's error code. Set the userptr argument
with the CURLOPT_SSL_CTX_DATA option.
This function gets called on all new connections made to a server, during the TLS negotiation. The TLS context points to a newly initialized object each time.
Seek and ioctl
This callback is set with CURLOPT_SEEKFUNCTION.
The callback gets called by libcurl to seek to a certain position in the input
stream and can be used to fast forward a file in a resumed upload (instead of
reading all uploaded bytes with the normal read function/callback). It is also
called to rewind a stream when data has already been sent to the server and
needs to be sent again. This may happen when doing an HTTP PUT or POST with a
multi-pass authentication method, or when an existing HTTP connection is
reused too late and the server closes the connection. The function shall work
like fseek(3) or lseek(3) and it gets SEEK_SET, SEEK_CUR or SEEK_END as
argument for origin, although libcurl currently only passes SEEK_SET.
The custom userp sent to the callback is the pointer you set with
CURLOPT_SEEKDATA.
The callback function must return CURL_SEEKFUNC_OK on success,
CURL_SEEKFUNC_FAIL to cause the upload operation to fail or
CURL_SEEKFUNC_CANTSEEK to indicate that while the seek failed, libcurl is
free to work around the problem if possible. The latter can sometimes be done
by instead reading from the input or similar.
If you forward the input arguments directly to fseek(3) or lseek(3), note that
the data type for offset is not the same as defined for curl_off_t on many
systems.
Network data conversion
Up until libcurl version 7.82.0, these callbacks were provided to make things work on non-ASCII platforms. The support for these callbacks have since been removed.
The documentation below is kept here for a while and describes how they used to work. It is removed from this book at a future date.
Convert to and from network callbacks
For non-ASCII platforms, CURLOPT_CONV_FROM_NETWORK_FUNCTION is
provided. This function should convert to host encoding from the
network encoding.
CURLOPT_CONV_TO_NETWORK_FUNCTION should convert from host encoding
to the network encoding. It is used when commands or ASCII data are sent
over the network.
Convert from UTF-8 callback
CURLOPT_CONV_FROM_UTF8_FUNCTION should convert to host encoding from UTF-8
encoding. It is required only for SSL processing.
Opensocket and closesocket
Occasionally you end up in a situation where you want your application to
control with more precision exactly what socket libcurl uses for its
operations. libcurl offers this pair of callbacks that replaces libcurl's own
call to socket() and the subsequent close() of the same file descriptor.
Provide a file descriptor
By setting the CURLOPT_OPENSOCKETFUNCTION callback, you can provide a custom
function to return a file descriptor for libcurl to use:
curl_easy_setopt(handle, CURLOPT_OPENSOCKETFUNCTION, opensocket_callback);
The opensocket_callback function must match this prototype:
curl_socket_t opensocket_callback(void *clientp,
                                  curlsocktype purpose,
                                  struct curl_sockaddr *address);
The callback gets the clientp as first argument, which is an opaque pointer
you set with CURLOPT_OPENSOCKETDATA.
The other two arguments pass in data that identifies for what purpose and
address the socket is to be used. The purpose is a typedef with a value of
CURLSOCKTYPE_IPCXN or CURLSOCKTYPE_ACCEPT, identifying in which
circumstance the socket is created. The "accept" case being when libcurl is
used to accept an incoming FTP connection for when FTP active mode is used,
and all other cases when libcurl creates a socket for its own outgoing
connections the IPCXN value is passed in.
The address pointer points to a struct curl_sockaddr that describes the IP
address of the network destination for which this socket is created. Your
callback can for example use this information to whitelist or blacklist
specific addresses or address ranges.
The socketopen callback is also explicitly allowed to modify the target address in that struct, if you would like to offer some sort of network filter or translation layer.
The callback should return a file descriptor or CURL_SOCKET_BAD, which then
causes an unrecoverable error within libcurl and it returns
CURLE_COULDNT_CONNECT from its perform function.
If you want to return a file descriptor that is already connected to a server, then you must also set the sockopt callback and make sure that returns the correct return value.
The curl_sockaddress struct looks like this:
struct curl_sockaddr {
  int family;
  int socktype;
  int protocol;
  unsigned int addrlen;
  struct sockaddr addr;
};
Socket close callback
The corresponding callback to the open socket is of course the close socket. Usually when you provide a custom way to provide a file descriptor you want to provide your own cleanup version as well:
curl_easy_setopt(handle, CURLOPT_CLOSESOCKETFUNCTION,
                 closesocket_callback);
The closesocket_callback function must match this prototype:
int closesocket_callback(void *clientp, curl_socket_t item);
SSH key
This callback is set with CURLOPT_SSH_KEYFUNCTION.
It gets called when the known_host matching has been done, to allow the
application to act and decide for libcurl how to proceed. The callback is
called if CURLOPT_SSH_KNOWNHOSTS is also set.
In the arguments to the callback are the old key and the new key and the callback is expected to return a return code that tells libcurl how to act:
CURLKHSTAT_FINE_REPLACE - The new host+key is accepted and libcurl replaces
the old host+key into the known_hosts file before continuing with the
connection. This also adds the new host+key combo to the known_host pool kept
in memory if it was not already present there. The adding of data to the file
is done by completely replacing the file with a new copy, so the permissions
of the file must allow this.
CURLKHSTAT_FINE_ADD_TO_FILE - The host+key is accepted and libcurl appends
it to the known_hosts file before continuing with the connection. This also
adds the host+key combo to the known_host pool kept in memory if it was not
already present there. The adding of data to the file is done by completely
replacing the file with a new copy, so the permissions of the file must allow
this.
CURLKHSTAT_FINE - The host+key is accepted libcurl continues with the
connection. This also adds the host+key combo to the known_host pool kept in
memory if it was not already present there.
CURLKHSTAT_REJECT - The host+key is rejected. libcurl denies the connection
to continue and it closes.
CURLKHSTAT_DEFER - The host+key is rejected, but the SSH connection is asked
to be kept alive. This feature could be used when the app wants to somehow
return and act on the host+key situation and then retry without needing the
overhead of setting it up from scratch again.
RTSP interleaved data
The callback with the CURLOPT_INTERLEAVEFUNCTION option.
This callback gets called by libcurl as soon as it has received interleaved
RTP data when doing an RTSP transfer. It gets called for each $ block and
therefore contains exactly one upper-layer protocol unit (e.g. one RTP
packet). libcurl writes the interleaved header as well as the included data
for each call. The first byte is always an ASCII dollar sign. The dollar sign
is followed by a one byte channel identifier and then a 2 byte integer length
in network byte order. See RFC2326 Section 10.12 for more information on how
RTP interleaving behaves. If unset or set to NULL, curl uses the default write
function.
The CURLOPT_INTERLEAVEDATA pointer is passed in the userdata argument in the
callback.
FTP wildcard matching
libcurl supports FTP wildcard matching. You use this feature by setting
CURLOPT_WILDCARDMATCH to 1L and then use a "wildcard pattern" in the in
the filename part of the URL.
Wildcard patterns
The default libcurl wildcard matching function supports:
* - ASTERISK
ftp://example.com/some/path/*.txt
To match all txt files in the directory some/path. Only two asterisks are
allowed within the same pattern string.
? - QUESTION MARK"
A question mark matches any (exactly one) character. Like if you have files
called photo1.jpeg and photo7.jpeg this pattern could match them:
ftp://example.com/some/path/photo?.jpeg
[ - BRACKET EXPRESSION
The left bracket opens a bracket expression. The question mark and asterisk
have no special meaning in a bracket expression. Each bracket expression ends
by the right bracket (]) and matches exactly one character. Some examples
follow:
[a-zA-Z0-9] or [f-gF-G] - character intervals
[abc] - character enumeration
[^abc] or [!abc] - negation
[[:name:]] class expression. Supported classes are alnum, lower, space,
alpha, digit, print, upper, blank, graph, xdigit.
[][-!^] - special case, matches only \-, ], [, ! or ^.
[\\[\\]\\\\] - escape syntax. Matches [, ] or \\.
Using the rules above, a filename pattern can be constructed:
ftp://example.com/some/path/[a-z[:upper:]\\\\].jpeg
FTP chunk callbacks
When FTP wildcard matching is used, the CURLOPT_CHUNK_BGN_FUNCTION callback
is called before a transfer is initiated for a file that matches.
The callback can then opt to return one of these return codes to tell libcurl what to do with the file:
CURL_CHUNK_BGN_FUNC_OKtransfer the fileCURL_CHUNK_BGN_FUNC_SKIPCURL_CHUNK_BGN_FUNC_FAILstop because of error
After the matched file has been transferred or skipped, the
CURLOPT_CHUNK_END_FUNCTION callback is called.
The end chunk callback can only return success or error.
FTP matching callback
If the default pattern matching function is not to your liking, you can provide
your own replacement function by setting the CURLOPT_FNMATCH_FUNCTION option
to your alternative.
Resolver start
This callback function, set with CURLOPT_RESOLVER_START_FUNCTION gets called
by libcurl every time before a new resolve request is started, and it
specifies for which CURL * handle the resolve is intended.
Sending trailers
"Trailers" is an HTTP/1 feature where headers can be passed on at the end of a transfer. This callback is used for when you want to send trailers with curl after an upload has been performed. An upload in the form of a chunked encoded POST.
The callback set with CURLOPT_TRAILERFUNCTION is called and the function can
then append headers to a list. One or many. When done, libcurl sends off those
as trailers to the server.
HSTS
For HSTS, HTTP Strict Transport Security, libcurl provides two callbacks to allow an allocation to implement the storage for rules. The callbacks are then set to read and/or write the HSTS policies from a persistent storage.
With CURLOPT_HSTSREADFUNCTION, the application provides a function using
which HSTS data into libcurl is read. CURLOPT_HSTSWRITEFUNCTION is the
corresponding function that libcurl calls to write data.
Prereq
"Prereq" here means immediately before the request is issued. That is the moment where this callback is called.
Set the function with CURLOPT_PREREQFUNCTION and it gets called and passed
on the used IP address and port numbers in the arguments. This allows the
application to know about the transfer immediately before it starts and also
allows it to cancel this particular transfer should it want to.
Connection control
When doing a transfer with libcurl there is typically a connection involved. A connection done using an Internet transport protocol like TCP or QUIC. Transfers are done over connections and libcurl offers a lot of concepts for connections and options to control how it works with them.
- How libcurl connects
- Local address and port number
- Connection reuse
- Keep alive
- Name resolving
- Proxies
How libcurl connects
When libcurl is about to do an Internet transfer, it first resolves the host name to get a number of IP addresses for the host. A hostname needs to have at least one address for libcurl to be able to connect to it.
A hostname can have both IPv4 addresses and IPv6 addresses and they can have a set of both.
If the host only returned addresses of a single IP family, libcurl iterates over each address and tries to connect. If the connect attempt fails for an IP, libcurl continues to try the next entry until the entire list is exhausted.
An application can limit which IP versions libcurl uses by setting
CURLOPT_IPRESOLVE.
Happy Eyeballs
When it has received both IPv4 and IPv6 addresses for a host, libcurl first tries to connect to an IPv6 address and after a short delay it tries connecting to the first IPv4 address - at the same time and in parallel. Once one of the attempts succeeds, the others are discarded. This method of attempting to connect using both families at the same time is called Happy Eyeballs and is the widely accepted best practice for Internet clients.
An application can set the delay with which the second family connect attempt
starts in the Happy Eyeball procedure by using
CURLOPT_HAPPY_EYEBALLS_TIMEOUT_MS.
Timeout and halving
The connection phase has a maximum allowed time (set with
CURLOPT_CONNECTTIMEOUT_MS), which defaults to 300 seconds. The entire
connect procedure is deemed failed if no connect has succeeded within that
time.
When libcurl has multiple addresses left to try to connect to, and there is more than 600 millisecond left, it does at most allow half the remaining time for this attempt. This is to avoid a single sink-hole address make libcurl spend its entire timeout on that bad entry.
For example: if there are 1000 milliseconds left of the timeout and there are two IP addresses left to try to connect to, libcurl then only allows 500 milliseconds on the next attempt.
If there instead only are 600 milliseconds left of the timeout and there are two IP addresses left to try to connect to, libcurl allows the entire remaining timeout period on the next attempt, in order to not make it too short to succeed. The timeout halving approach is only done as long as there is more than 600 milliseconds remaining.
HTTP/3
For applications that ask libcurl to use HTTP/3, it adds another layer of Happy Eyeballs. HTTP/3 works over QUIC and QUIC is a different transport protocol than TCP and a mechanism that sometimes is blocked or otherwise does not work as well as TCP. In an effort to smooth out the problems this brings, libcurl performs QUIC connects in parallel with regular TCP connects in addition to the different IP version connects described above.
When libcurl get both IPv4 and IPv6 addresses for a host, and it wants to do HTTP/3 with the host, it proceeds like this:
- Start an IPv6 QUIC connect attempt, iterate over the IPv6 addresses
- After a short delay, start an IPv4 QUIC connect attempt, iterate over the IPv4 addresses
- After a short delay, start an IPv6 TCP connect attempt, iterate over the IPv6 addresses
- After a short delay, start an IPv4 TCP connect attempt, iterate over the IPv4 addresses
Once a connect attempt is successful, all the other ones are immediately discarded.
The HTTP/3 happy eyeballing is done when libcurl is asked to use
CURL_HTTP_VERSION_3 but not if set to CURL_HTTP_VERSION_3ONLY.
Local address and port number
In almost all situations you want to let the system pick the default source IP address and local port number when setting up a connection.
For the rare instances when that is not good enough, libcurl features overrides.
Local address
A connection created by libcurl needs to have a source IP that routes back to this host. An application can not randomly pick whatever IP address it wants to use and expect that to work. A network interface in the machine needs to have the IP address assigned.
You can ask libcurl to use a non-default IP address with CURLOPT_INTERFACE.
As the name hints, it is designed to get a named network interface as input
and it then attempts to use that interface's IP address for outgoing traffic.
The name can however instead be an IP address or a hostname, even though we do not recommend using those versions.
To prevent libcurl from guessing what kind of input that is provided, prefix the interface name with "if!", to make sure the name is not mistaken for a hostname.
Similarly, you prefix the provided name with "host!" to insist the address is a hostname or IP number.
Local port number
By default, 16-bit random source local port numbers are used for connections,
from the so called ephemeral port range. An application can ask for a
specific port range to be used with the CURLOPT_LOCALPORT and
CURLOPT_LOCALPORTRANGE options. Since port numbers are finite resources,
narrowing the selection of ports to select from increases the risk that the
connection cannot be setup if none of the attempted port numbers are currently
available to be used.
Connection reuse
libcurl keeps a pool of old connections alive. When one transfer has completed it keeps N connections alive in a connection pool (sometimes also called connection cache) so that a subsequent transfer that happens to be able to reuse one of the existing connections can use it instead of creating a new one. Reusing a connection instead of creating a new one offers significant benefits in speed and required resources.
When libcurl is about to make a new connection for the purposes of doing a transfer, it first checks to see if there is an existing connection in the pool that it can reuse instead. The connection re-use check is done before any DNS or other name resolving mechanism is used, so it is purely hostname based. If there is an existing live connection to the right hostname, a lot of other properties (port number, protocol, etc) are also checked to see that it can be used.
Easy API pool
When you are using the easy API, or, more specifically, curl_easy_perform(),
libcurl keeps the pool associated with the specific easy handle. Then reusing
the same easy handle ensures libcurl can reuse its connection.
Multi API pool
When you are using the multi API, the connection pool is instead kept associated with the multi handle. This allows you to cleanup and re-create easy handles freely without risking losing the connection pool, and it allows the connection used by one easy handle to get reused by a separate one in a later transfer. Reuse the multi handle.
Sharing the connection cache
Since libcurl 7.57.0, applications can use the share interface to have otherwise independent transfers share the same connection pool.
When connections are not reused as you want
libcurl automatically and always tries to reuse connections unless explicitly told not to. There are however several reasons why a connection is not used for a subsequent transfer.
-
The server signals that the connection is closed after this transfer. For example by using the
Connection: closeHTTP response header or a HTTP/2 or HTTP/3 "go away" frame. -
The HTTP/1 response of a transfer is sent in such a way that a connection close is the only way to detect the end of the body. Or an HTTP/1 receive error that makes curl deem that it cannot safely reuse the connection anymore.
-
The connection is deemed "dead" when libcurl tries to reuse it. It might happen when the server side has closed the connection after the previous transfer was completed. It can also happen if a stateful firewall/NAT or something in the network path drops the connection or if there is HTTP/2 or HTTP/3 traffic (like PING frames) over the connection when unattended.
-
The previous transfer is deemed too old to reuse. If
CURLOPT_MAXLIFETIME_CONNis set, libcurl does not reuse a connection that is older than the set value in seconds. -
The previous transfer is deemed having idled for too long. By default libcurl never attempts to reuse a connection that has been idle for more than 118 seconds. This time can be changed with
CURLOPT_MAXAGE_CONN. -
If the connection pool is full when a transfer ends and a new connection is about to get stored there, the oldest idle connection in the pool is closed and discarded and therefore cannot be reused anymore. Increase the connection pool size with
CURLMOPT_MAXCONNECTSorCURLOPT_MAXCONNECTS, depending on which API you are using. -
When using the multi interface, if the previous transfer has not ended when the next transfer is started, and the previous connection cannot be used for multiplexing.
Etc. Usually you can learn about the reason by enabling CURLOPT_VERBOSE and
inspecting what libcurl informs the application.
Keep alive
Once a TCP connection has been established, that connection is defined to be valid until one side closes it. Once the connection has entered the connected state, it remains connected indefinitely. In reality, the connection does not last indefinitely. Many firewalls or NAT systems close connections if there has been no activity in some time period. The Keep Alive signal can be used to refrain intermediate hosts from closing idle connection due to inactivity.
libcurl offers several options to enable and control TCP Keep alive for connections it creates. There is one main boolean option to switch the feature on/off, and there are three separate options for the counters and timeouts involved.
It can be noted that while this method tries to defeat middle boxes closing down idle connections, there are also such boxes that plain ignore keep alive probes. There are no guarantees that this actually works.
Enable keep alive
Set the CURLOPT_TCP_KEEPALIVE long to 1 to enable, 0 to disable. If enabled,
libcurl sets TCP Keep Alive options on any new TCP connection it creates using
this handle. If it creates connections using other protocols, like UDP or
QUIC, those connections are not affected.
Idle time
You set the CURLOPT_TCP_KEEPIDLE long to the number of seconds you want the
connection to be idle before sending the first keep alive probe. The default
value is 60 seconds. It makes sense to try to set this to a time slightly
lower than the time limit in your strictest middle box.
Probe interval
Set CURLOPT_TCP_KEEPINTVL to a long for the number of seconds to wait
between subsequent keep alive probes. The probes that follow once the first
keep alive probe has been sent. Default is 60 seconds.
Probe count
Sometimes referred as keep alive retry. Set CURLOPT_TCP_KEEPCNT to a long
holding the number of retransmissions to be carried out before declaring that
remote end is not available and closing the connection. Default is 9. This
libcurl option was added in 8.9.0, long after the previous options.
Example
A tiny example of libcurl application doing a transfer using TCP keep alive.
int main(void)
{
  CURL *curl = curl_easy_init();
  if(curl) {
    curl_easy_setopt(curl, CURLOPT_URL, "https://example.com");

    /* enable TCP keep-alive for this transfer */
    curl_easy_setopt(curl, CURLOPT_TCP_KEEPALIVE, 1L);

    /* keep-alive idle time to 120 seconds */
    curl_easy_setopt(curl, CURLOPT_TCP_KEEPIDLE, 120L);

    /* interval time between keep-alive probes: 60 seconds */
    curl_easy_setopt(curl, CURLOPT_TCP_KEEPINTVL, 60L);

    /* maximum number of keep-alive probes: 3 */
    curl_easy_setopt(curl, CURLOPT_TCP_KEEPCNT, 3L);

    curl_easy_perform(curl);
  }
}
HTTP Keep-Alive
There was this old keyword called Keep-Alive used for HTTP/1.0 in the
Connection: header. It has an entirely separate functionality and is not
related to TCP Keep Alive: it meant that the connection should be kept alive
for persistent use in subsequent transfers. That became default for HTTP in
1.1.
QUIC and HTTP/2
Both QUIC and HTTP/2 have PING frames that can be sent between two peers involved in the communication that then have similar effects as TCP Keep Alive. These options do however not control libcurl's use of PING frames.
Name resolving
Most transfers libcurl can do involves a name that first needs to be translated to an Internet address. That is name resolving. Using a numerical IP address directly in the URL usually avoids the name resolve phase, but in many cases it is not easy to manually replace the name with the IP address.
libcurl tries hard to re-use an existing connection rather than to create a new one. The function that checks for an existing connection to use is based purely on the name and is performed before any name resolving is attempted. That is one of the reasons the re-use is so much faster. A transfer using a reused connection does not resolve the hostname again.
If no connection can be reused, libcurl resolves the hostname to the set of addresses it resolves to. Typically this means asking for both IPv4 and IPv6 addresses and there may be a whole set of those returned to libcurl. That set of addresses is then tried until one works, or it returns failure.
An application can force libcurl to use only an IPv4 or IPv6 resolved address
by setting CURLOPT_IPRESOLVE to the preferred value. For example, ask to
only use IPv6 addresses:
curl_easy_setopt(easy, CURLOPT_IPRESOLVE, CURL_IPRESOLVE_V6);
Name resolver backends
libcurl can be built to do name resolves in one out of these three different ways and depending on which backend way that is used, it gets a slightly different feature set and sometimes modified behavior.
-
The default backend is invoking the normal libc resolver functions in a new helper-thread, so that it can still do fine-grained timeouts if wanted and there is no blocking calls involved.
-
On older systems, libcurl uses the standard synchronous name resolver functions. They unfortunately make all transfers within a multi handle block during its operation and it is much harder to time out nicely.
-
There is also support for resolving with the c-ares third party library, which supports asynchronous name resolving without the use of threads. This scales better to huge number of parallel transfers but it is not always 100% compatible with the native name resolver functionality.
DNS over HTTPS
Independently of what resolver backend that libcurl is built to use, since 7.62.0 it also provides a way for the user to ask a specific DoH (DNS over HTTPS) server for the address of a name. This avoids using the normal, native resolver method and server and instead asks a dedicated separate one.
A DoH server is specified as a full URL with the CURLOPT_DOH_URL option like
this:
curl_easy_setopt(easy, CURLOPT_DOH_URL, "https://example.com/doh");
The URL passed to this option must be using https:// and it is generally recommended that you have HTTP/2 support enabled so that libcurl can perform multiple DoH requests multiplexed over the connection to the DoH server.
Caching
When a name has been resolved, the result is stored in libcurl's in-memory
cache so that subsequent resolves of the same name are instant for as long the
name is kept in the DNS cache. By default, each entry is kept in the cache for
60 seconds, but that value can be changed with CURLOPT_DNS_CACHE_TIMEOUT.
The DNS cache is kept within the easy handle when curl_easy_perform is used,
or within the multi handle when the multi interface is used. It can also be
made shared between multiple easy handles using the
share interface.
Custom addresses for hosts
Sometimes it is handy to provide fake, custom addresses for real hostnames so that libcurl connects to a different address instead of one an actual name resolve would suggest.
With the help of the CURLOPT_RESOLVE option, an application can pre-populate libcurl's DNS cache with a custom address for a given hostname and port number.
To make libcurl connect to 127.0.0.1 when example.com on port 443 is requested, an application can do:
struct curl_slist *dns;
dns = curl_slist_append(NULL, "example.com:443:127.0.0.1");
curl_easy_setopt(curl, CURLOPT_RESOLVE, dns);
Since this puts the fake address into the DNS cache, it works even when following redirects etc.
Name server options
For libcurl built to use c-ares, there is a few options available that offer fine-grained control of what DNS servers to use and how. This is limited to c-ares build purely because these are powers that are not available when the standard system calls for name resolving are used.
-
With
CURLOPT_DNS_SERVERS, the application can select to use a set of dedicated DNS servers. -
With
CURLOPT_DNS_INTERFACEit can tell libcurl which network interface to speak DNS over instead of the default one. -
With
CURLOPT_DNS_LOCAL_IP4andCURLOPT_DNS_LOCAL_IP6, the application can specify which specific network addresses to bind DNS resolves to.
No global DNS cache
The option called CURLOPT_DNS_USE_GLOBAL_CACHE once told curl to use a
global DNS cache. This functionality has been removed since 7.65.0, so while
this option still exists it does nothing.
Proxies
A proxy in a network context is a middle man, a server in between you as a client and the remote server you want to communicate with. The client contacts the middle man which then goes on to contact the remote server for you.
This style of proxy use is sometimes used by companies and organizations, in which case you are usually required to use them to reach the target server.
There are several different kinds of proxies and different protocols to use when communicating with a proxy, and libcurl supports a few of the most common proxy protocols. It is important to realize that the protocol used to the proxy is not necessarily the same protocol used to the remote server.
When setting up a transfer with libcurl you need to point out the server name and port number of the proxy. You may find that your favorite browsers can do this in slightly more advanced ways than libcurl can, and we get into such details in later sections.
Proxy types
libcurl supports the two major proxy types: SOCKS and HTTP proxies. More specifically, it supports both SOCKS4 and SOCKS5 with or without remote name lookup, as well as both HTTP and HTTPS to the local proxy.
The easiest way to specify which kind of proxy you are talking to is to set
the scheme part of the proxy hostname string (CURLOPT_PROXY) to match it:
socks4://proxy.example.com:12345/
socks4a://proxy.example.com:12345/
socks5://proxy.example.com:12345/
socks5h://proxy.example.com:12345/
http://proxy.example.com:12345/
https://proxy.example.com:12345/
socks4 - means SOCKS4 with local name resolving
socks4a - means SOCKS4 with proxy's name resolving
socks5 - means SOCKS5 with local name resolving
socks5h - means SOCKS5 with proxy's name resolving
http - means HTTP, which always lets the proxy resolve names
https - means HTTPS to the proxy, which always lets the proxy resolve
names.
You can also opt to set the type of the proxy with a separate option if you
prefer to only set the hostname, using CURLOPT_PROXYTYPE. Similarly, you
can set the proxy port number to use with CURLOPT_PROXYPORT.
Local or proxy name lookup
In a section above you can see that different proxy setups allow the name resolving to be done by different parties involved in the transfer. You can in several cases either have the client resolve the server hostname and pass on the IP address to the proxy to connect to - which of course assumes that the name lookup works accurately on the client system - or you can hand over the name to the proxy to have the proxy resolve the name; converting it to an IP address to connect to.
When you are using an HTTP or HTTPS proxy, you always give the name to the proxy to resolve.
Which proxy?
If your network connection requires the use of a proxy to reach the destination, you must figure this out and tell libcurl to use the correct proxy. There is no support in libcurl to make it automatically figure out or detect a proxy.
When using a browser, it is popular to provide the proxy with a PAC script or other means but none of those are recognized by libcurl.
Proxy environment variables
If no proxy option has been set, libcurl checks for the existence of specially named environment variables before it performs its transfer to see if a proxy is requested to get used.
You can specify the proxy by setting a variable named [scheme]_proxy to hold
the proxy hostname (the same way you would specify the host with -x). If
you want to tell curl to use a proxy when accessing an HTTP server, you set
the http_proxy environment variable. Like this:
http_proxy=http://proxy.example.com:80
The proxy example above is for HTTP, but can of course also set ftp_proxy,
https_proxy, and so on for the specific protocols you want to proxy. All
these proxy environment variable names except http_proxy can also be specified
in uppercase, like HTTPS_PROXY.
To set a single variable that controls all protocols, the ALL_PROXY
exists. If a specific protocol variable one exists, such a one takes
precedence.
When using environment variables to set a proxy, you could easily end up in a
situation where one or a few hostnames should be excluded from going through
the proxy. This can be done with the NO_PROXY variable - or the
corresponding CURLOPT_NOPROXY libcurl option. Set that to a comma-separated
list of hostnames that should not use a proxy when being accessed. You can set
NO_PROXY to be a single asterisk ('*') to match all hosts.
HTTP proxy
The HTTP protocol details exactly how an HTTP proxy should be used. Instead of sending the request to the actual remote server, the client (libcurl) instead asks the proxy for the specific resource. The connection to the HTTP proxy is made using plain unencrypted HTTP.
If an HTTPS resource is requested, libcurl instead issues a CONNECT request
to the proxy. Such a request opens a tunnel through the proxy, where it passes
data through without understanding it. This way, libcurl can establish a
secure end-to-end TLS connection even when an HTTP proxy is present.
You can proxy non-HTTP protocols over an HTTP proxy, but since this is mostly done by the CONNECT method to tunnel data through it requires that the proxy is configured to allow the client to connect to those other particular remote port numbers. Many HTTP proxies are setup to inhibit connections to other port numbers than 80 and 443.
HTTPS proxy
An HTTPS proxy is similar to an HTTP proxy but allows the client to connect to it using a secure HTTPS connection. Since the proxy connection is separate from the connection to the remote site even in this situation, as HTTPS to the remote site is tunneled through the HTTPS connection to the proxy, libcurl provides a whole set of TLS options for the proxy connection that are separate from the connection to the remote host.
For example, CURLOPT_PROXY_CAINFO is the same functionality for the HTTPS
proxy as CURLOPT_CAINFO is for the remote
host. CURLOPT_PROXY_SSL_VERIFYPEER is the proxy version of
CURLOPT_SSL_VERIFYPEER and so on.
libcurl speaks HTTP/1 to HTTPS proxies by default. You can make it try using
HTTP/2 by setting CURLOPT_PROXYTYPE to CURLPROXY_HTTPS2 when the proxy is
also set to use a https:// scheme. When using HTTP/2 to the proxy, libcurl
can reuse the proxy connection and do multiplexed transfers over that when
talking to different remote server as long as the remote protocol is not TLS
based.
Proxy authentication
Authentication with a proxy means that you need to provide valid credentials in the handshake negotiation with the proxy itself. The proxy authentication is then in addition to and separate of the possible authentication or lack of authentication with the remote host.
libcurl supports authentication with HTTP, HTTPS and SOCKS5 proxies. The key
option is then CURLOPT_PROXYUSERPWD which sets the username and password to
use - unless you set it within the CURLOPT_PROXY string.
HTTP Proxy headers
With an HTTP or HTTP proxy, libcurl issues a request to the proxy that includes a set of headers. An application can of course modify the headers sent to proxies similar to requests sent to servers.
libcurl offers the CURLOPT_PROXYHEADER for controlling the headers that are
sent to a proxy when there is a separate request sent to the server. This
typically means the initial CONNECT request sent to a proxy for setting up a
tunnel through the proxy.
Transfer control
An ongoing transfer can be controlled in several ways. The following pages describe further details:
Stop
An Internet transfer might be brief but can also take a long time. Maybe even an infinite amount of time.
libcurl normally performs transfers until they are complete or until an error occurs. If none of those events happen, the transfer continues.
At times, you might want to stop a libcurl transfer before it would otherwise stop.
easy API
As explained elsewhere, the curl_easy_perform() function is a synchronous
function call. It does the entire transfer before it returns.
There are a few different ways to stop a transfer before it would otherwise end:
- return an error from a callback
- set an option that makes the transfer stop after a fixed period of time
Every callback can return an error, and when an error is returned from one of those functions the entire transfer is stopped. For example the read, write or progress callbacks.
The second way is to set a timeout or other option that stops the transfer after a time or at a particular condition. For example one or more of the following:
CURLOPT_TIMEOUT- set a maximum time the entire transfer may takeCURLOPT_CONNECTTIMEOUT- set a maximum time "connection phase" may takeCURLOPT_LOW_SPEED_LIMIT- set the lowest acceptable transfer speed. The transfer stops if slower than this speed forCURLOPT_LOW_SPEED_TIMEnumber of second.
There is no provided function that allows your application to stop an ongoing
curl_easy_perform() call from another thread. The common suggestion is then
that you signal that intent in a private way that you can detect in a callback
and have that callback return error when it happens.
multi API
The multi interface is generally a non-blocking API, so in most situations you
can stop a transfer by removing its corresponding easy handle from the multi
handle using curl_multi_remove_handle().
When you use the multi API, you might call libcurl to wait for activities or
traffic on sockets libcurl works with. A call that might sit blocking while
waiting for something to happen (or a timeout to expire), like
curl_multi_poll().
An application can make a blocked call to curl_multi_poll() wake up and
return forcibly and immediately by calling curl_multi_wakeup() from another
thread.
Stop slow transfers
By default, a transfer can stall or transfer data extremely slow for any period without that being an error.
Stop a transfer if below N bytes/sec during M seconds. Set N with
CURLOPT_LOW_SPEED_LIMIT and set M with CURLOPT_LOW_SPEED_TIME.
Using these option in real code can look like this:
#include <stdio.h>
#include <curl/curl.h>

int main(void)
{
  CURL *curl;
  CURLcode res = CURLE_OK;

  curl = curl_easy_init();
  if(curl) {
    /* abort if slower than 30 bytes/sec during 60 seconds */
    curl_easy_setopt(curl, CURLOPT_LOW_SPEED_TIME, 60L);
    curl_easy_setopt(curl, CURLOPT_LOW_SPEED_LIMIT, 30L);

    curl_easy_setopt(curl, CURLOPT_URL, "https://curl.se/");

    res = curl_easy_perform(curl);

    curl_easy_cleanup(curl);
  }

  return (int)res;
}
Rate limit
Lets an application set a speed cap. Do not transfer data faster than a set number of bytes per second. libcurl then attempts to keep the average speed below the given threshold over a period of multiple seconds.
There are separate options for receiving (CURLOPT_MAX_RECV_SPEED_LARGE) and
sending (CURLOPT_MAX_SEND_SPEED_LARGE).
Here is an example source code showing it in use:
#include <stdio.h>
#include <curl/curl.h>

int main(void)
{
  CURL *curl;
  CURLcode res = CURLE_OK;

  curl = curl_easy_init();
  if(curl) {
    curl_off_t maxrecv = 31415;
    curl_off_t maxsend = 67954;

    curl_easy_setopt(curl, CURLOPT_MAX_RECV_SPEED_LARGE, maxrecv);
    curl_easy_setopt(curl, CURLOPT_MAX_SEND_SPEED_LARGE, maxsend);

    curl_easy_setopt(curl, CURLOPT_URL, "https://curl.se/");

    res = curl_easy_perform(curl);

    curl_easy_cleanup(curl);
  }

  return (int)res;
}
Progress meter
libcurl can be made to output a progress meter on stderr. This feature is
disabled by default and is one of those options with an ones awkward negation
in the name: CURLOPT_NOPROGRESS - set it to 1L to disable progress
meter. Set it to 0L to enable it.
Return error to stop transfer
It can look something like this in code:
#include <stdio.h>
#include <curl/curl.h>

int main(void)
{
  CURL *curl;
  CURLcode res = CURLE_OK;

  curl = curl_easy_init();
  if(curl) {
    /* enable progress meter */
    curl_easy_setopt(curl, CURLOPT_NOPROGRESS, 0L);

    curl_easy_setopt(curl, CURLOPT_URL, "https://curl.se/");

    res = curl_easy_perform(curl);

    curl_easy_cleanup(curl);
  }

  return (int)res;
}
Progress callback
This callback lets the application keep track of transfer progress. It is also called on idle with the easy interface and is a common way to make libcurl stop a transfer by returning error.
See the progress callback section for all the details.
Authentication
Doing transfers with libcurl usually allows the application to do it without providing any credentials at all. You could perhaps call it anonymously.
For FTP transfers, libcurl then uses a default user and password as the convention tells us, while with some other protocols like SFTP and SCP the transfer is most likely to fail. Authentication is mandatory for some transfers.
Authentication for libcurl means credentials (user + password) and in some cases an additional method: letting the application select what authentication method to use. Each protocol typically have their own sets.
Depending on the authentication method and if the transmission is perhaps not using an authenticated security layer (such as TLS, QUIC or SSH) there is a risk that sensitive information leaks over the network. The easiest way to avoid this risk is to never use authentication with unauthenticated protocols.
For some protocols or methods, authentication is done per connection, for others it is done per transfer. libcurl keeps track of that and makes sure that connections are reused correctly. Meaning that sometimes it cannot reuse connections for transfers done using different credentials but sometimes it can.
Username
Set the username with CURLOPT_USERNAME, as a plain null-terminated C string.
The older option called CURLOPT_USERPWD is better avoided, for the simple
reason that it wants username and password in the same string, colon
separated, which easily cause problems if either the name or the password
contain a colon. Which can be tricky to guarantee to never happen.
Password
Set the password to use with CURLOPT_PASSWORD, as a plain null-terminated C
string.
Method
The method selection depends on the protocol. For HTTP specifics, see the HTTP Authentication section.
.netrc
Unix systems have for a long time offered a way for users to store their user
name and password for remote FTP servers. ftp clients have supported this for
decades and this way allowed users to quickly login to known servers without
manually having to reenter the credentials each time. The .netrc file is
typically stored in a user's home directory.
libcurl supports getting credentials from the .netrc file if you ask it to
it, with the CURLOPT_NETRC option.
This option has three different settings, with CURL_NETRC_IGNORED being the
default:
Setting it to CURL_NETRC_OPTIONAL means that the use of the .netrc file is
optional, and user information provided in the URL is to be preferred. The
file is scanned for the host and username to find the password.
CURL_NETRC_REQUIRED instead means that the use of the .netrc file is
required, and any credential information present in the URL is ignored.
Cleanup
In previous sections we have discussed how to setup handles and how to drive the transfers. All transfers end up at some point, either successfully or with a failure.
Multi API
When you have finished a single transfer with the multi API, you use
curl_multi_info_read() to identify exactly which easy handle was completed
and you remove that easy handle from the multi handle with
curl_multi_remove_handle().
If you remove the last easy handle from the multi handle so there are no more transfers going on, you can close the multi handle like this:
curl_multi_cleanup( multi_handle );
easy handle
When the easy handle is done serving its purpose, you can close it. If you intend to do another transfer, you are however advised to rather reuse the handle rather than to close it and create a new one.
If you do not intend to do another transfer with the easy handle, you ask libcurl to cleanup:
curl_easy_cleanup( easy_handle );
Post transfer info
Remember how libcurl transfers are associated with easy handles. Each transfer has such a handle and when a transfer is completed, before the handle is cleaned or reused for another transfer, it can be used to extract information from the previous operation.
Your friend for doing this is called curl_easy_getinfo() and you tell it
which specific information you are interested in and it returns that if it
can.
When you use this function, you pass in the easy handle, which information you want and a pointer to a variable to hold the answer. You must pass in a pointer to a variable of the correct type or you risk that things go side-ways. These information values are designed to be provided after the transfer is completed.
The data you receive can be a long, a 'char *', a 'struct curl_slist *', a double or a socket.
This is how you extract the Content-Type: value from the previous HTTP
transfer:
CURLcode res;
char *content_type;
res = curl_easy_getinfo(curl, CURLINFO_CONTENT_TYPE, &content_type);
If you want to extract the local port number that was used in that connection:
CURLcode res;
long port_number;
res = curl_easy_getinfo(curl, CURLINFO_LOCAL_PORT, &port_number);
Available information
| Getinfo option | Type | Description |
|---|---|---|
CURLINFO_ACTIVESOCKET | curl_socket_t | The session's active socket |
CURLINFO_APPCONNECT_TIME | double | Time from start until SSL/SSH handshake completed |
CURLINFO_APPCONNECT_TIME_T | curl_off_t | Time from start until SSL/SSH handshake completed (in microseconds) |
CURLINFO_CAINFO | char * | Path to the default CA file libcurl is built to use |
CURLINFO_CAPATH | char * | Path to the CA directory libcurl is built to use |
CURLINFO_CERTINFO | struct curl_slist * | Certificate chain |
CURLINFO_CONDITION_UNMET | long | Whether or not a time conditional was met |
CURLINFO_CONNECT_TIME | double | Time from start until remote host or proxy completed |
CURLINFO_CONNECT_TIME_T | curl_off_t | Time from start until remote host or proxy completed (in microseconds) |
CURLINFO_CONN_ID | curl_off_t | Numerical id of the current connection (meant for callbacks) |
CURLINFO_CONTENT_LENGTH_DOWNLOAD | double | Content length from the Content-Length header |
CURLINFO_CONTENT_LENGTH_DOWNLOAD_T | curl_off_t | Content length from the Content-Length header |
CURLINFO_CONTENT_LENGTH_UPLOAD | double | Upload size |
CURLINFO_CONTENT_LENGTH_UPLOAD_T | curl_off_t | Upload size |
CURLINFO_CONTENT_TYPE | char * | Content type from the Content-Type header |
CURLINFO_COOKIELIST | struct curl_slist * | List of all known cookies |
CURLINFO_EFFECTIVE_METHOD | char * | Last used HTTP request method |
CURLINFO_EFFECTIVE_URL | char * | Last used URL |
CURLINFO_FILETIME | long | Remote time of the retrieved document |
CURLINFO_FILETIME_T | curl_off_t | Remote time of the retrieved document |
CURLINFO_FTP_ENTRY_PATH | char * | The entry path after logging in to an FTP server |
CURLINFO_HEADER_SIZE | long | Number of bytes of all headers received |
CURLINFO_HTTP_CONNECTCODE | long | Last proxy CONNECT response code |
CURLINFO_HTTP_VERSION | long | The HTTP version used in the connection |
CURLINFO_HTTPAUTH_AVAIL | long | Available HTTP authentication methods (bitmask) |
CURLINFO_LASTSOCKET | long | Last socket used |
CURLINFO_LOCAL_IP | char * | Local-end IP address of last connection |
CURLINFO_LOCAL_PORT | long | Local-end port of last connection |
CURLINFO_NAMELOOKUP_TIME | double | Time from start until name resolving completed |
CURLINFO_NAMELOOKUP_TIME_T | curl_off_t | Time from start until name resolving completed (in microseconds) |
CURLINFO_NUM_CONNECTS | long | Number of new successful connections used for previous transfer |
CURLINFO_OS_ERRNO | long | The errno from the last failure to connect |
CURLINFO_PRETRANSFER_TIME | double | Time from start until the transfer begins |
CURLINFO_PRETRANSFER_TIME_T | curl_off_t | Time from start until the transfer begins (in microseconds) |
CURLINFO_PRIMARY_IP | char * | IP address of the last connection |
CURLINFO_PRIMARY_PORT | long | Port of the last connection |
CURLINFO_PRIVATE | char * | User's private data pointer |
CURLINFO_PROTOCOL | long | The protocol used for the connection |
CURLINFO_PROXY_ERROR | long | Detailed (SOCKS) proxy error if CURLE_PROXY was returned from the transfer |
CURLINFO_PROXY_SSL_VERIFYRESULT | long | Proxy certificate verification result |
CURLINFO_PROXYAUTH_AVAIL | long | Available HTTP proxy authentication methods |
CURLINFO_QUEUE_TIME_T | curl_off_t | Time in microseconds this transfer was held in queue waiting to start |
CURLINFO_REDIRECT_COUNT | long | Total number of redirects that were followed |
CURLINFO_REDIRECT_TIME | double | Time taken for all redirect steps before the final transfer |
CURLINFO_REDIRECT_TIME_T | curl_off_t | Time taken for all redirect steps before the final transfer (in microseconds) |
CURLINFO_REDIRECT_URL | char * | URL a redirect would take you to, had you enabled redirects |
CURLINFO_REFERER | char * | The used request Referer: header |
CURLINFO_REQUEST_SIZE | long | Number of bytes sent in the issued HTTP requests |
CURLINFO_RESPONSE_CODE | long | Last received response code |
CURLINFO_RETRY_AFTER | curl_off_t | The value from the response Retry-After: header |
CURLINFO_RTSP_CLIENT_CSEQ | long | RTSP next expected client CSeq |
CURLINFO_RTSP_CSEQ_RECV | long | RTSP last received |
CURLINFO_RTSP_SERVER_CSEQ | long | RTSP next expected server CSeq |
CURLINFO_RTSP_SESSION_ID | char * | RTSP session ID |
CURLINFO_SCHEME | char * | The scheme used for the connection |
CURLINFO_SIZE_DOWNLOAD | double | Number of bytes downloaded |
CURLINFO_SIZE_DOWNLOAD_T | curl_off_t | Number of bytes downloaded |
CURLINFO_SIZE_UPLOAD | double | Number of bytes uploaded |
CURLINFO_SIZE_UPLOAD_T | curl_off_t | Number of bytes uploaded |
CURLINFO_SPEED_DOWNLOAD | double | Average download speed |
CURLINFO_SPEED_DOWNLOAD_T | curl_off_t | Average download speed |
CURLINFO_SPEED_UPLOAD | double | Average upload speed |
CURLINFO_SPEED_UPLOAD_T | curl_off_t | Average upload speed |
CURLINFO_SSL_ENGINES | struct curl_slist * | A list of OpenSSL crypto engines |
CURLINFO_SSL_VERIFYRESULT | long | Certificate verification result |
CURLINFO_STARTTRANSFER_TIME | double | Time from start until the first byte is received |
CURLINFO_STARTTRANSFER_TIME_T | curl_off_t | Time from start until the first byte is received (in microseconds) |
CURLINFO_TLS_SSL_PTR | struct curl_slist * | TLS session info that can be used for further processing |
CURLINFO_TOTAL_TIME | double | Total time of previous transfer |
CURLINFO_TOTAL_TIME_T | curl_off_t | Total time of previous transfer (in microseconds) |
CURLINFO_XFER_ID | curl_off_t | Numerical id of the current transfer (meant for callbacks) |
libcurl HTTP
HTTP is by far the most commonly used protocol by libcurl users and libcurl offers countless ways of modifying such transfers. See the HTTP protocol basics for some basics on how the HTTP protocol works.
HTTPS
Doing HTTPS is typically done the same way as for HTTP as the extra security
layer and server verification etc is done automatically and transparently by
default. Just use the https:// scheme in the URL.
HTTPS is HTTP with TLS on top. See also the TLS transfer options section.
HTTP proxy
See using Proxies with libcurl
Sections
- HTTP responses
- HTTP requests
- HTTP versions
- HTTP ranges
- HTTP authentication
- Cookies with libcurl
- Download
- Upload
- Multiplexing
- HSTS
- alt-svc
Responses
Every HTTP request includes an HTTP response. An HTTP response is a set of metadata and a response body, where the body can occasionally be zero bytes and thus nonexistent. An HTTP response however always has response headers.
Response body
The response body is passed to the write callback and the response headers to the header callback.
Virtually all libcurl-using applications need to set at least one of those callbacks instructing libcurl what to do with received headers and data.
Response meta-data
libcurl offers the curl_easy_getinfo() function that allows an application
to query libcurl for information from the previously performed transfer.
Sometimes an application wants to know the size of the data. The size of a
response as told by the server headers can be extracted with
curl_easy_getinfo() like this:
curl_off_t size;
curl_easy_getinfo(curl, CURLINFO_CONTENT_LENGTH_DOWNLOAD_T, &size);
If you can wait until after the transfer is already done, which also is a more reliable way since not all URLs provide the size up front (like for example for servers that generate content on demand) you can instead ask for the amount of downloaded data in the most recent transfer.
curl_off_t size;
curl_easy_getinfo(curl, CURLINFO_SIZE_DOWNLOAD_T, &size);
HTTP response code
Every HTTP response starts off with a single line that contains the HTTP response code. It is a three digit number that contains the server's idea of the status for the request. The numbers are detailed in the HTTP standard specifications but they are divided into ranges that work like this:
| Code | Meaning |
|---|---|
| 1xx | Transient code, a new one follows |
| 2xx | Things are OK |
| 3xx | The content is somewhere else |
| 4xx | Failed because of a client problem |
| 5xx | Failed because of a server problem |
You can extract the response code after a transfer like this
long code;
curl_easy_getinfo(curl, CURLINFO_RESPONSE_CODE, &code);
About HTTP response code "errors"
While the response code numbers can include numbers (in the 4xx and 5xx ranges) which the server uses to signal that there was an error processing the request, it is important to realize that this does not make libcurl return an error.
When libcurl is asked to perform an HTTP transfer it returns an error if that HTTP transfer fails. However, getting an HTTP 404 or the like back is not a problem for libcurl. It is not an HTTP transfer error. A user might be writing a client for testing a server's HTTP responses.
If you insist on curl treating HTTP response codes from 400 and up as errors,
libcurl offers the CURLOPT_FAILONERROR option that if set instructs curl to
return CURLE_HTTP_RETURNED_ERROR in this case. It then returns error as soon
as possible and does not deliver the response body.
Requests
An HTTP request is what curl sends to the server when it tells the server what to do. When it wants to get data or send data. All transfers involving HTTP start with an HTTP request.
An HTTP request contains a method, a path, HTTP version and a set of request headers. A libcurl-using application can tweak all those fields.
Request method
Every HTTP request contains a "method", sometimes referred to as a "verb". It is usually something like GET, HEAD, POST or PUT but there are also more esoteric ones like DELETE, PATCH and OPTIONS.
Usually when you use libcurl to set up and perform a transfer the specific
request method is implied by the options you use. If you ask for a URL, it
means the method is GET while if you set for example CURLOPT_POSTFIELDS
that makes libcurl use the POST method. If you set CURLOPT_UPLOAD to true,
libcurl sends a PUT method in its HTTP request and so on. Asking for
CURLOPT_NOBODY makes libcurl use HEAD.
However, sometimes those default HTTP methods are not good enough or not the
ones you want your transfer to use. Then you can instruct libcurl to use the
specific method you like with CURLOPT_CUSTOMREQUEST. For example, you want
to send a DELETE method to the URL of your choice:
curl_easy_setopt(curl, CURLOPT_CUSTOMREQUEST, "DELETE");
curl_easy_setopt(curl, CURLOPT_URL, "https://example.com/file.txt");
The CURLOPT_CUSTOMREQUEST setting should only be the single keyword to use as method in the HTTP request line. If you want to change or add additional HTTP request headers, see the following section.
Customize HTTP request headers
When libcurl issues HTTP requests as part of performing the data transfers you have asked it to, it sends them off with a set of HTTP headers that are suitable for fulfilling the task given to it.
When given the URL http://localhost/file1.txt, libcurl sends the following
request to the server:
GET /file1.txt HTTP/1.1
Host: localhost
Accept: */*
If you instruct your application to also set CURLOPT_POSTFIELDS to the
string "foobar" (6 letters, the quotes only used for visual delimiters here),
it would send the following headers:
POST /file1.txt HTTP/1.1
Host: localhost
Accept: */*
Content-Length: 6
Content-Type: application/x-www-form-urlencoded
If you are not pleased with the default set of headers libcurl sends, the application has the power to add, change or remove headers in the HTTP request.
Add a header
To add a header that would not otherwise be in the request, add it with
CURLOPT_HTTPHEADER. Suppose you want a header called Name: that contains
Mr. Smith:
struct curl_slist *list = NULL;
list = curl_slist_append(list, "Name: Mr Smith");
curl_easy_setopt(curl, CURLOPT_HTTPHEADER, list);
curl_easy_perform(curl);
curl_slist_free_all(list); /* free the list again */
Change a header
If one of those default headers are not to your satisfaction you can alter
them. Like if you think the default Host: header is wrong (even though it is
derived from the URL you give libcurl), you can tell libcurl your own:
struct curl_slist *list = NULL;
list = curl_slist_append(list, "Host: Alternative");
curl_easy_setopt(curl, CURLOPT_HTTPHEADER, list);
curl_easy_perform(curl);
curl_slist_free_all(list); /* free the list again */
Remove a header
When you think libcurl uses a header in a request that you really think it
should not, you can easily tell it to remove it from the request. Like if you
want to take away the Accept: header. Provide the header name with nothing
to the right sight of the colon:
struct curl_slist *list = NULL;
list = curl_slist_append(list, "Accept:");
curl_easy_setopt(curl, CURLOPT_HTTPHEADER, list);
curl_easy_perform(curl);
curl_slist_free_all(list); /* free the list again */
Provide a header without contents
As you may then have noticed in the above sections, if you try to add a header
with no contents on the right side of the colon, it is treated as a removal
instruction and it instead completely inhibits that header from being sent. If
you instead truly want to send a header with zero contents on the right
side, you need to use a special marker. You must provide the header with a
semicolon instead of a proper colon. Like Header;. If you want to add a
header to the outgoing HTTP request that is Moo: with nothing following the
colon, you could write it like:
struct curl_slist *list = NULL;
list = curl_slist_append(list, "Moo;");
curl_easy_setopt(curl, CURLOPT_HTTPHEADER, list);
curl_easy_perform(curl);
curl_slist_free_all(list); /* free the list again */
Referrer
The Referer: header (yes, it is misspelled) is a standard HTTP header that
tells the server from which URL the user-agent was directed from when it
arrived at the URL it now requests. It is a normal header so you can set it
yourself with the CURLOPT_HEADER approach as shown above, or you can use the
shortcut known as CURLOPT_REFERER. Like this:
curl_easy_setopt(curl, CURLOPT_REFERER, "https://example.com/fromhere/");
curl_easy_perform(curl);
Automatic referrer
When libcurl is asked to follow redirects itself with the
CURLOPT_FOLLOWLOCATION option, and you still want to have the Referer:
header set to the correct previous URL from where it did the redirect, you can
ask libcurl to set that by itself:
curl_easy_setopt(curl, CURLOPT_FOLLOWLOCATION, 1L);
curl_easy_setopt(curl, CURLOPT_AUTOREFERER, 1L);
curl_easy_setopt(curl, CURLOPT_URL, "https://example.com/redirected.cgi");
curl_easy_perform(curl);
Versions
Like all Internet protocols, the HTTP protocol has kept evolving over the years and now there are clients and servers distributed over the world and over time that speak different versions with varying levels of success. In order to get libcurl to work with the URLs you pass in, libcurl offers ways for you to specify which HTTP version to use. libcurl is designed in a way so that it tries to use the most common, the most sensible if you want, default values first but sometimes that is not enough and then you may need to instruct libcurl what to do.
libcurl defaults to using HTTP/2 for HTTPS servers if you use a libcurl build with HTTP/2 abilities built-in. libcurl then attempts to use HTTP/2 automatically or falls back to 1.1 in case the negotiation failed. Non-HTTP/2 capable libcurls use HTTP/1.1 over HTTPS by default. Plain HTTP requests default to HTTP/1.1.
If the default behavior is not good enough for your transfer, the
CURLOPT_HTTP_VERSION option is there for you.
| Option | Description |
|---|---|
| CURL_HTTP_VERSION_NONE | Reset back to default behavior |
| CURL_HTTP_VERSION_1_0 | Enforce use of the legacy HTTP/1.0 protocol version |
| CURL_HTTP_VERSION_1_1 | Do the request using the HTTP/1.1 protocol version |
| CURL_HTTP_VERSION_2_0 | Attempt to use HTTP/2 |
| CURL_HTTP_VERSION_2TLS | Attempt to use HTTP/2 on HTTPS connections only, otherwise do HTTP/1.1 |
| CURL_HTTP_VERSION_2_PRIOR_KNOWLEDGE | Use HTTP/2 straight away without "upgrading" from 1.1. It requires that you know that this server is OK with it. |
| CURL_HTTP_VERSION_3 | Try HTTP/3, allow fallback to older version. |
| CURL_HTTP_VERSION_3ONLY | Use HTTP/3 or fail if not possible |
Version 2 not mandatory
When asking libcurl to use HTTP/2, it is an ask not a requirement. libcurl then allows the server to select to use HTTP/1.1 or HTTP/2 and that is what decides which protocol that is ultimately used.
Version 3 can be mandatory
When asking libcurl to use HTTP/3 with the CURL_HTTP_VERSION_3 option, it
makes libcurl do a second connection attempt in parallel but slightly delayed,
so that if the HTTP/3 connection fails, it can still try and use an older HTTP
version.
Using CURL_HTTP_VERSION_3ONLY means that the fallback mechanism is not used
and a failed QUIC connection fails the transfer completely.
Ranges
What if the client only wants the first 200 bytes out of a remote resource or perhaps 300 bytes somewhere in the middle? The HTTP protocol allows a client to ask for only a specific data range. The client asks the server for the specific range with a start offset and an end offset. It can even combine things and ask for several ranges in the same request by listing a bunch of pieces next to each other. When a server sends back multiple independent pieces to answer such a request, you get them separated with mime boundary strings and it is up to the user application to handle that accordingly. curl does not further separate such a response.
However, a byte range is only a request to the server. It does not have to respect the request and in many cases, like when the server automatically generates the contents on the fly when it is being asked, it refuses to do it and it then instead respond with the full contents anyway.
You can make libcurl ask for a range with CURLOPT_RANGE. Like if you want
the first 200 bytes out of something:
curl_easy_setopt(curl, CURLOPT_RANGE, "0-199");
Or everything in the file starting from index 200:
curl_easy_setopt(curl, CURLOPT_RANGE, "200-");
Get 200 bytes from index 0 and 200 bytes from index 1000:
curl_easy_setopt(curl, CURLOPT_RANGE, "0-199,1000-199");
Authentication
libcurl supports a wide variety of HTTP authentication schemes.
Note that this way of authentication is different than the otherwise widely used scheme on the web today where authentication is performed by an HTTP POST and then keeping state in cookies. See Cookies with libcurl for details on how to do that.
Username and password
libcurl does not try any HTTP authentication without a given username. Set one like:
curl_easy_setopt(curl, CURLOPT_USERNAME, "joe");
and of course most authentications also require a set password that you set separately:
curl_easy_setopt(curl, CURLOPT_PASSWORD, "secret");
That is all you need. This makes libcurl switch on its default authentication method for this transfer: HTTP Basic.
Authentication required
A client does not itself decide that it wants to send an authenticated
request. It is something the server requires. When the server has a resource
that is protected and requires authentication, it responds with a 401 HTTP
response and a WWW-Authenticate: header. The header includes details about
what specific authentication methods it accepts for that resource.
Basic
Basic is the default HTTP authentication method and as its name suggests, it
is indeed basic. It takes the name and the password, separates them with a
colon and base64 encodes that string before it puts the entire thing into a
Authorization: HTTP header in the request.
If the name and password is set like the examples shown above, the exact outgoing header looks like this:
Authorization: Basic am9lOnNlY3JldA==
This authentication method is totally insecure over HTTP as the credentials are sent in plain-text over the network.
You can explicitly tell libcurl to use Basic method for a specific transfer like this:
curl_easy_setopt(curl, CURLOPT_HTTPAUTH, CURLAUTH_BASIC);
Digest
Another HTTP authentication method is called Digest. One advantage this method has compared to Basic, is that it does not send the password over the wire in plain text. This is however an authentication method that is rarely spoken by browsers and consequently is not a frequently used one.
You can explicitly tell libcurl to use the Digest method for a specific transfer like this (it still needs username and password set as well):
curl_easy_setopt(curl, CURLOPT_HTTPAUTH, CURLAUTH_DIGEST);
NTLM
Another HTTP authentication method is called NTLM.
You can explicitly tell libcurl to use the NTLM method for a specific transfer like this (it still needs username and password set as well):
curl_easy_setopt(curl, CURLOPT_HTTPAUTH, CURLAUTH_NTLM);
Negotiate
Another HTTP authentication method is called Negotiate.
You can explicitly tell libcurl to use the Negotiate method for a specific transfer like this (it still needs username and password set as well):
curl_easy_setopt(curl, CURLOPT_HTTPAUTH, CURLAUTH_NEGOTIATE);
Bearer
To pass on an OAuth 2.0 Bearer Access Token in a request, use
CURLOPT_XOAUTH2_BEARER for example:
CURL *curl = curl_easy_init();
if(curl) {
  curl_easy_setopt(curl, CURLOPT_URL, "pop3://example.com/");
  curl_easy_setopt(curl, CURLOPT_XOAUTH2_BEARER, "1ab9cb22ba269a7");
  ret = curl_easy_perform(curl);
  curl_easy_cleanup(curl);
}
Try-first
Some HTTP servers allow one out of several authentication methods, in some cases you find yourself in a position where you as a client does not want or is not able to select a single specific method before-hand and for yet another subset of cases your application does not know if the requested URL even require authentication or not.
libcurl covers all these situations as well.
You can ask libcurl to use more than one method, and when doing so, you imply that curl first tries the request without any authentication at all and then based on the HTTP response coming back, it selects one of the methods that both the server and your application allow. If more than one would work, curl picks them in a order based on how secure the methods are considered to be, picking the safest of the available methods.
Tell libcurl to accept multiple method by bitwise ORing them like this:
curl_easy_setopt(curl, CURLOPT_HTTPAUTH,
                 CURLAUTH_BASIC | CURLAUTH_DIGEST);
If you want libcurl to only allow a single specific method but still want it
to probe first to check if it can possibly still make the request without the
use of authentication, you can force that behavior by adding CURLAUTH_ONLY
to the bitmask.
Ask to use digest, but nothing else but digest, and only if proven really necessary:
curl_easy_setopt(curl, CURLOPT_HTTPAUTH,
                 CURLAUTH_DIGEST | CURLAUTH_ONLY);
Cookies
By default and by design, libcurl makes transfers as basic as possible and features need to be enabled to get used. One such feature is HTTP cookies, more commonly known as cookies.
Cookies are name/value pairs sent by the server (using a Set-Cookie: header)
to be stored in the client, and are then supposed to get sent back again in
requests that matches the host and path requirements that were specified along
with the cookie when it came from the server (using the Cookie: header). On
the modern web of today, sites are known to sometimes use large numbers
of cookies.
Cookie engine
When you enable the cookie engine for a specific easy handle, it means that it records incoming cookies, stores them in the in-memory cookie store that is associated with the easy handle and subsequently sends the proper ones back if an HTTP request is made that matches.
There are two ways to switch on the cookie engine:
Enable cookie engine with reading
Ask libcurl to import cookies into the easy handle from a given filename with
the CURLOPT_COOKIEFILE option:
curl_easy_setopt(easy, CURLOPT_COOKIEFILE, "cookies.txt");
A common trick is to specify a non-existing filename or plain "" to have it
activate the cookie engine with a blank cookie store to start with.
This option can be set multiple times and then each of the given files are read.
Enable cookie engine with writing
Ask for received cookies to get stored in a file with the CURLOPT_COOKIEJAR
option:
curl_easy_setopt(easy, CURLOPT_COOKIEJAR, "cookies.txt");
when the easy handle is closed later with curl_easy_cleanup(), all known
cookies are stored in the given file. The file format is the well-known
Netscape cookie file format that browsers also once used.
Setting custom cookies
A simpler and more direct way to pass on a set of specific cookies in a
request that does not add any cookies to the cookie store and does not even
activate the cookie engine, is to set the set with CURLOPT_COOKIE:
curl_easy_setopt(easy, CURLOPT_COOKIE, "name=daniel; present=yes;");
The string you set there is the raw string that would be sent in the HTTP request
and should be in the format of repeated sequences of NAME=VALUE; - including
the semicolon separator.
Import export
The cookie in-memory store can hold a bunch of cookies, and libcurl offers powerful ways for an application to play with them. You can set new cookies, you can replace an existing cookie and you can extract existing cookies.
Add a cookie to the cookie store
Add a new cookie to the cookie store by passing it into curl with
CURLOPT_COOKIELIST with a new cookie. The format of the input is a single
line in the cookie file format, or formatted as a Set-Cookie: response
header, but we recommend the cookie file style:
#define SEP  "\t"  /* Tab separates the fields */

char *my_cookie =
  "example.com"    /* Hostname */
  SEP "FALSE"      /* Include subdomains */
  SEP "/"          /* Path */
  SEP "FALSE"      /* Secure */
  SEP "0"          /* Expiry in epoch time format. 0 == Session */
  SEP "foo"        /* Name */
  SEP "bar";       /* Value */

curl_easy_setopt(curl, CURLOPT_COOKIELIST, my_cookie);
If that given cookie would match an already existing cookie (with the same domain and path, etc.), it would overwrite the old one with the new contents.
Get all cookies from the cookie store
Sometimes writing the cookie file when you close the handle is not enough and then your application can opt to extract all the currently known cookies from the store like this:
struct curl_slist *cookies
curl_easy_getinfo(easy, CURLINFO_COOKIELIST, &cookies);
This returns a pointer to a linked list of cookies, and each cookie is (again)
specified as a single line of the cookie file format. The list is allocated
for you, so do not forget to call curl_slist_free_all when the application
is done with the information.
Cookie store commands
If setting and extracting cookies is not enough, you can also interfere with the cookie store in more ways:
Wipe the entire in-memory storage clean with:
curl_easy_setopt(curl, CURLOPT_COOKIELIST, "ALL");
Erase all session cookies (cookies without expiry date) from memory:
curl_easy_setopt(curl, CURLOPT_COOKIELIST, "SESS");
Force a write of all cookies to the filename previously specified with
CURLOPT_COOKIEJAR:
curl_easy_setopt(curl, CURLOPT_COOKIELIST, "FLUSH");
Force a reload of cookies from the filename previously specified with
CURLOPT_COOKIEFILE:
curl_easy_setopt(curl, CURLOPT_COOKIELIST, "RELOAD");
Cookie file format
The cookie file format is text based and stores one cookie per line. Lines
that start with # are treated as comments.
Each line that each specifies a single cookie consists of seven text fields separated with TAB characters.
| Field | Example | Meaning |
|---|---|---|
| 0 | example.com | Domain name |
| 1 | FALSE | Include subdomains boolean |
| 2 | /foobar/ | Path |
| 3 | FALSE | Set over a secure transport |
| 4 | 1462299217 | Expires at – seconds since Jan 1st 1970, or 0 |
| 5 | person | Name of the cookie |
| 6 | daniel | Value of the cookie |
Download
The GET method is the default method libcurl uses when an HTTP URL is requested and no particular other method is asked for. It asks the server for a particular resource—the standard HTTP download request:
easy = curl_easy_init();
curl_easy_setopt(easy, CURLOPT_URL, "http://example.com/");
curl_easy_perform(easy);
Since options set in an easy handle are sticky and remain until changed, there
may be times when you have asked for another request method than GET and then
want to switch back to GET again for a subsequent request. For this purpose,
there is the CURLOPT_HTTPGET option:
curl_easy_setopt(easy, CURLOPT_HTTPGET, 1L);
Download headers too
An HTTP transfer also includes a set of response headers. Response headers are metadata associated with the actual payload, called the response body. All downloads get a set of headers too, but when using libcurl you can select whether you want to have them downloaded (seen) or not.
You can ask libcurl to pass on the headers to the same stream as the regular
body is, by using CURLOPT_HEADER:
easy = curl_easy_init();
curl_easy_setopt(easy, CURLOPT_HEADER, 1L);
curl_easy_setopt(easy, CURLOPT_URL, "http://example.com/");
curl_easy_perform(easy);
Or you can opt to store the headers in a separate download file, by relying on the default behaviors of the write and header callbacks:
easy = curl_easy_init();
FILE *file = fopen("headers", "wb");
curl_easy_setopt(easy, CURLOPT_HEADERDATA, file);
curl_easy_setopt(easy, CURLOPT_URL, "http://example.com/");
curl_easy_perform(easy);
fclose(file);
If you only want to casually browse the headers, you may even be happy enough with setting verbose mode while developing as that shows both outgoing and incoming headers sent to stderr:
curl_easy_setopt(easy, CURLOPT_VERBOSE, 1L);
Upload
Uploads over HTTP can be done in many different ways and it is important to notice the differences. They can use different methods, like POST or PUT, and when using POST the body formatting can differ.
In addition to those HTTP differences, libcurl offers different ways to provide the data to upload.
HTTP POST
POST is typically the HTTP method to pass data to a remote web application. A common way to do that in browsers is by filling in an HTML form and pressing submit. It is the standard way for an HTTP request to pass on data to the server. With libcurl you normally provide that data as a pointer and a length:
curl_easy_setopt(easy, CURLOPT_POSTFIELDS, dataptr);
curl_easy_setopt(easy, CURLOPT_POSTFIELDSIZE, (long)datalength);
Or you tell libcurl that it is a post but would prefer to have libcurl instead get the data by using the regular read callback:
curl_easy_setopt(easy, CURLOPT_POST, 1L);
curl_easy_setopt(easy, CURLOPT_READFUNCTION, read_callback);
This "normal" POST also sets the request header Content-Type: application/x-www-form-urlencoded.
HTTP multipart formposts
A multipart formpost is still using the same HTTP method POST; the difference is only in the formatting of the request body. A multipart formpost is a series of separate "parts", separated by MIME-style boundary strings. There is no limit to how many parts you can send.
Each such part has a name, a set of headers and a few other properties.
libcurl offers a set of convenience functions for constructing such a series
of parts and to send that off to the server, all prefixed with
curl_mime. Create a multipart post and for each part in the data you set the
name, the data and perhaps additional meta-data. A basic setup might look like
this:
/* Create the form */
form = curl_mime_init(curl);

/* Fill in the file upload field */
field = curl_mime_addpart(form);
curl_mime_name(field, "sendfile");
curl_mime_filedata(field, "photo.jpg");
Then you pass that post to libcurl like this:
curl_easy_setopt(easy, CURLOPT_MIMEPOST, form);
(curl_formadd is the former API to build multi-part formposts with but we no
longer recommend using that)
HTTP PUT
A PUT with libcurl assumes you pass the data to it using the read callback, as
that is the typical "file upload" pattern libcurl uses and provides. You set
the callback, you ask for PUT (by asking for CURLOPT_UPLOAD), you set the
size of the upload and you set the URL to the destination:
curl_easy_setopt(easy, CURLOPT_UPLOAD, 1L);
curl_easy_setopt(easy, CURLOPT_INFILESIZE_LARGE, (curl_off_t) size);
curl_easy_setopt(easy, CURLOPT_READFUNCTION, read_callback);
curl_easy_setopt(easy, CURLOPT_URL, "https://example.com/handle/put");
If you for some reason do not know the size of the upload before the transfer
starts, and you are using HTTP 1.1 you can add a Transfer-Encoding: chunked
header with CURLOPT_HTTPHEADER. For HTTP 1.0 you must provide
the size before hand and for HTTP 2 and later, neither the size nor the extra
header is needed.
Expect: headers
When doing HTTP uploads using HTTP 1.1, libcurl inserts an Expect: 100-continue header in some circumstances. This header offers the server a
way to reject the transfer early and save the client from having to send a lot
of data in vain before the server gets a chance to decline.
The header is added by libcurl if HTTP uploading is done with CURLOPT_UPLOAD
or if it is asked to do an HTTP POST for which the body size is either unknown
or known to be larger than 1024 bytes.
A libcurl-using client can explicitly disable the use of the Expect: header
with the CURLOPT_HTTPHEADER option.
This header is not used with HTTP/2 or HTTP/3.
Uploads also downloads
HTTP is a protocol that can respond with contents back even when you upload data to it - it is up to the server to decide. The response data may even start getting sent back to the client before the upload has completed.
Multiplexing
The HTTP versions 2 and 3 offer "multiplexing". Using this protocol feature, an HTTP client can do several concurrent transfers to a server over the same single connection. This feature does not exist in earlier versions of the HTTP protocol. In earlier HTTP versions, the client would either have to create multiple connections or do the transfers in a serial manner, one after the other.
libcurl supports HTTP multiplexing for both HTTP/2 and HTTP/3.
Make sure you do multiple transfers using the multi interface to a server that supports HTTP multiplexing. libcurl can only multiplex transfers when the same hostname is used for subsequent transfers.
For all practical purposes and API behaviors, an application does not have to care about if multiplexing is done or not.
libcurl enables multiplexing by default, but if you start multiple transfers
at the same time they prioritize short-term speed so they might then open new
connections rather than waiting for a connection to get created by another
transfer to be able to multiplex over. To tell libcurl to prioritize
multiplexing, set the CURLOPT_PIPEWAIT option for the transfer with
curl_easy_setopt().
With curl_multi_setopt()'s option CURLMOPT_PIPELINING, you can disable
multiplexing for a specific multi handle.
HSTS
HSTS is short for HTTP Strict-Transport-Security. It is a defined way for a server to tell a client that the client should prefer to use HTTPS with that site for a specified period of time into the future.
Here is how you use HSTS with libcurl.
In-memory cache
libcurl primarily features an in-memory cache for HSTS hosts, so that subsequent HTTP-only requests to a hostname present in the cache gets internally "redirected" to the HTTPS version. Assuming you have this feature enabled.
Enable HSTS for a handle
HSTS is enabled by setting the correct bitmask using the CURLOPT_HSTS_CTRL
option with curl_easy_setopt(). The bitmask has two separate flags that can
be used, but CURLHSTS_ENABLE is the primary one. If that is set, then this
easy handle how has HSTS support enabled.
The second flag available for this option is CURLHSTS_READONLYFILE, which if
set, tells libcurl that the filename you specify for it to use as a HSTS
cache is only to be read from, and not write anything back to.
Set a HSTS cache file
If you want to persist the HSTS cache on disk, then set a filename with the
CURLOPT_HSTS option. libcurl reads from this file at start of a transfer and
writes to it (unless it was set read-only) when the easy handle is closed.
alt-svc
Alternative Services, aka alt-svc, is an HTTP header that lets a server tell
the client that there is one or more alternatives for that server at
another place with the use of the Alt-Svc: response header.
The alternatives the server suggests can include a server running on another port on the same host, on another completely different hostname and it can also offer the service over another protocol.
Enable
To make libcurl consider any offered alternatives by serves, you must first
enable it in the handle. You do this by setting the correct bitmask to the
CURLOPT_ALTSVC_CTRL option. The bitmask allows the application to limit what
HTTP versions to allow, and if the cache file on disk should only be used to
read from (not write).
Enable alt-svc and allow it to switch to either HTTP/1 or HTTP/2:
curl_easy_setopt(curl, CURLOPT_ALTSVC_CTRL, CURLALTSVC_H1|CURLALTSVC_H2);
Tell libcurl to use a specific alt-svc cache file like this:
curl_easy_setopt(curl, CURLOPT_ALTSVC, "altsvc-cache.txt");
libcurl holds the list of alternatives in a memory-based cache, but loads all
already existing alternative service entries from the alt-svc file at start-up
and consider those when doing its subsequent HTTP requests. If servers
responds with new or updated Alt-Svc: headers, libcurl stores those in the
cache file at exit (unless the CURLALTSVC_READONLYFILE bit was set).
The alt-svc cache
The alt-svc cache is similar to a cookie jar. It is a text based file that stores one alternative per line and each entry also has an expiry time for which duration that particular alternative is valid.
HTTPS only
Alt-Svc: is only trusted and parsed from servers when connected to over
HTTPS.
HTTP/3
The use of Alt-Svc: headers is as of March 2022 still the only defined way
to bootstrap a client and server into using HTTP/3. The server then hints to
the client over HTTP/1 or HTTP/2 that it also is available over HTTP/3 and
then curl can connect to it using HTTP/3 in the subsequent request if the
alt-svc cache says so.
libcurl helpers
Doing transfers is good but in order to do effective transfers applications often need some extra API and super-powers.
Share data between handles
Sometimes applications need to share data between transfers. All easy handles added to the same multi handle automatically get a lot of sharing done between the handles in that same multi handle, but sometimes that is not exactly what you want.
Multi handle
All easy handles added to the same multi handle automatically share connection cache and dns cache.
Sharing between easy handles
libcurl has a generic "sharing interface", where the application creates a "share object" that then holds data that can be shared by any number of easy handles. The data is then stored and read from the shared object instead of kept within the handles that are sharing it.
CURLSH *share = curl_share_init();
The shared object can be set to share all or any of cookies, connection cache, dns cache and SSL session id cache.
For example, setting up the share to hold cookies and dns cache:
curl_share_setopt(share, CURLSHOPT_SHARE, CURL_LOCK_DATA_COOKIE);
curl_share_setopt(share, CURLSHOPT_SHARE, CURL_LOCK_DATA_DNS);
You then set up the corresponding transfer to use this share object:
curl_easy_setopt(curl, CURLOPT_SHARE, share);
Transfers done with this curl handle uses and stores its cookie and dns
information in the share handle. You can set several easy handles to share
the same share object.
What to share
CURL_LOCK_DATA_COOKIE - set this bit to share cookie jar. Note that each
easy handle still needs to get its cookie "engine" started properly to start
using cookies. It is not supported to use this option with multiple concurrent
threads.
CURL_LOCK_DATA_DNS - the DNS cache is where libcurl stores addresses for
resolved hostnames for a while to make subsequent lookups faster.
CURL_LOCK_DATA_SSL_SESSION - the SSL session ID cache is where libcurl store
resume information for SSL connections to be able to resume a previous
connection faster.
CURL_LOCK_DATA_CONNECT - when set, this handle uses a shared connection
cache and thus is more likely to find existing connections to re-use etc,
which may result in faster performance when doing multiple transfers to the
same host in a serial manner. It is not supported to use this option with
multiple concurrent threads.
CURL_LOCK_DATA_PSL - this bit shares the Public Suffix List between handles.
The list of public suffixes, aka top-level Internet domains, is used to help
manage the security of cookies. Sharing the list prevents overhead from having
to process multiple copies of the list.
CURL_LOCK_DATA_HSTS - this bit shares the in-memory HSTS (HTTP Strict
Transport Security) cache. HSTS is used by websites to indicate that HTTP
requests should instead be accessed securely using HTTPS. It is not supported
to use this option with multiple concurrent threads.
Locking
If you want have the share object shared by transfers in a multi-threaded environment. Perhaps you have a CPU with many cores and you want each core to run its own thread and transfer data, but you still want the different transfers to share data. Then you need to set the mutex callbacks.
If you do not use threading and you know you access the shared object in a serial one-at-a-time manner you do not need to set any locks. If there is ever more than one transfer that access share object at a time, it needs to get mutex callbacks setup to prevent data destruction and possibly even crashes.
Since libcurl itself does not know how to lock things or even what threading model you are using, you must make sure to do mutex locks that only allows one access at a time. A lock callback for a pthreads-using application could look similar to:
static void lock_cb(CURL *handle, curl_lock_data data,
                    curl_lock_access access, void *userptr)
{
  pthread_mutex_lock(&lock[data]); /* uses a global lock array */
}
curl_share_setopt(share, CURLSHOPT_LOCKFUNC, lock_cb);
With the corresponding unlock callback could look like:
static void unlock_cb(CURL *handle, curl_lock_data data,
                      void *userptr)
{
  pthread_mutex_unlock(&lock[data]); /* uses a global lock array */
}
curl_share_setopt(share, CURLSHOPT_UNLOCKFUNC, unlock_cb);
Unshare
A transfer uses the share object during its transfer and share what that object has been specified to share with other handles sharing the same object.
In a subsequent transfer, CURLOPT_SHARE can be set to NULL to prevent a
transfer from continuing to share. It that case, the handle may start the next
transfer with empty caches for the data that was previously shared.
Between two transfers, a share object can also get updated to share a
different set of properties so that the handles that share that object shares
a different set of data next time. You remove an item to share from a shared
object with the curl_share_setopt()'s CURLSHOPT_UNSHARE option like this
when unsharing DNS data:
curl_share_setopt(share, CURLSHOPT_UNSHARE, CURL_LOCK_DATA_DNS);
URL API
libcurl offers an API for parsing, updating and generating URLs. Using this, applications can take advantage of using libcurl's URL parser for its own purposes. By using the same parser, security problems due to different interpretations can be avoided.
- Include files
- Create, cleanup, duplicate
- Parse a URL
- Redirect to URL
- Get a URL
- Get URL parts
- Set URL parts
- Append to the query
CURLOPT_CURLU
Include files
You include <curl/curl.h> in your code when you want to use the URL API.
#include <curl/curl.h>
CURLU *h = curl_url();
rc = curl_url_set(h, CURLUPART_URL, "ftp://example.com/no/where", 0);
Create, cleanup, duplicate
The first step when using this API is to create a CURLU * handle that holds
URL info and resources. The handle is a reference to an associated data object
that holds information about a single URL and all its different components.
The API allows you to set or get each URL component separately or as a full URL.
Create a URL handle like this:
CURLU *h = curl_url();
When you are done with it, clean it up:
curl_url_cleanup(h);
When you need a copy of a handle, duplicate it:
CURLU *nh = curl_url_dup(h);
Parse a URL
You parse a full URL by setting the CURLUPART_URL part in the handle:
CURLU *h = curl_url();
rc = curl_url_set(h, CURLUPART_URL,
"https://example.com:449/foo/bar?name=moo", 0);
If successful, rc contains CURLUE_OK and the different URL components are
held in the handle. It means that the URL was valid as far as libcurl
concerns.
The function call's forth argument is a bitmask. Set none, one or more bits in that to alter the parser's behavior:
CURLU_NON_SUPPORT_SCHEME
Makes curl_url_set() accept a non-supported scheme. If not set, the only
acceptable schemes are for the protocols libcurl knows and have built-in
support for.
CURLU_URLENCODE
Makes the function URL encode the path part if any bytes in it would benefit from that: like spaces or "control characters".
CURLU_DEFAULT_SCHEME
If the passed in string does not use a scheme, assume that the default one was
intended. The default scheme is HTTPS. If this is not set, a URL without a
scheme part is not accepted as valid. Overrides the CURLU_GUESS_SCHEME
option if both are set.
CURLU_GUESS_SCHEME
Makes libcurl allow the URL to be set without a scheme and it instead
"guesses" which scheme that was intended based on the hostname. If the
outermost sub-domain name matches DICT, FTP, IMAP, LDAP, POP3 or SMTP then
that scheme is used, otherwise it picks HTTP. Conflicts with the
CURLU_DEFAULT_SCHEME option which takes precedence if both are set.
CURLU_NO_AUTHORITY
Skips authority checks. The RFC allows individual schemes to omit the host
part (normally the only mandatory part of the authority), but libcurl cannot
know whether this is permitted for custom schemes. Specifying the flag permits
empty authority sections, similar to how the file scheme is handled. Really
only usable in combination with CURLU_NON_SUPPORT_SCHEME.
CURLU_PATH_AS_IS
Makes libcurl skip the normalization of the path. That is the procedure where
curl otherwise removes sequences of dot-slash and dot-dot etc. The same option
used for transfers is called CURLOPT_PATH_AS_IS.
CURLU_ALLOW_SPACE
Makes the URL parser allow space (ASCII 32) where possible. The URL syntax
does normally not allow spaces anywhere, but they should be encoded as %20
or +. When spaces are allowed, they are still not allowed in the
scheme. When space is used and allowed in a URL, it is stored as-is unless
CURLU_URLENCODE is also set, which then makes libcurl URL-encode the space
before stored. This affects how the URL is constructed when curl_url_get()
is subsequently used to extract the full URL or individual parts.
Redirect to URL
When the handle already has parsed a URL, setting a second relative URL makes it "redirect" to adapt to it.
Example, first set the original URL then set the one we "redirect" to:
CURLU *h = curl_url();
rc = curl_url_set(h, CURLUPART_URL,
"https://example.com/foo/bar?name=moo", 0);
rc = curl_url_set(h, CURLUPART_URL, "../test?another", 0);
Get a URL
The CURLU * handle represents a single URL and you can easily extract that
full URL or its individual parts with curl_url_get:
char *url;
rc = curl_url_get(h, CURLUPART_URL, &url, CURLU_NO_DEFAULT_PORT);
curl_free(url);
If the handle does not have enough information to return the part that is being asked for, it returns error.
A returned string must be freed with curl_free() after you are done with it.
Flags
When retrieving a URL part using curl_url_get(), the API offers a few
different toggles to better specify exactly how that content should be
returned. They are set in the flags bitmask parameter, which is the
function's fourth argument. You can set zero, one or more bits.
CURLU_DEFAULT_PORT
If the URL handle has no port number stored, this option makes
curl_url_get() return the default port for the used scheme.
CURLU_DEFAULT_SCHEME
If the handle has no scheme stored, this option makes curl_url_get() return
the default scheme instead of error.
CURLU_NO_DEFAULT_PORT
Instructs curl_url_get() to not use a port number in the generated URL if
that port number matches the default port used for the scheme. For example, if
port number 443 is set and the scheme is https, the extracted URL does not
include the port number.
CURLU_URLENCODE
This flag makes curl_url_get() URL encode the hostname part when a full URL
is retrieved. If not set (default), libcurl returns the URL with the hostname
"raw" to support IDN names to appear as-is. IDN hostnames are typically using
non-ASCII bytes that otherwise are percent-encoded.
Note that even when not asking for URL encoding, the % (byte 37) is URL
encoded in hostnames to make sure the hostname remains valid.
CURLU_URLDECODE
Tells curl_url_get() to URL decode the contents before returning it. It does
attempt to decode the scheme, the port number or the full URL. The query
component also gets plus-to-space conversion as a bonus when this bit is
set. Note that this URL decoding is charset unaware and you get a zero
terminated string back with data that could be intended for a particular
encoding. If there are any byte values lower than 32 in the decoded string,
the get operation instead returns error.
CURLU_PUNYCODE
If set and CURLU_URLENCODE is not set, and asked to retrieve the
CURLUPART_HOST or CURLUPART_URL parts, libcurl returns the hostname in
its punycode version if it contains any non-ASCII octets (and is an IDN
name). If libcurl is built without IDN capabilities, using this bit makes
curl_url_get() return CURLUE_LACKS_IDN if the hostname contains anything
outside the ASCII range.
Get URL parts
The CURLU handle stores the individual parts of a URL and the application
can extract those pieces individually from the handle at any time. If they are
set.
The second argument to curl_url_get() specifies which part you want
extracted. They are all extracted as null-terminated char * data, so you
pass a pointer to such a variable.
char *host;
rc = curl_url_get(h, CURLUPART_HOST, &host, 0);
char *scheme;
rc = curl_url_get(h, CURLUPART_SCHEME, &scheme, 0);
char *user;
rc = curl_url_get(h, CURLUPART_USER, &user, 0);
char *password;
rc = curl_url_get(h, CURLUPART_PASSWORD, &password, 0);
char *port;
rc = curl_url_get(h, CURLUPART_PORT, &port, 0);
char *path;
rc = curl_url_get(h, CURLUPART_PATH, &path, 0);
char *query;
rc = curl_url_get(h, CURLUPART_QUERY, &query, 0);
char *fragment;
rc = curl_url_get(h, CURLUPART_FRAGMENT, &fragment, 0);
char *zoneid;
rc = curl_url_get(h, CURLUPART_ZONEID, &zoneid, 0);
Remember to free the returned string with curl_free when you are done with
it!
Extracted parts are not URL decoded unless the user asks for it with the
CURLU_URLDECODE flag.
URL parts
The different parts are named from their roles in the URL. Imagine a URL that looks like this:
http://joe:7Hbz@example.com:8080/images?id=5445#footer
When this URL is parsed by curl, it stores the different components like this:
| text | part |
|---|---|
http | CURLUPART_SCHEME |
joe | CURLUPART_USER |
7Hbz | CURLUPART_PASSWORD |
example.com | CURLUPART_HOST |
8080 | CURLUPART_PORT |
/images | CURLUPART_PATH |
id=5445 | CURLUPART_QUERY |
footer | CURLUPART_FRAGMENT |
Zone ID
The one thing that might stick out a little is the Zone id. It is an extra
qualifier that can be used for IPv6 numerical addresses, and only for such
addresses. It is used like this, where it is set to eth0:
http://[2a04:4e42:e00::347%25eth0]/
For this URL, curl extracts:
| text | part |
|---|---|
http | CURLUPART_SCHEME |
2a04:4e42:e00::347 | CURLUPART_HOST |
eth0 | CURLUPART_ZONEID |
/ | CURLUPART_PATH |
Asking for any other component returns non-zero as they are missing.
Set URL parts
The API allows the application to set individual parts of a URL held in the
CURLU handle, either after having parsed a full URL or instead of parsing
such.
rc = curl_url_set(urlp, CURLUPART_HOST, "www.example.com", 0);
rc = curl_url_set(urlp, CURLUPART_SCHEME, "https", 0);
rc = curl_url_set(urlp, CURLUPART_USER, "john", 0);
rc = curl_url_set(urlp, CURLUPART_PASSWORD, "doe", 0);
rc = curl_url_set(urlp, CURLUPART_PORT, "443", 0);
rc = curl_url_set(urlp, CURLUPART_PATH, "/index.html", 0);
rc = curl_url_set(urlp, CURLUPART_QUERY, "name=john", 0);
rc = curl_url_set(urlp, CURLUPART_FRAGMENT, "anchor", 0);
rc = curl_url_set(urlp, CURLUPART_ZONEID, "25", 0);
The API always expects a null-terminated char * string in the third
argument, or NULL to clear the field. Note that the port number is also
provided as a string this way.
Set parts are not URL encoded unless the user asks for it with the
CURLU_URLENCODE flag in the forth argument.
Update parts
By setting an individual part, you can for example first set a full URL, then update a single component of that URL and then extract the updated version of that URL.
For example, let's say we have this URL
const char *url="http://joe:7Hbz@example.com:8080/images?id=5445#footer";
and we want change the host in that URL to instead become example.net, it
could be done like this:
CURLU *h = curl_url();
rc = curl_url_set(h, CURLUPART_URL, url, 0);
Then change the hostname part:
rc = curl_url_set(h, CURLUPART_HOST, "example.net", 0);
and this then now holds this URL:
http://joe:7Hbz@example.net:8080/images?id=5445#footer
If you then continue and change the path part to /foo like this:
rc = curl_url_set(h, CURLUPART_PATH, "/foo", 0);
and the URL handle now holds this URL:
http://joe:7Hbz@example.net:8080/foo?id=5445#footer
etc...
Append to the query
An application can append a string to the right end of the existing query part
with the CURLU_APPENDQUERY flag.
Consider a handle that holds the URL https://example.com/?shoes=2. An
application can then add the string hat=1 to the query part like this:
rc = curl_url_set(urlp, CURLUPART_QUERY, "hat=1", CURLU_APPENDQUERY);
It even notices the lack of an ampersand (&) separator so it injects one
too, and the handle's full URL would then equal
https://example.com/?shoes=2&hat=1.
The appended string can of course also get URL encoded on add, and if asked,
the encoding skips the = character. For example, append candy=M&M to what
we already have, and URL encode it to deal with the ampersand in the data:
rc = curl_url_set(urlp, CURLUPART_QUERY, "candy=M&M",
CURLU_APPENDQUERY | CURLU_URLENCODE);
Now the URL looks like https://example.com/?shoes=2&hat=1&candy=M%26M.
CURLOPT_CURLU
As a convenience to applications, they can pass in an already parsed URL to
libcurl to work with, as an alternative to CURLOPT_URL.
You pass in a CURLU handle instead of a URL string with the CURLOPT_CURLU
option.
Example:
CURLU *h = curl_url();
rc = curl_url_set(h, CURLUPART_URL, "https://example.com/", 0);
CURL *easy = curl_easy_init();
curl_easy_setopt(easy, CURLOPT_CURLU, h);
WebSocket
WebSocket is a transfer protocol done on top of HTTP that offers a general purpose bidirectional byte-stream. The protocol was created for more than just plain uploads and downloads and is more similar to something like TCP over HTTP.
A WebSocket client application sets up a connection with an HTTP request that upgrades into WebSocket - and once upgraded, the involved parties speak WebSocket over that connection until it is done and the connection is closed.
Support
To figure out if your libcurl installation supports WebSocket, you can call
curl_version_info() and check the ->protocols fields in the
returned struct. It should contain ws for it to be present, and probably
also wss.
WebSocket is supported by default since 8.11.0.
URLs
A client starts a WebSocket communication with libcurl by using a URL with the
scheme ws or wss. Like in wss://websocket.example.com/traffic-lights.
The wss variant is for using a TLS security connection, while the ws one
is done over insecure clear text.
Concept
A libcurl application can do WebSocket using one of these two different approaches below.
1. The callback approach
It can decide to use the regular write callback
to receive incoming data, and respond to that data in or outside of the
callback with curl_ws_send. Thereby treating the entire session as a form of
download from the server.
Within the write callback, an application can call curl_ws_meta() to
retrieve information about the incoming WebSocket data.
2. The connect-only approach
The other way to do it, if using the write callback is not suitable, is to set
CURLOPT_CONNECT_ONLY to the value 2L and let libcurl do a transfer that
only sets up the connection to the server, does the WebSocket upgrade and then
is considered complete. After that connect-only transfer, the application
can use curl_ws_recv() and curl_ws_send() to receive and send WebSocket
data over the connection.
Upgrade or die
Doing a transfer with a ws:// or wss:// URL implies that libcurl makes a
successful upgrade to the WebSocket protocol or an error is returned. An HTTP
200 response code which for example is considered fine in a normal HTTP
transfer is therefore considered an error when asking for a WebSocket transfer.
Automatic PONG
If not using raw mode, libcurl automatically responds with the
appropriate PONG response for incoming PING frames and does not expose
them in the API.
Options
There is a dedicated setopt option for the application to control a WebSocket
communication: CURLOPT_WS_OPTIONS.
This option sets a bitmask of flags to libcurl, but at the moment, there is only a single bit used.
Raw mode
By setting the CURLWS_RAW_MODE bit in the bitmask, libcurl delivers all
WebSocket traffic raw to the write callback instead of parsing the WebSocket
traffic itself. This raw mode is intended for applications that maybe
implemented WebSocket handling already and want to move over to use libcurl
for the transfer and maintain its own WebSocket logic.
In raw mode, libcurl also does not handle any PING traffic automatically.
Read
An application receives and reads incoming WebSocket traffic using one of these two methods:
Write callback
When the CURLOPT_CONNECT_ONLY option is not set, WebSocket data is
delivered to the write callback.
In the default frame mode (as opposed to raw mode), libcurl delivers parts
of WebSocket fragments to the callback as data arrives. The application can
then call curl_ws_meta() to get information about the specific frame that
was passed to the callback.
libcurl can deliver full fragments or partial ones, depending on what comes over the wire when. Each WebSocket fragment can be up to 63-bit in size.
curl_ws_recv
If the connect-only option was set, the transfer ends after the WebSocket has
been setup to the remote host and from that point the application needs to
call curl_ws_recv() to read WebSocket data and curl_ws_send() to send it.
The curl_ws_recv function has this prototype:
CURLcode curl_ws_recv(CURL *curl, void *buffer, size_t buflen,
size_t *recv, struct curl_ws_frame **meta);
curl - the handle to the transfer
buffer - pointer to a buffer to receive the WebSocket data in
buflen - the size in bytes of the buffer
recv - the size in bytes of the data stored in the *buffer on return
meta - gets a pointer to a struct with information about the received frame.
Meta
curl_ws_recv() and curl_ws_meta() both return a pointer to a
curl_ws_frame struct, which provides information about the incoming
WebSocket data. A WebSocket "frame" in this case is a part of a WebSocket
fragment. It can be a whole fragment, but it might only be a piece of
it. The curl_ws_frame contains information about the frame to tell you the
details.
struct curl_ws_frame {
int age; /* zero */
int flags; /* See the CURLWS_* defines */
curl_off_t offset; /* the offset of this data into the frame */
curl_off_t bytesleft; /* number of pending bytes left of the payload */
};
age
This is a number that identifies the age of this struct. It is always 0 now, but might increase in a future and then the struct might grow.
flags
The `flags' field is a bitmask describing details of data.
CURLWS_TEXT
The buffer contains text data. Note that this makes a difference to WebSocket but libcurl itself does make any verification of the content or precautions that you actually receive valid UTF-8 content.
CURLWS_BINARY
This is binary data.
CURLWS_FINAL
This is the final fragment of the message, if this is not set, it implies that there is another fragment coming as part of the same message.
CURLWS_CLOSE
This transfer is now closed.
CURLWS_PING
This is an incoming ping message, that expects a pong response.
offset
When the data is delivered as part of a larger fragment, this identifies the offset, in bytes, into the larger fragment where this piece belongs.
bytesleft
Number of outstanding payload bytes after this frame, that is left to complete this fragment.
The maximum size of a WebSocket fragment is 63 bits.
Write
An application can receive WebSocket data two different ways, but there is
only one way for it to send data over the connection: the curl_ws_send()
function.
curl_ws_send()
CURLcode curl_ws_send(CURL *curl, const void *buffer, size_t buflen,
size_t *sent, curl_off_t fragsize,
unsigned int sendflags);
curl - transfer handle
buffer - pointer to the frame data to send
buflen - length of the data (in bytes) in buffer
fragsize - the total size of the whole fragment, used when sending only a
part of a larger fragment.
sent - number of bytes that were sent
flags - bitmask describing the data. See bit descriptions below.
Full fragment vs partial
To send a complete WebSocket fragment, set fragsize to zero and provide data
for all other arguments.
To send a fragment in smaller pieces: send the first part with fragsize set
to the total fragment size. You must know and provide the size of the
entire fragment before you can send it. In subsequent calls to
curl_ws_send() you send the next pieces of the fragment with fragsize set
to zero but with the CURLWS_OFFSET bit sets in the flags argument. Repeat
until all pieces have been sent that constitute the whole fragment.
Flags
CURLWS_TEXT
The buffer contains text data. Note that this makes a difference to WebSocket but libcurl itself does not perform any verification of the content or make any precautions that you actually send valid UTF-8 content.
CURLWS_BINARY
This is binary data.
CURLWS_CONT
This is not the final fragment of the message, which implies that there is another fragment coming as part of the same message where this bit is not set.
CURLWS_CLOSE
Close this transfer.
CURLWS_PING
This as a ping.
CURLWS_PONG
This as a pong.
CURLWS_OFFSET
The provided data is only a partial fragment and there is more data coming in
a following call to curl_ws_send(). When sending only a piece of the
fragment like this, the fragsize must be provided with the total expected
frame size in the first call and it needs to be zero in subsequent calls.
When CURLWS_OFFSET is set, no other flag bits should be set as this is a
continuation of a previous send and the bits describing the fragments were set
then.
Headers API
libcurl offers an API for iterating over all received HTTP headers and for extracting the contents from specific ones.
When returning header content, libcurl trims leading and trailing whitespace but does not modify or change content in any other way.
This API was made official and is provided for real starting in libcurl 7.84.0.
Header origins
HTTP headers are key value pairs that are sent from the server in a few different origins during a transfer. libcurl collects all headers and provides easy access to them for applications.
HTTP headers can arrive as
- CURLH_HEADER - before regular response content.
- CURLH_TRAILER - fields arriving after the response content
- CURLH_CONNECT - response headers in the proxy
CONNECTrequest that might have been done before the actual server request - CURLH_1XX - headers in the potential 1xx HTTP responses that might have preceded the following >= 2xx response code.
- CURLH_PSEUDO - HTTP/2 and HTTP/3 level headers that start with colon
(
:)
Request number
A single HTTP transfer done with libcurl might consist of a series of HTTP
requests and the request argument to the header API functions lets you
specify which particular individual request you want the headers from. 0 being
the first request and then the number increases for further redirects or when
multi-state authentication is used. Passing in -1 is a shortcut to the last
request in the series, independently of the actual amount of requests used.
Header folding
HTTP/1 headers supports a deprecated format called folding, which means that there is a continuation line after a header, making the line folded.
The headers API supports folded headers and returns such contents unfolded - where the different parts are separated by a single whitespace character.
When
The two header API function calls are perfectly possible to call at any time during a transfer, both from inside and outside of callbacks. It is however important to remember that the API only returns information about the state of the headers at the exact moment it is called, which might not be the final status if you call it while the transfer is still in progress.
Header struct
The header struct pointer the header API functions return, points to memory
associated with the easy handle and subsequent calls to the functions clobber
that struct. Applications need to copy the data if they want to keep it
around. The memory used for the struct gets freed with calling
curl_easy_cleanup().
The struct
struct curl_header {
char *name;
char *value;
size_t amount;
size_t index;
unsigned int origin;
void *anchor;
};
name is the name of header. It uses the casing used for the first instance of the header with this name.
value is the content. It comes exactly as delivered over the network but with leading and trailing whitespace and newlines stripped off. The data is always null-terminated.
amount is the number of headers using this name that exist, within the asked origin and request context.
index is the zero based entry number of this particular header name, which in case this header was used more than once in the requested scope can be larger than 0 but is always less than amount.
origin has (exactly) one of the origin bits set, indicating where from the header originates.
anchor is a private handle used by libcurl internals. Do not modify. Do not assume anything about it.
Get a header
CURLHcode curl_easy_header(CURL *easy,
const char *name,
size_t index,
unsigned int origin,
int request,
struct curl_header **hout);
This function returns information about a field with a specific name, and you ask the function to search for it in one or more origins.
The index argument is when you want to ask for the nth occurrence of a header; when there are more than one available. Setting index to 0 returns the first instance - in many cases that is the only one.
The request argument tells libcurl from which request you want headers from.
An application needs to pass in a pointer to a struct curl_header * in the
last argument, as a pointer is returned there when an error is not
returned. See Header struct for details on the out result of
a successful call.
If the given name does not match any received header in the given origin, the
function returns CURLHE_MISSING or if no headers at all have been received
yet it returns CURLHE_NOHEADERS.
Iterate over headers
struct curl_header *curl_easy_nextheader(CURL *easy,
unsigned int origin,
int request,
struct curl_header *previous);
This function lets the application iterate over all available headers from within the given origins that arrived in the request.
The request argument tells libcurl from which request you want headers from.
If previous is set to NULL, this function returns a pointer to the first header. The application can then use that pointer as an argument to the next call to iterate over all available headers within the same origin and request context.
When this function returns NULL, there are no more headers within the context.
See Header struct for details on the curl_header struct that
function this returns a pointer to.
libcurl examples
The native API for libcurl is in C so this chapter is focused on examples written in C. But since many language bindings for libcurl are thin, they usually expose more or less the same functions and thus they can still be interesting and educational for users of other languages, too.
- Get a simple HTTP page
- Get a page in memory
- Submit a login form over HTTP
- Get an FTP directory listing
- Non-blocking HTTP form-post
- WebSocket with CONNECT_ONLY
- WebSocket using callback
Get a simple HTTP page
This example fetches the HTML from a given URL and sends it to stdout. Possibly the simplest libcurl program you can write.
By replacing the URL this is able to get contents over other supported protocols as well.
Getting the output sent to stdout is a default behavior and usually not what you actually want. Most applications instead install a write callback to have receive the data that arrives.
#include <stdio.h>
#include <curl/curl.h>
int main(void)
{
CURL *curl;
CURLcode res;
curl = curl_easy_init();
if(curl) {
curl_easy_setopt(curl, CURLOPT_URL, "http://example.com/");
/* Perform the request, 'res' holds the return code */
res = curl_easy_perform(curl);
/* Check for errors */
if(res != CURLE_OK)
fprintf(stderr, "curl_easy_perform() failed: %s\n",
curl_easy_strerror(res));
/* always cleanup */
curl_easy_cleanup(curl);
}
return 0;
}
Get a response into memory
This example is a variation of the former that instead of sending the received data to stdout (which often is not what you want), this example instead stores the incoming data in a memory buffer that is enlarged as the incoming data grows.
It accomplishes this by using a write callback to receive the data.
This example uses a fixed URL string with a set URL scheme, but you can of course change this to use any other supported protocol and then get a resource from that instead.
#include <stdio.h>
#include <stdlib.h>
#include <string.h>
#include <curl/curl.h>
struct MemoryStruct {
char *memory;
size_t size;
};
static size_t
mem_cb(void *contents, size_t size, size_t nmemb, void *userp)
{
size_t realsize = size * nmemb;
struct MemoryStruct *mem = (struct MemoryStruct *)userp;
mem->memory = realloc(mem->memory, mem->size + realsize + 1);
if(mem->memory == NULL) {
/* out of memory */
printf("not enough memory (realloc returned NULL)\n");
return 0;
}
memcpy(&(mem->memory[mem->size]), contents, realsize);
mem->size += realsize;
mem->memory[mem->size] = 0;
return realsize;
}
int main(void)
{
CURL *curl_handle;
CURLcode res;
struct MemoryStruct chunk;
chunk.memory = malloc(1); /* grown as needed by the realloc above */
chunk.size = 0; /* no data at this point */
curl_global_init(CURL_GLOBAL_ALL);
/* init the curl session */
curl_handle = curl_easy_init();
/* specify URL to get */
curl_easy_setopt(curl_handle, CURLOPT_URL, "https://www.example.com/");
/* send all data to this function */
curl_easy_setopt(curl_handle, CURLOPT_WRITEFUNCTION, mem_cb);
/* we pass our 'chunk' struct to the callback function */
curl_easy_setopt(curl_handle, CURLOPT_WRITEDATA, (void *)&chunk);
/* some servers do not like requests that are made without a user-agent
field, so we provide one */
curl_easy_setopt(curl_handle, CURLOPT_USERAGENT, "libcurl-agent/1.0");
/* get it! */
res = curl_easy_perform(curl_handle);
/* check for errors */
if(res != CURLE_OK) {
fprintf(stderr, "curl_easy_perform() failed: %s\n",
curl_easy_strerror(res));
}
else {
/*
* Now, our chunk.memory points to a memory block that is chunk.size
* bytes big and contains the remote file.
*
* Do something nice with it
*/
printf("%lu bytes retrieved\n", (long)chunk.size);
}
/* cleanup curl stuff */
curl_easy_cleanup(curl_handle);
free(chunk.memory);
/* we are done with libcurl, so clean it up */
curl_global_cleanup();
return 0;
}
Submit a login form over HTTP
A login submission over HTTP is usually a matter of figuring out exactly what data to submit in a POST and to which target URL to send it.
Once logged in, the target URL can be fetched if the proper cookies are used. As many login-systems work with HTTP redirects, we ask libcurl to follow such if they arrive.
Some login forms makes it more complicated and require that you got cookies from the page showing the login form etc, so if you need that you may want to extend this code a little bit.
By passing in a non-existing cookie file, this example enables the cookie parser so incoming cookies are stored when the response from the login response arrives and then the subsequent request for the resource uses those and prove to the server that we are in fact correctly logged in.
#include <stdio.h>
#include <string.h>
#include <curl/curl.h>
int main(void)
{
CURL *curl;
CURLcode res;
static const char *postthis = "user=daniel&password=monkey123";
curl = curl_easy_init();
if(curl) {
curl_easy_setopt(curl, CURLOPT_URL, "https://example.com/login.cgi");
curl_easy_setopt(curl, CURLOPT_POSTFIELDS, postthis);
curl_easy_setopt(curl, CURLOPT_FOLLOWLOCATION, 1L); /* redirects */
curl_easy_setopt(curl, CURLOPT_COOKIEFILE, ""); /* no file */
res = curl_easy_perform(curl);
/* Check for errors */
if(res != CURLE_OK)
fprintf(stderr, "curl_easy_perform() failed: %s\n",
curl_easy_strerror(res));
else {
/*
* After the login POST, we have received the new cookies. Switch
* over to a GET and ask for the login-protected URL.
*/
curl_easy_setopt(curl, CURLOPT_URL, "https://example.com/file");
curl_easy_setopt(curl, CURLOPT_HTTPGET, 1L); /* no more POST */
res = curl_easy_perform(curl);
/* Check for errors */
if(res != CURLE_OK)
fprintf(stderr, "second curl_easy_perform() failed: %s\n",
curl_easy_strerror(res));
}
/* always cleanup */
curl_easy_cleanup(curl);
}
return 0;
}
Get an FTP directory listing
This example fetches the FTP directory output from the given URL and sends it to stdout. The trailing slash in the URL is what makes libcurl treat it as a directory.
#include <curl/curl.h>
int main(void)
{
CURL *curl;
CURLcode res;
curl_global_init(CURL_GLOBAL_DEFAULT);
curl = curl_easy_init();
if(curl) {
/*
* Make the URL end with a trailing slash
*/
curl_easy_setopt(curl, CURLOPT_URL, "ftp://ftp.example.com/");
res = curl_easy_perform(curl);
/* always cleanup */
curl_easy_cleanup(curl);
if(CURLE_OK != res) {
/* we failed */
fprintf(stderr, "curl told us %d\n", res);
}
}
curl_global_cleanup();
return 0;
}
Non-blocking HTTP form-post
This examples makes a multipart form-post using the multi interface.
#include <stdio.h>
#include <string.h>
#include <sys/time.h>
#include <curl/curl.h>
int main(void)
{
CURL *curl;
CURLM *multi_handle;
int still_running = 0;
curl_mime *form = NULL;
curl_mimepart *field = NULL;
struct curl_slist *headerlist = NULL;
static const char buf[] = "Expect:";
curl = curl_easy_init();
multi_handle = curl_multi_init();
if(curl && multi_handle) {
/* Create the form */
form = curl_mime_init(curl);
/* Fill in the file upload field */
field = curl_mime_addpart(form);
curl_mime_name(field, "sendfile");
curl_mime_filedata(field, "multi-post.c");
/* Fill in the filename field */
field = curl_mime_addpart(form);
curl_mime_name(field, "filename");
curl_mime_data(field, "multi-post.c", CURL_ZERO_TERMINATED);
/* Fill in the submit field too, even if this is rarely needed */
field = curl_mime_addpart(form);
curl_mime_name(field, "submit");
curl_mime_data(field, "send", CURL_ZERO_TERMINATED);
/* initialize custom header list (stating that Expect: 100-continue is
not wanted */
headerlist = curl_slist_append(headerlist, buf);
/* what URL that receives this POST */
curl_easy_setopt(curl, CURLOPT_URL, "https://example.com/upload.cgi");
curl_easy_setopt(curl, CURLOPT_VERBOSE, 1L);
curl_easy_setopt(curl, CURLOPT_HTTPHEADER, headerlist);
curl_easy_setopt(curl, CURLOPT_MIMEPOST, form);
curl_multi_add_handle(multi_handle, curl);
do {
CURLMcode mc = curl_multi_perform(multi_handle, &still_running);
if(still_running)
/* wait for activity, timeout or "nothing" */
mc = curl_multi_poll(multi_handle, NULL, 0, 1000, NULL);
if(mc)
break;
} while(still_running);
curl_multi_cleanup(multi_handle);
/* always cleanup */
curl_easy_cleanup(curl);
/* then cleanup the form */
curl_mime_free(form);
/* free slist */
curl_slist_free_all(headerlist);
}
return 0;
}
WebSocket with CONNECT_ONLY
This example sets up a WebSocket stream with libcurl, then does the rest of
the communication using curl_ws_recv() and curl_ws_send().
If your WebSocket is more transfer-oriented rather than a back-and-forth, it might be easier to do it with callbacks.
#include <string.h>
#ifdef _WIN32
#include <winsock2.h>
#include <windows.h>
#define sleep(s) Sleep((DWORD)(s * 1000))
#else
#include <unistd.h>
#endif
#include <curl/curl.h>
static CURLcode ping(CURL *curl, const char *send_payload)
{
CURLcode result = CURLE_OK;
const char *buf = send_payload;
size_t sent, blen = strlen(send_payload);
while(blen) {
result = curl_ws_send(curl, buf, blen, &sent, 0, CURLWS_PING);
if(result == CURLE_OK) {
buf += sent; /* deduct what was sent */
blen -= sent;
}
else if(result == CURLE_AGAIN) { /* blocked on sending */
fprintf(stderr, "ws: sent PING blocked, waiting a second\n");
sleep(1); /* either select() on socket or max timeout would
be good here. */
}
else /* real error sending */
break;
}
if(result == CURLE_OK)
fprintf(stderr, "ws: sent PING with payload\n");
return result;
}
static CURLcode recv_pong(CURL *curl, const char *expected_payload)
{
size_t rlen = 0;
const struct curl_ws_frame *meta;
char buffer[256];
CURLcode result;
retry:
result = curl_ws_recv(curl, buffer, sizeof(buffer), &rlen, &meta);
if(result == CURLE_OK) {
/* on small PING content, this example assumes the complete
* PONG content arrives in one go. Larger frames arrive
* in chunks, however. */
if(meta->flags & CURLWS_PONG) {
int same = 0;
if(rlen == strlen(expected_payload)) {
if(!memcmp(expected_payload, buffer, rlen))
same = 1;
}
fprintf(stderr, "ws: received PONG with %s payload back\n",
same ? "same" : "different");
}
else if(meta->flags & CURLWS_TEXT) {
fprintf(stderr, "ws: received TEXT frame '%.*s'\n",
(int)rlen, buffer);
}
else if(meta->flags & CURLWS_BINARY) {
fprintf(stderr, "ws: received BINARY frame of %u bytes\n",
(unsigned int)rlen);
}
else {
/* some other frame arrived. */
fprintf(stderr, "ws: received frame of %u bytes rflags %x\n",
(unsigned int)rlen, meta->flags);
goto retry;
}
}
else if(result == CURLE_AGAIN) { /* blocked on receiving */
fprintf(stderr, "ws: PONG not there yet, waiting a second\n");
sleep(1); /* either select() on socket or max timeout would
be good here. */
goto retry;
}
if(result != CURLE_OK)
fprintf(stderr, "ws: curl_ws_recv returned %u, received %u\n",
(unsigned int)result, (unsigned int)rlen);
return result;
}
/* close the connection */
static void websocket_close(CURL *curl)
{
size_t sent;
(void)curl_ws_send(curl, "", 0, &sent, 0, CURLWS_CLOSE);
}
static CURLcode websocket(CURL *curl)
{
CURLcode result;
int i = 0;
do {
result = ping(curl, "foobar");
if(result != CURLE_OK)
break;
result = recv_pong(curl, "foobar");
if(result != CURLE_OK)
break;
sleep(1);
} while(i++ < 10);
websocket_close(curl);
return result;
}
int main(int argc, const char *argv[])
{
CURL *curl;
CURLcode result = curl_global_init(CURL_GLOBAL_ALL);
if(result != CURLE_OK)
return (int)result;
curl = curl_easy_init();
if(curl) {
if(argc == 2)
curl_easy_setopt(curl, CURLOPT_URL, argv[1]);
else
curl_easy_setopt(curl, CURLOPT_URL, "wss://example.com");
curl_easy_setopt(curl, CURLOPT_CONNECT_ONLY, 2L);
/* Perform the request, result gets the return code */
result = curl_easy_perform(curl);
/* Check for errors */
if(result != CURLE_OK)
fprintf(stderr, "curl_easy_perform() failed: %s\n",
curl_easy_strerror(result));
else {
/* connected and ready */
result = websocket(curl);
}
/* always cleanup */
curl_easy_cleanup(curl);
}
curl_global_cleanup();
return (int)result;
}
WebSocket using callback
This example sets up a WebSocket download and handles all the incoming data in the standard write callback.
If your WebSocket need is more of a back-and-forth communication, you might want to rather use the dedicated send and receive functions shown in the simple WebSocket example.
#include <stdio.h>
#include <curl/curl.h>
static size_t write_cb(char *b, size_t size, size_t nitems, void *p)
{
CURL *curl = p;
size_t i;
const struct curl_ws_frame *frame = curl_ws_meta(curl);
fprintf(stderr, "Type: %s\n",
frame->flags & CURLWS_BINARY ? "binary" : "text");
fprintf(stderr, "Bytes: %u", (unsigned int)(nitems * size));
for(i = 0; i < nitems; i++)
fprintf(stderr, "%02x ", (unsigned char)b[i]);
return nitems;
}
int main(void)
{
CURL *curl;
CURLcode result = curl_global_init(CURL_GLOBAL_ALL);
if(result != CURLE_OK)
return (int)result;
curl = curl_easy_init();
if(curl) {
curl_easy_setopt(curl, CURLOPT_URL, "wss://example.com");
curl_easy_setopt(curl, CURLOPT_WRITEFUNCTION, write_cb);
/* pass the easy handle to the callback */
curl_easy_setopt(curl, CURLOPT_WRITEDATA, curl);
/* Perform the request, result gets the return code */
result = curl_easy_perform(curl);
/* Check for errors */
if(result != CURLE_OK)
fprintf(stderr, "curl_easy_perform() failed: %s\n",
curl_easy_strerror(result));
/* always cleanup */
curl_easy_cleanup(curl);
}
curl_global_cleanup();
return (int)result;
}
libcurl bindings
Creative people have written bindings or interfaces for various environments and programming languages. Using one of these allows you to take advantage of the power of curl from within your favorite language or system. This is a list of all known interfaces, as of the time of this writing.
The bindings listed below are not part of the curl/libcurl distribution archives. They must be downloaded and installed separately.
libcurl internals
libcurl is never finished and is not just an off-the-shelf product. It is a living project that is improved and modified on almost a daily basis. We depend on skilled and interested hackers to fix bugs and to add features.
This chapter is meant to describe internal details to aid keen libcurl hackers to learn some basic concepts on how libcurl works internally and thus possibly where to look for problems or where to add things when you want to make the library do something new.
- Easy handles and connections
- Everything is multi
- State machines
- Protocol handler
- Backends
- Caches and state
- Timeouts
- Windows vs Unix
- Memory debugging
- Content Encoding
- Structs
- Resolving host names
- Tests
Easy handles and connections
When reading the source code there are some useful basics that are good to know and keep in mind:
-
'data' is the variable name we use all over to refer to the easy handle (
struct Curl_easy) for the transfer being worked on. No other name should be used for this and nothing else should use this name. The easy handle is the main object identifying a transfer. A transfer typically uses a connection at some point and typically only one at a time. There is adata->connpointer that identifies the connection that is currently used by this transfer. A single connection can be used over time and even concurrently by several transfers (and thus easy handles) when multiplexed connections are used. -
connis the variable name we use all over the internals to refer to the current connection the code works on (struct connectdata). -
resultis the usual name we use for aCURLcodevariable to hold the return values from functions and if that return value is different than zero, it is an error and the function should clean up and return (usually passing on the same error code to its parent function).
Everything is multi
libcurl offers a few different APIs to do transfers; where the primary differences are the synchronous easy interface versus the non-blocking multi interface. The multi interface itself can then be further used either by using the event-driven socket interface or the normal perform interface.
Internally however, everything is written for the event-driven interface. Everything needs to be written in non-blocking fashion so that functions are never waiting for data in loop or similar. Unless they are the surface functions that have that expressed functionality.
The function curl_easy_perform() which performs a single transfer
synchronously, is itself a wrapper function that internally setups and uses
the multi interface itself.
State machines
To facilitate non-blocking behavior all through, the curl source is full of state machines. Work on as much data as there is and drive the state machine to where it can go based on what's available and allow the functions to continue from that point later on when more data arrives that then might drive the state machine further.
There are such states in many different levels for a given transfer and the code for each particular protocol may have its own set of state machines.
mstate
One of the primary states is the main transfer "mode" the easy handle holds,
which says if the current transfer is resolving, waiting for a resolve,
connecting, waiting for a connect, issuing a request, doing a transfer etc
(see the CURLMstate enum in lib/multihandle.h). Every transfer done with
libcurl has an associated easy handle and every easy handle exercises that
state machine.
The image below shows all states and possible state transitions. See further explanation below.
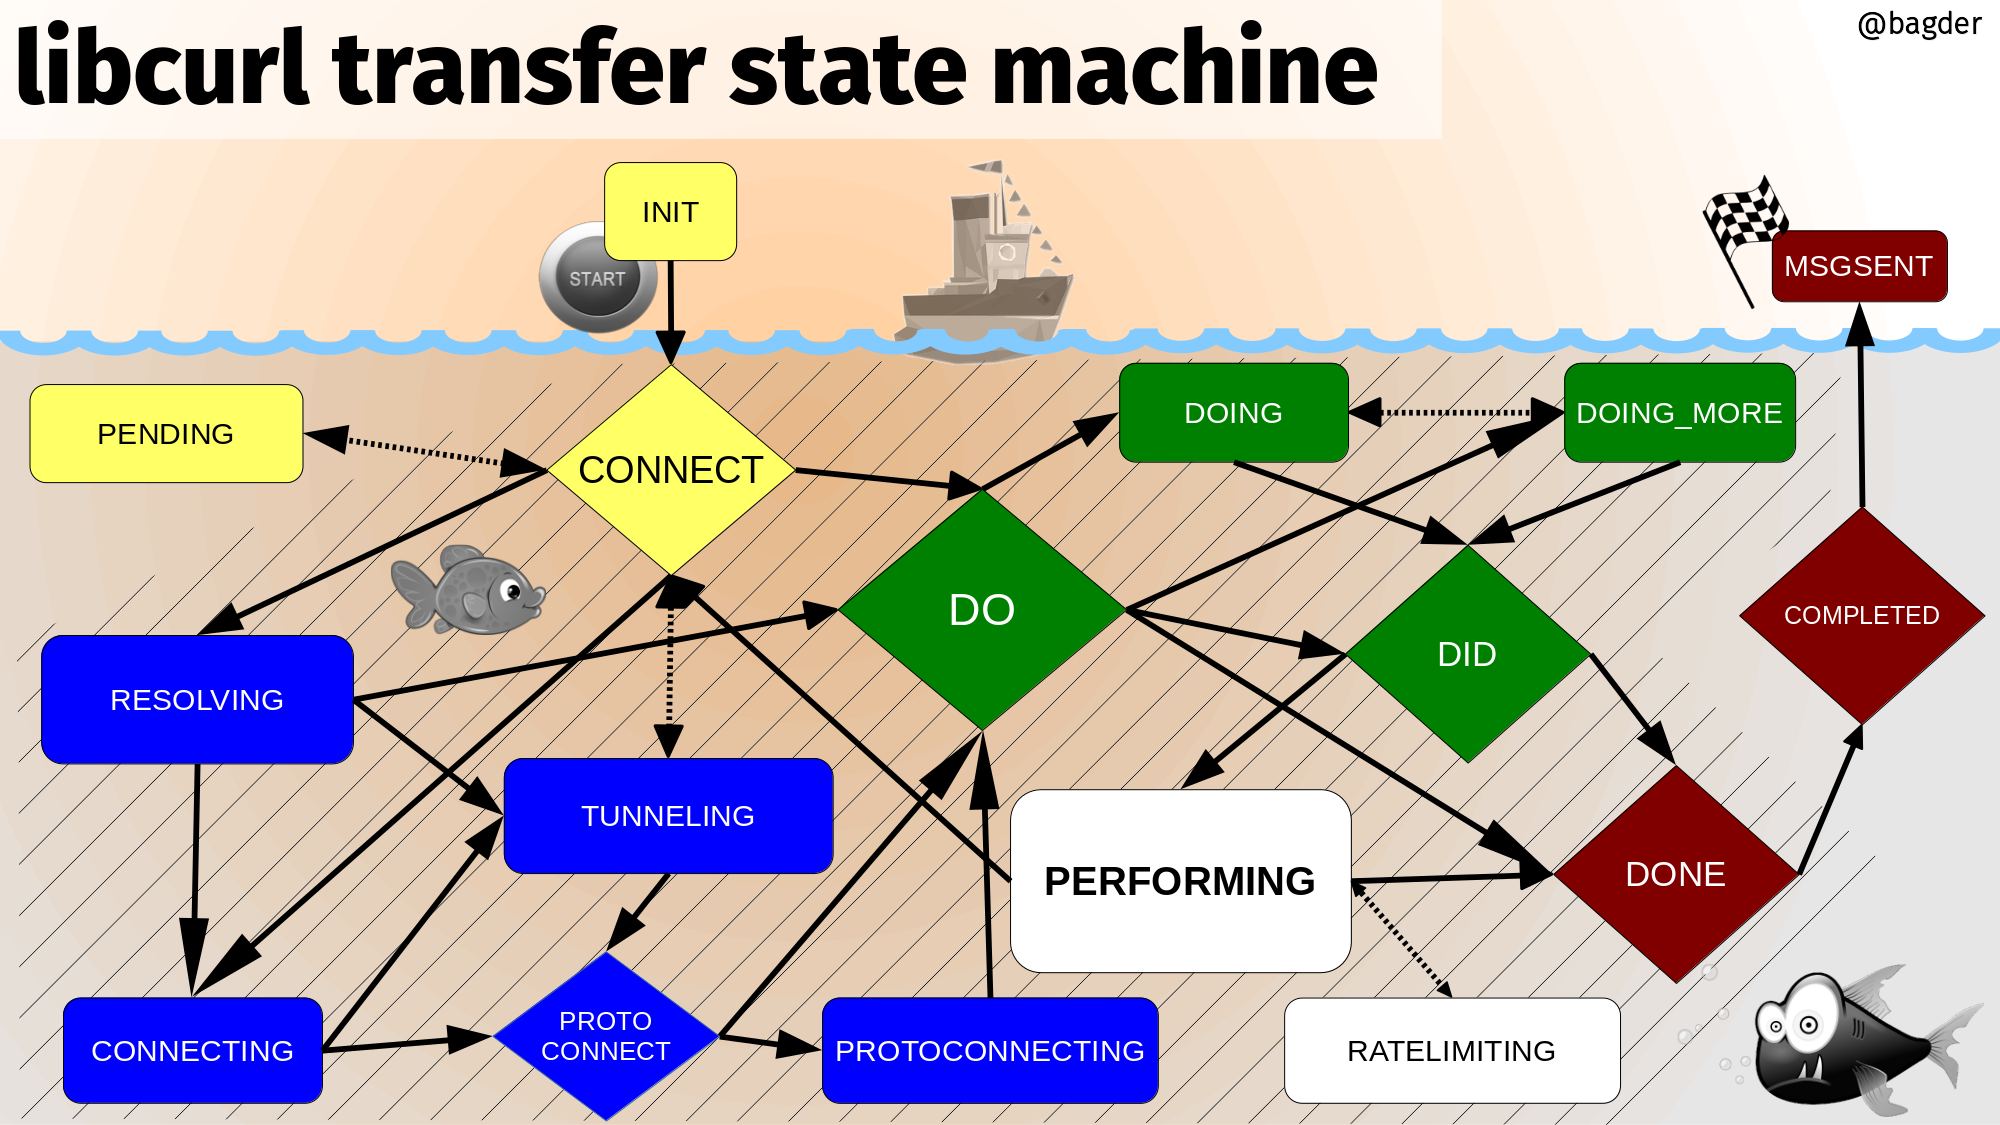
All transfers start in INIT and they end in MSGSENT
yellow: the initial setting-up states
blue: resolving names and setting up the connection
green: initiating and setting up the transfer
white: the transfer
red: post-transfer
Protocol handler
libcurl is a multi-protocol transfer library. The core of the code is a set of generic functions that are used for transfers in general and mostly works the same for all protocols. The main state machine described above for example is there and works for all protocols - even though some protocols may not make use of all states for all transfers.
However, each different protocol libcurl speaks also has its unique
particularities and specialties. In order to not have the code littered with
conditions in the style if the protocol is XYZ, then do…, we instead have
the concept of Curl_handler. Each supported protocol defines one of those in
lib/url.c there is an array of pointers to such handlers called
protocols[].
When a transfer is about to be done, libcurl parses the URL it is about to
operate on and among other things it figures out what protocol to use.
Normally this can be done by looking at the scheme part of the URL. For
https://example.com that is https and for imaps://example.com it is
imaps. Using the provided scheme, libcurl sets the conn->handler pointer
to the handler struct for the protocol that handles this URL.
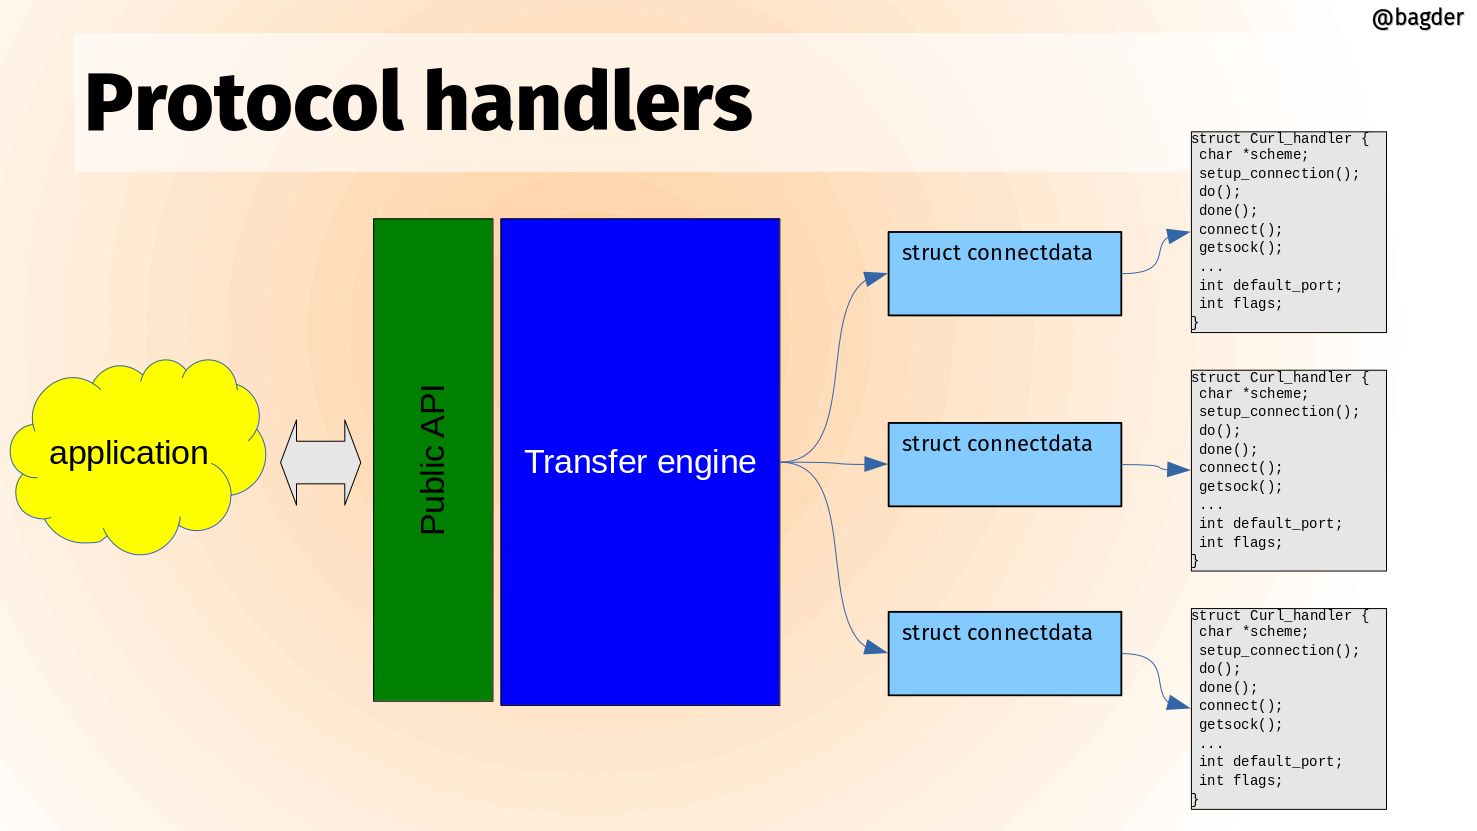
The handler struct contains a set of function pointers that can be NULL or set to point to a protocol specific function to do things necessary for that protocol to work for a transfer. Things that not all other protocols need. The handler struct also sets up the name of the protocol and describes its feature set with a bitmask.
A libcurl transfer is built around a set of different actions and the handler can extend each of them. Here are some example function pointers in this struct and how they are used:
Setup connection
If a connection cannot be reused for a transfer, it needs to setup a connection to the host given in the URL and when it does, it can also call the protocol handler's function for it. Like this:
if(conn->handler->setup_connection)
result = conn->handler->setup_connection(data, conn);
Connect
After a connection has been established, this function gets called
if(conn->handler->connect_it)
result = conn->handler->connect_it(data, &done);
Do
Do is the action that issues a request for the particular resource the URL identifies. All protocol has a do action so this function must be provided:
result = conn->handler->do_it(data, &done);
Done
When a transfer is completed, the done action is taken:
result = conn->handler->done(data, status, premature);
Disconnect
The connection is about to be taken down.
result = conn->handler->disconnect(data, conn, dead_connection);
Backends
A backend in curl is a build-time selectable alternative implementation.
When you build curl, you can select alternative implementations for several different things. Different providers of the same feature set. You select which backend or backends (plural) to use when you build curl.
- Backends are selectable and deselectable
- Often platform dependent
- Can differ in features
- Can differ in 3rd party licenses
- Can differ in maturity
- The internal APIs are never exposed externally
Different backends
In the libcurl source code, there are internal APIs for providing functionality. In these different areas there are multiple different providers:
- IDN
- Name resolving
- TLS
- SSH
- HTTP/3
- HTTP content encoding
Backends visualized
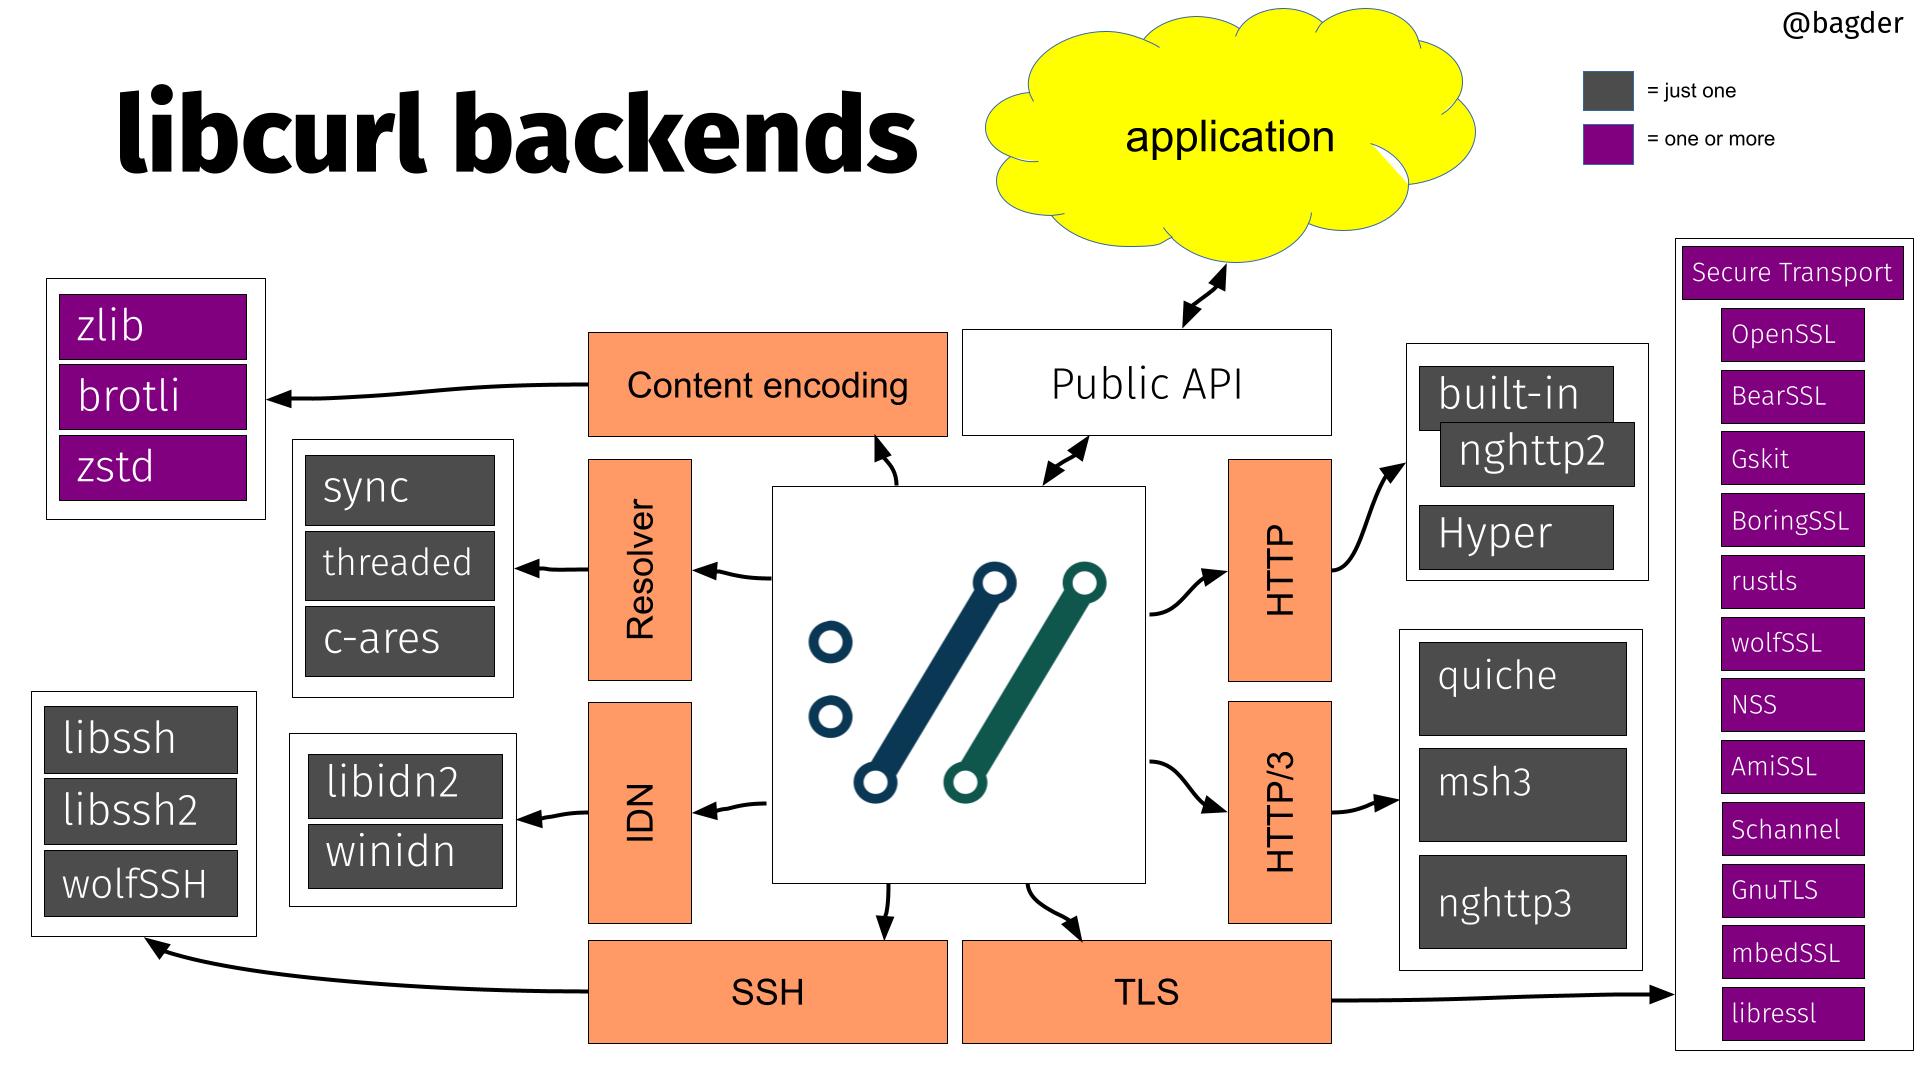
Applications (in the upper green cloud) access libcurl through the public API. The API is fixed and stable.
Internally, the core of libcurl uses internal APIs to perform the different duties it needs to do. Each of these internal APIs are powered by alternative implementations, in many times powered by different third party libraries.
The image above shows the different third party libraries powering different internal APIs. The purple boxes are one or more and the dark gray ones are "one of these".
HTTP/3 backends
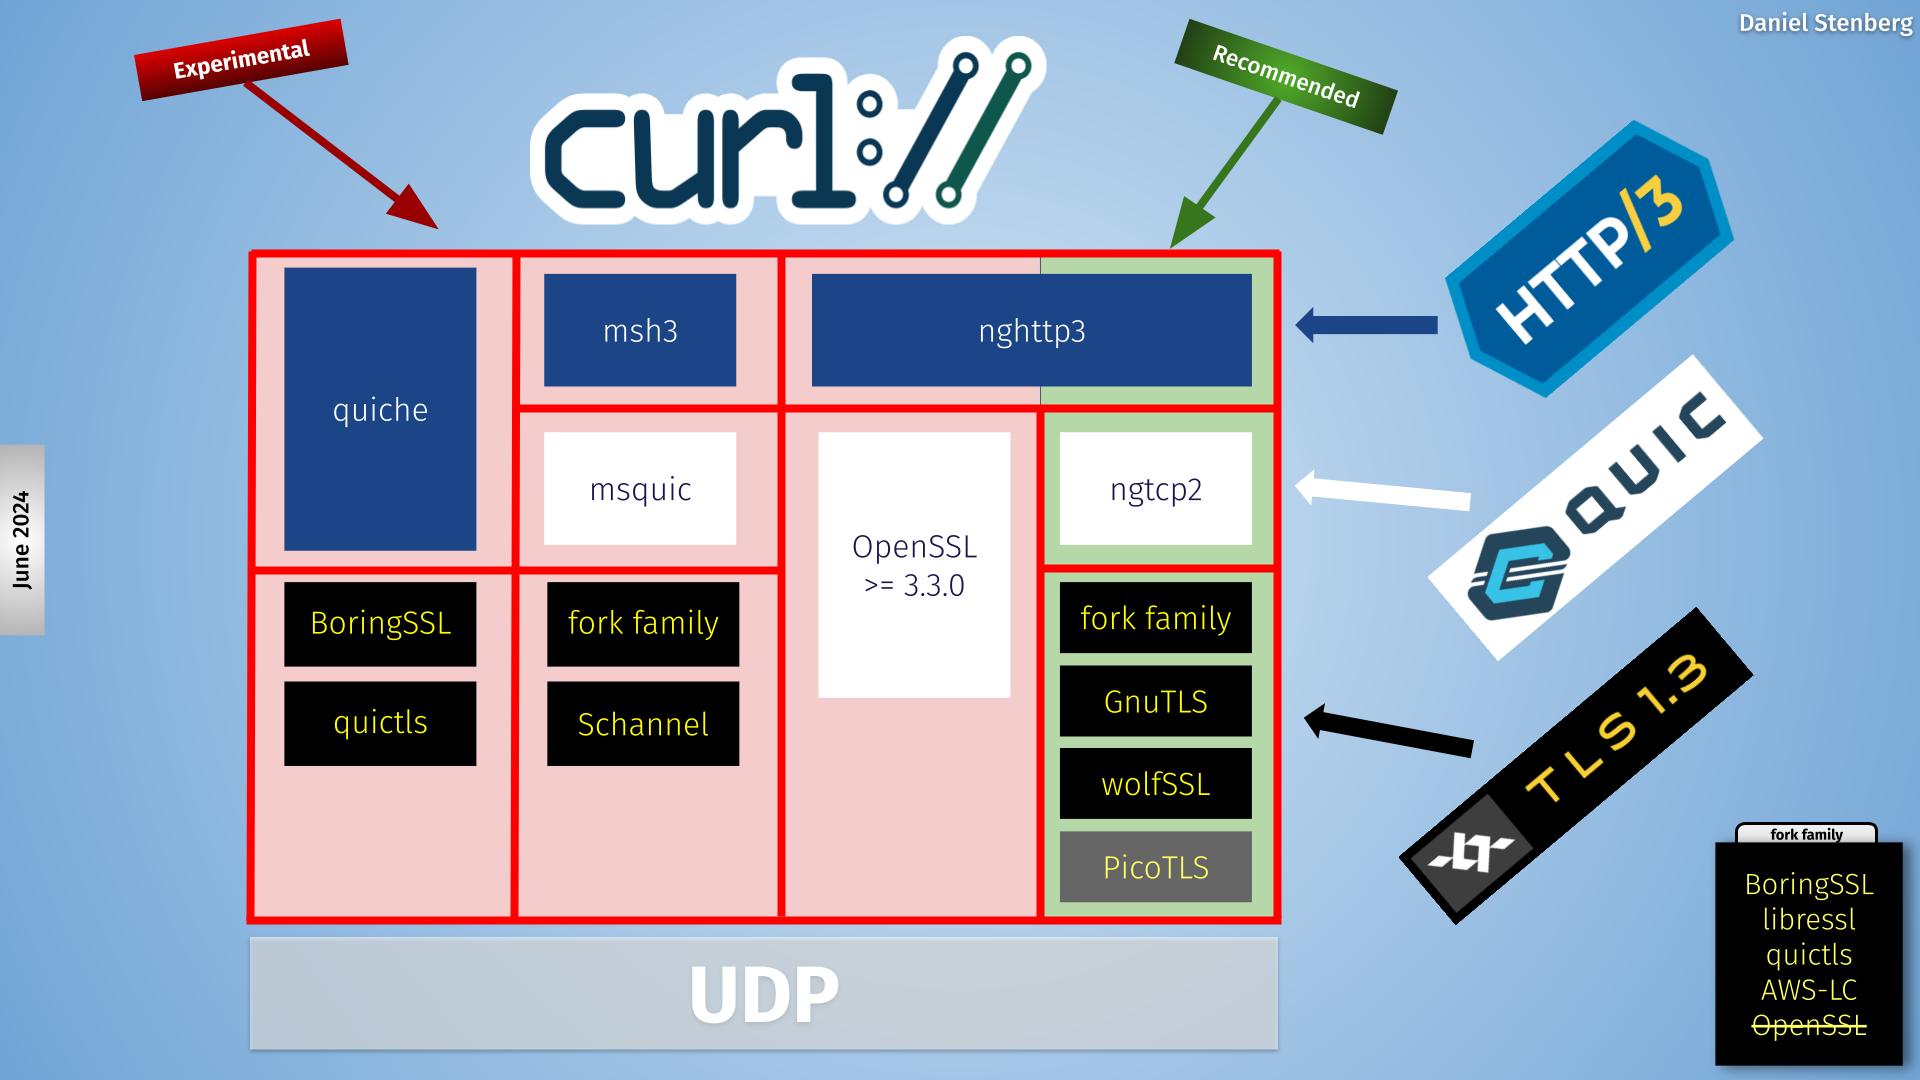
libcurl offers four different backends, visualized as different column in this picture.
The same data in a table, where each line is a specific backend build:
| status | HTTP/3 library | QUIC library | TLS libraries (one of) |
|---|---|---|---|
| recommended | nghttp3 | ngtcp2 | fork family, GnuTLS or wolfSSL |
| experimental | quiche | quiche | BoringSSL or quictls |
| experimental | msh3 | msquic | fork family or Schannel |
| experimental | nghttp3 | OpenSSL 3.3.0+ | OpenSSL 3.3.0+ |
fork family means BoringSSL, LibreSSL, quictls and AWS-LC
Caches and state
When libcurl is used for Internet transfers, it stores data in caches and state storage in order to do subsequent transfers faster and better.
The caches are kept associated with the CURL or CURLM handles, depending
on which libcurl API is used, easy or multi.
DNS cache
When libcurl resolves the IP addresses of a hostname it stores the result in its DNS cache (with a default life-time of 60 seconds), so that subsequent lookups can use the cached data immediately instead of doing the (potentially slow) resolve operation again. This cache exists in memory only.
connection cache
Also known as the connection pool. This is where curl puts live connections after a transfer is complete so that a subsequent transfer might be able to use an already existing connection instead of having to set a new one up. When a connection is reused, curl avoids name lookups, TLS handshakes and more. This cache exists in memory only.
TLS session-ID cache
When curl uses TLS, it saves the session-ID in a cache. When a subsequent transfer needs to redo the TLS handshake with a host for which it has a cached session-ID, the handshake can complete faster. This cache exists in memory only.
CA store cache
When curl creates a new connection and performs a TLS handshake, it needs to load and parse a CA store to use for verifying the certificate presented by the remote server. The CA store cache keeps the parsed CA store in memory for a period of time (default is 24 hours) so that subsequent handshakes are done much faster by avoiding having to re-parse this potentially large data amount. This cache exists in memory only. Added in 7.87.0.
HSTS
HSTS is HTTP Strict Transport Security. HTTPS servers can inform clients that
they want the client to connect to its hostname using only HTTPS going forward
and not HTTP, even when HTTP:// URLs are used. curl keeps this connection
upgrade information in memory and can be told to load it from and save it to
disk as well.
Alt-Svc
Alt-Svc: is an HTTP response header that informs the client about
alternative hostnames, port numbers and protocol versions where the same
service is also available. curl keeps this alternative service information in
memory and can be told to load it from and save it to disk as well.
Cookies
Cookies are name value pairs sent from an HTTP server to the client, meant to be sent back in subsequent requests that match the conditions. curl keeps all cookies in memory and can be told to load them from and save them to disk as well.
Timeouts
All internals need to be written non-blocking and cannot hang around and wait for things to occur. At the same time, the multi interface allows users to call libcurl to perform virtually at any time, even if no action has happened or a timeout has triggered.
Exposes a single timeout to apps
In the external API libcurl provides a single timeout at a time, no matter how
many concurrent transfers and what options are set. An application can get the
timeout value it with curl_multi_timeout() or in a CURLMOPT_TIMERFUNCTION
callback, depending on what API it wants to use.
Internally, this is done like this:
- Every easy handle keeps an array of timeouts, in a sorted order. The closest (next-timeout) in time is first in the list.
- All easy handles are put in a splay tree which is binary self-balancing search tree that makes it fast to insert and remove nodes depending on their timeouts.
- As soon as any handle's next-timeout changes, the splay tree is re-balanced.
Extracting the easy handles with expired timeouts is a quick operation.
Set a timeout
The internal function for setting a timeout is called Curl_expire(). It
asks that libcurl gets called again for this handle in a certain amount of
milliseconds into the future. A timeout is set with a specific ID, to make
sure that it overrides previous values set for the same timeout etc. The
existing timeout IDs are limited and the set is hard-coded.
A timeout can be removed again with Curl_expire_clear(), which then removes
that timeout from the list of timeouts for the given easy handle.
Expired timeouts
Expiration of a timeout means that the application knows that it needs to call libcurl again. When the socket_action API is used, it even knows to call libcurl again for a specific given easy handle for which the timeout has expired.
There is no other special action or activity happening when a timeout expires than that the perform function is called. Each state or internal function needs to know what times or states to check for and act accordingly when called (again).
Windows vs Unix
There are a few differences in how to program curl the Unix way compared to the Windows way. Perhaps the four most notable details are:
Different function names for socket operations
In curl, this is solved with defines and macros, so that the source looks
the same in all places except for the header file that defines them. The
macros in use are sclose(), sread() and swrite().
Init calls
Windows requires a couple of init calls for the socket stuff.
That is taken care of by the curl_global_init() call, but if other libs
also do it etc there might be reasons for applications to alter that
behavior.
We require WinSock version 2.2 and load this version during global init.
File descriptors
File descriptors for network communication and file operations are not as easily interchangeable as in Unix.
We avoid this by not trying any funny tricks on file descriptors.
Stdout
When writing data to stdout, Windows makes end-of-lines the DOS way, thus destroying binary data, although you do want that conversion if it is text coming through... (sigh)
We set stdout to binary under Windows
Ifdefs
Inside the source code, We make an effort to avoid #ifdef [Your OS]. All
conditionals that deal with features should instead be in the format
#ifdef HAVE_THAT_WEIRD_FUNCTION. Since Windows cannot run configure scripts,
we maintain a curl_config-win32.h file in the lib directory that is supposed
to look exactly like a curl_config.h file would have looked like on a
Windows machine.
Generally speaking: curl is frequently compiled on several dozens of operating systems. Do not walk on the edge.
Memory debugging
The file lib/memdebug.c contains debug-versions of a few functions.
Functions such as malloc(), free(), fopen(), fclose(), etc that
somehow deal with resources that might give us problems if we leak them. The
functions in the memdebug system do nothing fancy, they do their normal
function and then log information about what they did. The logged data can
then be analyzed after a complete session,
memanalyze.pl is the Perl script present in tests/ that analyzes a log
file generated by the memory tracking system. It detects if resources are
allocated but never freed and other kinds of errors related to resource
management.
Internally, the definition of the preprocessor symbol DEBUGBUILD restricts
code which is only compiled for debug enabled builds. The symbol CURLDEBUG
is used to differentiate code which is only used for memory
tracking/debugging.
Use -DCURLDEBUG when compiling to enable memory debugging, this is also
switched on by running configure with --enable-curldebug. Use
-DDEBUGBUILD when compiling to enable a debug build or run configure with
--enable-debug.
curl --version lists the Debug feature for debug enabled builds, and lists
the TrackMemory feature for curl debug memory tracking capable builds. These
features are independent and can be controlled when running the configure
script. When --enable-debug is given both features get enabled, unless some
restriction prevents memory tracking from being used.
Track Down Memory Leaks
... using the memory debug system. In general, we suggest using valgrind as the first choice.
Single-threaded
Please note that this memory leak system is not adjusted to work in more than one thread. If you want/need to use it in a multi-threaded app, please adjust accordingly.
Build
Rebuild libcurl with -DCURLDEBUG (usually, rerunning configure with
--enable-debug fixes this). make clean first, then make so that all
files are actually rebuilt properly. It also makes sense to build libcurl with
the debug option (usually -g to the compiler) so that debugging gets
easier if you actually do find a leak in the library.
This builds a library that has memory debugging enabled.
Modify Your Application
Add a line in your application code:
curl_dbg_memdebug("dump");
This makes the malloc debug system output a full trace of all resources using functions to the given filename. Make sure you rebuild your program and that you link with the same libcurl you built for this purpose as described above.
Run Your Application
Run your program as usual. Watch the specified memory trace file grow.
Make your program exit and use the proper libcurl cleanup functions etc, so that all non-leaks are returned/freed properly.
Analyze the Flow
Use the tests/memanalyze.pl Perl script to analyze the dump file:
$ tests/memanalyze.pl dump
This now outputs a report on what resources that were allocated but never freed etc. This report is fine for posting to the list.
If this does not produce any output, no leak was detected in libcurl. Then the leak is mostly likely to be in your code.
Content Encoding
About content encodings
HTTP/1.1 specifies that a client may request that a server encode its
response. This is usually used to compress a response using one (or more)
encodings from a set of commonly available compression techniques. These
schemes include deflate (the zlib algorithm), gzip, br (brotli) and
compress. A client requests that the server perform an encoding by
including an Accept-Encoding header in the request document. The value of
the header should be one of the recognized tokens deflate, ... (there is a
way to register new schemes/tokens, see sec 3.5 of the spec). A server MAY
honor the client's encoding request. When a response is encoded, the server
includes a Content-Encoding header in the response. The value of the
Content-Encoding header indicates which encodings were used to encode the
data, in the order in which they were applied.
It is also possible for a client to attach priorities to different schemes so
that the server knows which it prefers. See sec 14.3 of RFC 2616 for more
information on the Accept-Encoding header. See sec 3.1.2.2 of RFC
7231 for more
information on the Content-Encoding header.
Supported content encodings
The deflate, gzip, zstd and br content encodings are supported by
libcurl. Both regular and chunked transfers work fine. The zlib library is
required for the deflate and gzip encodings, the brotli decoding library
is for the br encoding and not too surprisingly libzstd does zstd.
The libcurl interface
To ask libcurl make a request using content encoding, use:
curl_easy_setopt(curl, CURLOPT_ACCEPT_ENCODING, string);
where string is the intended value of the Accept-Encoding header.
libcurl supports multiple encodings but only understands how to process
responses that use the deflate, gzip, zstd and/or br content
encodings, so the only values for CURLOPT_ACCEPT_ENCODING that work
(besides identity, which does nothing) are deflate, gzip, zstd and
br. If a response is encoded using the compress or methods, libcurl
returns an error indicating that the response could not be decoded. If
<string> is NULL no Accept-Encoding header is generated. If <string> is
a zero-length string, then an Accept-Encoding header containing all
supported encodings is generated.
The CURLOPT_ACCEPT_ENCODING must be set to any non-NULL value for content
to be automatically decoded. If it is not set and the server still sends
encoded content (despite not having been asked), the data is returned in its
raw form and the Content-Encoding type is not checked.
The curl interface
Use the --compressed option with curl to cause it to ask servers to
compress responses using any format supported by curl.
Structs
This section documents internal structs. Since they are truly internal, we change them occasionally which might make this section slightly out of date at times.
Curl_easy
The Curl_easy struct is the one returned to the outside in the external
API as an opaque CURL *. This pointer is usually known as an easy handle
in API documentations and examples.
Information and state that is related to the actual connection is in the
connectdata struct. When a transfer is about to be made, libcurl either
creates a new connection or re-uses an existing one. The current connectdata
that is used by this handle is pointed out by Curl_easy->conn.
Data and information that regard this particular single transfer is put in
the SingleRequest sub-struct.
When the Curl_easy struct is added to a multi handle, as it must be in
order to do any transfer, the ->multi member points to the Curl_multi
struct it belongs to. The ->prev and ->next members are then used by the
multi code to keep a linked list of Curl_easy structs that are added to
that same multi handle. libcurl always uses multi so ->multi points to a
Curl_multi when a transfer is in progress.
->mstate is the multi state of this particular Curl_easy. When
multi_runsingle() is called, it acts on this handle according to which
state it is in. The mstate is also what tells which sockets to return for a
specific Curl_easy when [curl_multi_fdset()][12] is called etc.
The libcurl source code generally use the name data everywhere for the
local variable that points to the Curl_easy struct.
When doing multiplexed HTTP/2 transfers, each Curl_easy is associated with
an individual stream, sharing the same connectdata struct. Multiplexing
makes it even more important to keep things associated with the right thing.
connectdata
A general idea in libcurl is to keep connections around in a connection cache after they have been used in case they are used again and then re-use an existing one instead of creating a new one as it creates a significant performance boost.
Each connectdata struct identifies a single physical connection to a
server. If the connection cannot be kept alive, the connection is closed
after use and then this struct can be removed from the cache and freed.
Thus, the same Curl_easy can be used multiple times and each time select
another connectdata struct to use for the connection. Keep this in mind,
as it is then important to consider if options or choices are based on the
connection or the Curl_easy.
As a special complexity, some protocols supported by libcurl require a
special disconnect procedure that is more than shutting down the socket. It
can involve sending one or more commands to the server before doing so.
Since connections are kept in the connection cache after use, the original
Curl_easy may no longer be around when the time comes to shut down a
particular connection. For this purpose, libcurl holds a special dummy
closure_handle Curl_easy in the Curl_multi struct to use when needed.
FTP uses two TCP connections for a typical transfer but it keeps both in this single struct and thus can be considered a single connection for most internal concerns.
The libcurl source code generally uses the name conn for the local
variable that points to the connectdata.
Curl_multi
Internally, the easy interface is implemented as a wrapper around multi interface functions. This makes everything multi interface.
Curl_multi is the multi handle struct exposed as the opaque CURLM * in
external APIs.
This struct holds a list of Curl_easy structs that have been added to this
handle with [curl_multi_add_handle()][13]. The start of the list is
->easyp and ->num_easy is a counter of added Curl_easys.
->msglist is a linked list of messages to send back when
[curl_multi_info_read()][14] is called. A node is added to that list when
an individual Curl_easy's transfer has completed.
->hostcache points to the name cache. It is a hash table for looking up
name to IP. The nodes have a limited lifetime in there and this cache is
meant to reduce the time for when the same name is wanted within a short
period of time.
->timetree points to a tree of Curl_easys, sorted by the remaining time
until it should be checked - normally some sort of timeout. Each Curl_easy
has one node in the tree.
->sockhash is a hash table to allow fast lookups of socket descriptor for
which Curl_easy uses that descriptor. This is necessary for the
multi_socket API.
->conn_cache points to the connection cache. It keeps track of all
connections that are kept after use. The cache has a maximum size.
->closure_handle is described in the connectdata section.
The libcurl source code generally uses the name multi for the variable that
points to the Curl_multi struct.
Curl_handler
Each unique protocol that is supported by libcurl needs to provide at least
one Curl_handler struct. It defines what the protocol is called and what
functions the main code should call to deal with protocol specific issues.
In general, there is a source file named [protocol].c in which there is a
struct Curl_handler Curl_handler_[protocol] declared. In url.c there is
then the main array with all individual Curl_handler structs pointed to
from a single array which is scanned through when a URL is given to libcurl
to work with.
The concrete function pointer prototypes can be found in lib/urldata.h.
-
->schemeis the URL scheme name, usually spelled out in uppercase. That is HTTP or FTP etc. SSL versions of the protocol need their ownCurl_handlersetup so HTTPS separate from HTTP. -
->setup_connectionis called to allow the protocol code to allocate protocol specific data that then gets associated with thatCurl_easyfor the rest of this transfer. It gets freed again at the end of the transfer. It gets called before theconnectdatafor the transfer has been selected/created. Most protocols allocate its privatestruct [PROTOCOL]here and assignCurl_easy->req.p.[protocol]to it. -
->connect_itallows a protocol to do some specific actions after the TCP connect is done, that can still be considered part of the connection phase. Some protocols alter theconnectdata->recv[]andconnectdata->send[]function pointers in this function. -
->connectingis similarly a function that keeps getting called as long as the protocol considers itself still in the connecting phase. -
->do_itis the function called to issue the transfer request. What we call the DO action internally. If the DO is not enough and things need to be kept getting done for the entire DO sequence to complete,->doingis then usually also provided. Each protocol that needs to do multiple commands or similar for do/doing needs to implement their own state machines (see SCP, SFTP, FTP). Some protocols (only FTP and only due to historical reasons) have a separate piece of the DO state calledDO_MORE. -
->doingkeeps getting called while issuing the transfer request command(s) -
->donegets called when the transfer is complete and DONE. That is after the main data has been transferred. -
->do_moregets called during theDO_MOREstate. The FTP protocol uses this state when setting up the second connection. -
->proto_getsock,->doing_getsock,->domore_getsock,->perform_getsockFunctions that return socket information. Which socket(s) to wait for which I/O action(s) during the particular multi state. -
->disconnectis called immediately before the TCP connection is shutdown. -
->readwritegets called during transfer to allow the protocol to do extra reads/writes -
->attachattaches a transfer to the connection. -
->defportis the default report TCP or UDP port this protocol uses -
->protocolis one or more bits in theCURLPROTO_*set. The SSL versions have their base protocol set and then the SSL variation. LikeHTTP|HTTPS. -
->flagsis a bitmask with additional information about the protocol that makes it get treated differently by the generic engine:PROTOPT_SSL- makes it connect and negotiate SSLPROTOPT_DUAL- this protocol uses two connectionsPROTOPT_CLOSEACTION- this protocol has actions to do before closing the connection. This flag is no longer used by code, yet still set for a bunch of protocol handlers.PROTOPT_DIRLOCK- direction lock. The SSH protocols set this bit to limit which direction of socket actions that the main engine concerns itself with.PROTOPT_NONETWORK- a protocol that does not use the network (readfile:)PROTOPT_NEEDSPWD- this protocol needs a password and uses a default one unless one is providedPROTOPT_NOURLQUERY- this protocol cannot handle a query part on the URL (?foo=bar)
conncache
Is a hash table with connections for later re-use. Each Curl_easy has a
pointer to its connection cache. Each multi handle sets up a connection
cache that all added Curl_easys share by default.
Curl_share
The libcurl share API allocates a Curl_share struct, exposed to the
external API as CURLSH *.
The idea is that the struct can have a set of its own versions of caches and
pools and then by providing this struct in the CURLOPT_SHARE option, those
specific Curl_easys use the caches/pools that this share handle holds.
Then individual Curl_easy structs can be made to share specific things
that they otherwise would not, such as cookies.
The Curl_share struct can currently hold cookies, DNS cache and the SSL
session cache.
CookieInfo
This is the main cookie struct. It holds all known cookies and related
information. Each Curl_easy has its own private CookieInfo even when
they are added to a multi handle. They can be made to share cookies by using
the share API.
Resolving hostnames
Aka hostip.c explained
The main compile-time defines to keep in mind when reading the host*.c
source file are these:
CURLRES_IPV6
this host has getaddrinfo() and family, and thus we use that. The host may
not be able to resolve IPv6, but we do not really have to take that into
account. Hosts that are not IPv6-enabled have CURLRES_IPV4 defined.
CURLRES_ARES
is defined if libcurl is built to use c-ares for asynchronous name resolves. This can be Windows or *nix.
CURLRES_THREADED
is defined if libcurl is built to use threading for asynchronous name resolves. The name resolve is done in a new thread, and the supported asynch API is be the same as for ares-builds. This is the default under (native) Windows.
If any of the two previous are defined, CURLRES_ASYNCH is defined too. If
libcurl is not built to use an asynchronous resolver, CURLRES_SYNCH is
defined.
host*.c sources
The host*.c sources files are split up like this:
hostip.c- method-independent resolver functions and utility functionshostasyn.c- functions for asynchronous name resolveshostsyn.c- functions for synchronous name resolvesasyn-ares.c- functions for asynchronous name resolves using c-aresasyn-thread.c- functions for asynchronous name resolves using threadshostip4.c- IPv4 specific functionshostip6.c- IPv6 specific functions
The hostip.h is the single united header file for all this. It defines the
CURLRES_* defines based on the config*.h and curl_setup.h defines.
Tests
The curl test suite is a fundamental cornerstone in our development process. It helps us verify that existing functionality is still there like before, and we use it to check that new functionality behaves as expected.
With every bugfix and new feature, we ideally also create one or more test cases.
The test suite is custom made and tailored specifically for our own purposes to allow us to test curl from every possible angle that we think we need. It does not rely on any third party test frameworks.
The tests are meant to be possible to build and run on virtually all platforms available.
- Test file format
- Build tests
- Run tests
- Debug builds
- Test servers
- curl tests
- libcurl tests
- Unit tests
- Valgrind
- Continuous Integration
- Autobuilds
- Torture
Test file format
Each curl test is designed in a single text file using an XML-like format.
Labels mark the beginning and the end of all sections, and each label must be
written in its own line. Comments are either XML-style (enclosed with <!--
and -->) or shell script style (beginning with #) and must appear on their
own lines and not alongside actual test data. Most test data files are
syntactically valid XML, although a few files are not (lack of support for
character entities and the preservation of carriage return and linefeed
characters at the end of lines are the biggest differences).
All tests must begin with a <testcase> tag, which encompasses the remainder
of the file. See below for other tags.
Each test file is called tests/data/testNUMBER where NUMBER is a unique
numerical test identifier. Each test has to use its own dedicated number. The
number has no meaning other than identifying the test.
The test file defines exactly what command line or tool to run, what test servers to invoke and how they should respond, exactly what protocol exchange that should happen, what output and return code to expect and much more.
Everything is written within their dedicated tags like this when the name is set:
<name>
HTTP with host name written backwards
</name>
keywords
Every test has one or more <keywords> set in the top of the file. They are
meant to be "tags" that identify features and protocols that are tested by
this test case. runtests.pl can be made to run only tests that match (or do
not match) such keywords.
Preprocessed
Under the hood, each test input file is preprocessed at startup by
runtests.pl. This means that variables, macros and keywords are expanded and
a temporary version of the file is stored in tests/log/testNUMBER - and
that file is then used by all the test servers etc.
This processing allows the test format to offer features like %repeat to
create really big test files without bloating the input files correspondingly.
Base64 Encoding
In the preprocess stage, a special instruction can be used to have runtests.pl base64 encode a certain section and insert in the generated output file. This is in particular good for test cases where the test tool is expected to pass in base64 encoded content that might use dynamic information that is unique for this particular test invocation, like the server port number.
To insert a base64 encoded string into the output, use this syntax:
%b64[ data to encode ]b64%
The data to encode can then use any of the existing variables mentioned below, or even percent-encoded individual bytes. As an example, insert the HTTP server's port number (in ASCII) followed by a space and the hexadecimal byte 9a:
%b64[%HTTPPORT %9a]b64%
Hexadecimal decoding
In the preprocess stage, a special instruction can be used to have runtests.pl generate a sequence of binary bytes.
To insert a sequence of bytes from a hex encoded string, use this syntax:
%hex[ %XX-encoded data to decode ]hex%
For example, to insert the binary octets 0, 1 and 255 into the test file:
%hex[ %00%01%FF ]hex%
Repeat content
In the preprocess stage, a special instruction can be used to have runtests.pl generate a repetitive sequence of bytes.
To insert a sequence of repeat bytes, use this syntax to make the <string>
get repeated <number> of times. The number has to be 1 or larger and the
string may contain %HH hexadecimal codes:
%repeat[<number> x <string>]%
For example, to insert the word hello a 100 times:
%repeat[100 x hello]%
Conditional lines
Lines in the test file can be made to appear conditionally on a specific
feature (see the "features" section below) being set or not set. If the
specific feature is present, the following lines are output, otherwise it
outputs nothing, until a following else or endif clause. Like this:
%if brotli
Accept-Encoding
%endif
It can also check for the inverse condition, so if the feature is not set by the use of an exclamation mark:
%if !brotli
Accept-Encoding: not-brotli
%endif
You can also make an "else" clause to get output for the opposite condition, like:
%if brotli
Accept-Encoding: brotli
%else
Accept-Encoding: nothing
%endif
Note that there can be no nested conditions. You can only do one conditional at a time and you can only check for a single feature in it.
Variables
When the test is preprocessed, a range of variables in the test file are replaced by their content at that time.
Available substitute variables include:
%CLIENT6IP- IPv6 address of the client running curl%CLIENTIP- IPv4 address of the client running curl%CURL- Path to the curl executable%FILE_PWD- Current directory, on Windows prefixed with a slash%FTP6PORT- IPv6 port number of the FTP server%FTPPORT- Port number of the FTP server%FTPSPORT- Port number of the FTPS server%FTPTIME2- Timeout in seconds that should be sufficient to receive a response from the test FTP server%FTPTIME3- Even longer than%FTPTIME2%GOPHER6PORT- IPv6 port number of the Gopher server%GOPHERPORT- Port number of the Gopher server%GOPHERSPORT- Port number of the Gophers server%HOST6IP- IPv6 address of the host running this test%HOSTIP- IPv4 address of the host running this test%HTTP6PORT- IPv6 port number of the HTTP server%HTTPPORT- Port number of the HTTP server%HTTP2PORT- Port number of the HTTP/2 server%HTTPSPORT- Port number of the HTTPS server%HTTPSPROXYPORT- Port number of the HTTPS-proxy%HTTPTLS6PORT- IPv6 port number of the HTTP TLS server%HTTPTLSPORT- Port number of the HTTP TLS server%HTTPUNIXPATH- Path to the Unix socket of the HTTP server%SOCKSUNIXPATH- Absolute Path to the Unix socket of the SOCKS server%IMAP6PORT- IPv6 port number of the IMAP server%IMAPPORT- Port number of the IMAP server%MQTTPORT- Port number of the MQTT server%TELNETPORT- Port number of the telnet server%NOLISTENPORT- Port number where no service is listening%POP36PORT- IPv6 port number of the POP3 server%POP3PORT- Port number of the POP3 server%POSIX_PWD- Current directory somewhat mingw friendly%PROXYPORT- Port number of the HTTP proxy%PWD- Current directory%RTSP6PORT- IPv6 port number of the RTSP server%RTSPPORT- Port number of the RTSP server%SMBPORT- Port number of the SMB server%SMBSPORT- Port number of the SMBS server%SMTP6PORT- IPv6 port number of the SMTP server%SMTPPORT- Port number of the SMTP server%SOCKSPORT- Port number of the SOCKS4/5 server%SRCDIR- Full path to the source dir%SSHPORT- Port number of the SCP/SFTP server%SSHSRVMD5- MD5 of SSH server's public key%SSHSRVSHA256- SHA256 of SSH server's public key%SSH_PWD- Current directory friendly for the SSH server%TESTNUMBER- Number of the test case%TFTP6PORT- IPv6 port number of the TFTP server%TFTPPORT- Port number of the TFTP server%USER- Login ID of the user running the test%VERSION- the full version number of the tested curl
Tags
Each test is always specified entirely within the <testcase> tag. Each test
case is further split up into four main sections: info, reply, client
and verify.
-
info provides information about the test case
-
reply is used for the server to know what to send as a reply for the requests curl sends
-
client defines how the client should behave
-
verify defines how to verify that the data stored after a command has been run ended up correctly
Each main section supports a number of available sub-tags that can be specified, that are checked/used if specified.
<info>
<keywords>
A newline-separated list of keywords describing what this test case uses and tests. Try to use already used keywords. These keywords are used for statistical/informational purposes and for choosing or skipping classes of tests. "Keywords" must begin with an alphabetic character, "-", "[" or "{" and may consist of multiple words separated by spaces which are treated together as a single identifier.
<reply>
<data [nocheck="yes"] [sendzero="yes"] [base64="yes"] [hex="yes"] [nonewline="yes"]>
data to be sent to the client on its request and later verified that it
arrived safely. Set nocheck="yes" to prevent the test script from verifying
the arrival of this data.
If the data contains swsclose anywhere within the start and end tag, and
this is an HTTP test, then the connection is closed by the server after this
response is sent. If not, the connection is kept persistent.
If the data contains swsbounce anywhere within the start and end tag, the
HTTP server detects if this is a second request using the same test and part
number and then increases the part number with one. This is useful for auth
tests and similar.
sendzero=yes means that the (FTP) server "sends" the data even if the size
is zero bytes. Used to verify curl's behavior on zero bytes transfers.
base64=yes means that the data provided in the test-file is a chunk of data
encoded with base64. It is the only way a test case can contain binary
data. (This attribute can in fact be used on any section, but it does not make
much sense for other sections than "data").
hex=yes means that the data is a sequence of hex pairs. It gets decoded and
used as "raw" data.
nonewline=yes means that the last byte (the trailing newline character)
should be cut off from the data before sending or comparing it.
For FTP file listings, the <data> section is used only if you make sure
that there has been a CWD done first to a directory named test-[number]
where [number] is the test case number. Otherwise the ftp server cannot know
from which test file to load the list content.
<dataNUMBER>
Send back this contents instead of the one. The number NUMBER is set
by:
- The test number in the request line is >10000 and this is the remainder of [test case number]%10000.
- The request was HTTP and included digest details, which adds 1000 to the number
- If an HTTP request is NTLM type-1, it adds 1001 to the number
- If an HTTP request is NTLM type-3, it adds 1002 to the number
- If an HTTP request is Basic and the number is already >=1000, it adds 1
- If an HTTP request is Negotiate, the number gets incremented by one for each request with Negotiate authorization header on the same test case.
Dynamically changing the test number in this way allows the test harness to be
used to test authentication negotiation where several different requests must
be sent to complete a transfer. The response to each request is found in its
own data section. Validating the entire negotiation sequence can be done by
specifying a datacheck section.
<connect>
The connect section is used instead of the 'data' for all CONNECT requests. The remainder of the rules for the data section then apply but with a connect prefix.
<socks>
Address type and address details as logged by the SOCKS proxy.
<datacheck [mode="text"] [nonewline="yes"]>
if the data is sent but this is what should be checked afterwards. If
nonewline=yes is set, runtests cuts off the trailing newline from the data
before comparing with the one actually received by the client.
Use the mode="text" attribute if the output is in text mode on platforms
that have a text/binary difference.
<datacheckNUM [nonewline="yes"] [mode="text"]>
The contents of numbered datacheck sections are appended to the non-numbered
one.
<size>
number to return on an ftp SIZE command (set to -1 to make this command fail)
<mdtm>
what to send back if the client sends an FTP MDTM command, set to -1 to have
it return that the file does not exist
<postcmd>
special purpose server-command to control its behavior after the reply is sent For HTTP/HTTPS, these are supported:
wait [secs] - Pause for the given time
<servercmd>
Special-commands for the server.
The first line of this file is always set to Testnum [number] by the test
script, to allow servers to read that to know what test the client is about to
issue.
For FTP/SMTP/POP/IMAP
REPLY [command] [return value] [response string]- Changes how the server responds to the [command]. [response string] is evaluated as a perl string, so it can contain embedded\r\n, for example. There is a special [command] named "welcome" (without quotes) which is the string sent immediately on connect as a welcome.REPLYLF(like above but sends the response terminated with LF-only and not CRLF)COUNT [command] [number]- Do theREPLYchange for[command]only[number]times and then go back to the built-in approachDELAY [command] [secs]- Delay responding to this command for the given timeRETRWEIRDO- Enable the "weirdo" RETR case when multiple response lines appear at once when a file is transferredRETRNOSIZE- Make sure the RETR response does not contain the size of the fileNOSAVE- Do not save what is receivedSLOWDOWN- Send FTP responses with 0.01 sec delay between each bytePASVBADIP- makes PASV send back an illegal IP in its 227 responseCAPA [capabilities]- Enables support for and specifies a list of space separated capabilities to return to the client for the IMAPCAPABILITY, POP3CAPAand SMTPEHLOcommandsAUTH [mechanisms]- Enables support for SASL authentication and specifies a list of space separated mechanisms for IMAP, POP3 and SMTPSTOR [msg]respond with this instead of default afterSTOR
For HTTP/HTTPS
auth_requiredif this is set and a POST/PUT is made without auth, the server does NOT wait for the full request body to get sentidle- do nothing after receiving the request, "sit idle"stream- continuously send data to the client, never-endingwritedelay: [msecs]delay this amount between reply packetsskip: [number]- instructs the server to ignore reading this many bytes from a PUT or POST requestrtp: part [num] channel [num] size [num]- stream a fake RTP packet for the given part on a chosen channel with the given payload sizeconnection-monitor- When used, this logs[DISCONNECT]to theserver.inputlog when the connection is disconnected.upgrade- when an HTTP upgrade header is found, the server upgrades to http2swsclose- instruct server to close connection after responseno-expect- do not read the request body if Expect: is present
For TFTP
writedelay: [secs] delay this amount between reply packets (each packet
being 512 bytes payload)
<client>
<server>
What server(s) this test case requires/uses. Available servers:
fileftp-ipv6ftpftpsgophergophershttp-ipv6http-proxyhttp-unixhttp/2httphttpshttptls+srp-ipv6httptls+srpimapmqttnonepop3rtsp-ipv6rtspscpsftpsmtpsocks4socks5
Enter only one server per line. This subsection is mandatory.
<features>
A list of features that MUST be present in the client/library for this test to be able to run. If a required feature is not present then the test is SKIPPED.
Alternatively a feature can be prefixed with an exclamation mark to indicate a feature is NOT required. If the feature is present then the test is SKIPPED.
Features testable here are:
alt-svcbearsslc-arescookiescryptodebugDoHgetrlimitGnuTLSGSS-APIh2cHSTSHTTP-authhttp/2idnipv6Kerberoslarge_fileld_preloadlibssh2libssholdlibssh(versions before 0.9.4)libzmanualMimenetrcNTLMOpenSSLparsedateproxyPSLrustlsSchannelsectranspshuffle-dnssocksSPNEGOSSLSSLpinningSSPIthreaded-resolverTLS-SRPTrackMemorytypecheckUnicodeunittestunix-socketsverbose-stringswakeupwin32wolfssl
in addition to all protocols that curl supports. A protocol only needs to be
specified if it is different from the server (useful when the server is
none).
<killserver>
Using the same syntax as in <server> but when mentioned here these servers
are explicitly KILLED when this test case is completed. Only use this if there
is no other alternatives. Using this of course requires subsequent tests to
restart servers.
<precheck>
A command line that if set gets run by the test script before the test. If an output is displayed by the command or if the return code is non-zero, the test gets skipped and the (single-line) output is displayed as reason for not running the test.
<postcheck>
A command line that if set gets run by the test script after the test. If the command exists with a non-zero status code, the test is considered failed.
<tool>
Name of tool to invoke instead of "curl". This tool must be built and exist
either in the libtest/ directory (if the tool name starts with lib) or in
the unit/ directory (if the tool name starts with unit).
<name>
Brief test case description, shown when the test runs.
<setenv>
variable1=contents1
variable2=contents2
Set the given environment variables to the specified value before the actual command is run. They are cleared again after the command has been run.
<command [option="no-output/no-include/force-output/binary-trace"] [timeout="secs"][delay="secs"][type="perl/shell"]>
Command line to run.
Note that the URL that gets passed to the server actually controls what data
that is returned. The last slash in the URL must be followed by a number. That
number (N) is used by the test-server to load test case N and return the data
that is defined within the <reply><data></data></reply> section.
If there is no test number found above, the HTTP test server uses the number following the last dot in the given hostname (made so that a CONNECT can still pass on test number) so that "foo.bar.123" gets treated as test case 123. Alternatively, if an IPv6 address is provided to CONNECT, the last hexadecimal group in the address is used as the test number. For example the address "[1234::ff]" would be treated as test case 255.
Set type="perl" to write the test case as a perl script. It implies that
there is no memory debugging and valgrind gets shut off for this test.
Set type="shell" to write the test case as a shell script. It implies that
there is no memory debugging and valgrind gets shut off for this test.
Set option="no-output" to prevent the test script to slap on the --output
argument that directs the output to a file. The --output is also not added
if the verify/stdout section is used.
Set option="force-output" to make use of --output even when the test is
otherwise written to verify stdout.
Set option="no-include" to prevent the test script to slap on the
--include argument.
Set option="binary-trace" to use --trace instead of --trace-ascii for
tracing. Suitable for binary-oriented protocols such as MQTT.
Set timeout="secs" to override default server logs advisor read lock
timeout. This timeout is used by the test harness, once that the command has
completed execution, to wait for the test server to write out server side log
files and remove the lock that advised not to read them. The "secs" parameter
is the not negative integer number of seconds for the timeout. This timeout
attribute is documented for completeness sake, but is deep test harness stuff
and only needed for specific test cases. Avoid using it.
Set delay="secs" to introduce a time delay once that the command has
completed execution and before the <postcheck> section runs. The "secs"
parameter is the not negative integer number of seconds for the delay. This
'delay' attribute is intended for specific test cases, and normally not
needed.
<file name="log/filename" [nonewline="yes"]>
This creates the named file with this content before the test case is run, which is useful if the test case needs a file to act on.
If nonewline="yes" is used, the created file gets the final newline stripped
off.
<stdin [nonewline="yes"]>
Pass this given data on stdin to the tool.
If nonewline is set, we cut off the trailing newline of this given data
before comparing with the one actually received by the client
<verify>
<errorcode>
numerical error code curl is supposed to return. Specify a list of accepted error codes by separating multiple numbers with comma. See test 237 for an example.
<strip>
One regex per line that is removed from the protocol dumps before the comparison is made. This is useful to remove dependencies on dynamically changing protocol data such as port numbers or user-agent strings.
<strippart>
One perl op per line that operates on the protocol dump. This is pretty
advanced. Example: s/^EPRT .*/EPRT stripped/.
<protocol [nonewline="yes"]>
the protocol dump curl should transmit, if nonewline is set, we cut off the
trailing newline of this given data before comparing with the one actually
sent by the client The <strip> and <strippart> rules are applied before
comparisons are made.
<proxy [nonewline="yes"]>
The protocol dump curl should transmit to an HTTP proxy (when the http-proxy
server is used), if nonewline is set, we cut off the trailing newline of
this given data before comparing with the one actually sent by the client The
<strip> and <strippart> rules are applied before comparisons are made.
<stderr [mode="text"] [nonewline="yes"]>
This verifies that this data was passed to stderr.
Use the mode="text" attribute if the output is in text mode on platforms
that have a text/binary difference.
If nonewline is set, we cut off the trailing newline of this given data
before comparing with the one actually received by the client
<stdout [mode="text"] [nonewline="yes"]>
This verifies that this data was passed to stdout.
Use the mode="text" attribute if the output is in text mode on platforms
that have a text/binary difference.
If nonewline is set, we cut off the trailing newline of this given data
before comparing with the one actually received by the client
<file name="log/filename" [mode="text"]>
The file's contents must be identical to this after the test is complete. Use
the mode="text" attribute if the output is in text mode on platforms that
have a text/binary difference.
<file1>
1 to 4 can be appended to 'file' to compare more files.
<file2>
<file3>
<file4>
<stripfile>
One perl op per line that operates on the output file or stdout before being compared with what is stored in the test file. This is pretty advanced. Example: "s/^EPRT .*/EPRT stripped/"
<stripfile1>
1 to 4 can be appended to stripfile to strip the corresponding
<stripfile2>
<stripfile3>
<stripfile4>
<upload>
the contents of the upload data curl should have sent
<valgrind>
disable - disables the valgrind log check for this test
Build tests
Before you can run any tests you need to build curl but also build the test suite and its associated tools and servers.
Most conveniently, you can build and run them all by issuing make test in
the build directory root but if you want to work more on tests or perhaps even
debug one, you may want to jump into the tests directory and work from
within that. Build it all and run test 144 like this:
cd tests
make
./runtests.pl 144
Run tests
The main script that runs tests is called tests/runtests.pl and some of its
more useful features are:
Run a range of tests
Run test 1 to 27:
./runtests.pl 1 to 27
Run all tests marked as SFTP:
./runtests.pl SFTP
Run all tests not marked FTP:
./runtests.pl '!FTP'
Run a specific test with gdb
./runtests.pl -g 144
It starts up gdb, you can set break-points etc and then type run and off it
goes and performs the entire thing through the debugger.
Run a specific test without valgrind
The test suite uses valgrind by default if it finds it, which is an excellent way to find problems but it also makes the test run much slower. Sometimes you want to do it faster:
./runtests.pl -n 144
Debug builds
When we speak of debug builds, we usually refer to curl builds that are done with debug code and symbols still present. We strongly recommend you do this if you want to work with curl development as it makes it easier to test and debug.
You make a debug build using configure like this:
./configure --enable-debug
Debug-builds make it possible to run individual test cases with gdb with runtests.pl, which is handy - especially for example if you can make it crash somewhere as then gdb can catch it and show you exactly where it happens etc.
Debug-builds are also built a little different than regular release builds in that they contain some snippets of code that makes curl easier to test. For example it allows the test suite to override the random number generator so that testing for values that otherwise are random actually work. Also, the unit tests only work on debug builds.
Memdebug
Debug builds also enable the memdebug internal memory tracking and debugging system.
When switched on, the memdebug system outputs detailed information about a lot of memory-related options into a logfile, so that it can be analyzed and verified after the fact. Verified that all memory was freed, all files were closed and so on.
This is a poor-man's version of valgrind but does not at all compare with its features. It is however fairly portable and low-impact.
In a debug build, the memdebug system is enabled by curl if the
CURL_MEMDEBUG environment variable is set to a filename, which is used for
the log. The test suite sets this variable for us (see tests/log/memdump)
and verifies it after each test run, if present.
Test servers
A large portion of the curl test suite actually runs curl command lines that interact with servers that are started on the local machine for testing purposes only during the test, and that are shut down again at the end of the test round.
The test servers are custom servers written for this purpose that speak HTTP, FTP, IMAP, POP3, SMTP, TFTP, MQTT, SOCKS proxies and more.
All test servers are controlled via the test file: which servers that each test case needs to have running to work, what they should return and how they are supposed to act for each test.
The test servers typically log their actions in dedicated files in
tests/log, and they can be useful to check out if your test does not act the
way you want.
curl tests
The standard test in the suite is the "curl test". They all invoke a curl command line and verifies that everything it sends, gets back and returns are exactly as expected. Any mismatch and the test is considered a fail and the script shows details about the error.
What the test features in the <client><command> section is what is used in
the command line, verbatim.
The tests/log/commands.log is handy to look at after a run, as it contains
the full command line that was run in the test.
If you want to make a test that does not invoke the curl command line tool, then you should consider the libcurl tests or unit tests instead.
libcurl tests
A libcurl test is a stand-alone C program that uses the public libcurl API to do something.
Apart from that, everything else is tested, verified and checked the same way curl tests are.
Since these C programs are usually built and run on a plethora of different platforms, considerations might need to be taken.
All libcurl test programs are kept in tests/libtest
Unit tests
Unit tests only work on debug builds.
Unit tests are tests that use functions that are libcurl internal and therefore not part of any public API, headers or external documentation.
If the internal function you want to test is made static, they should
instead be set UNITTEST - which then makes debug builds not use static for
them and they then become accessible to test from unit tests.
We provide a set of convenience functions and macros for unit tests to make it quick and easy to write them.
All unit test programs are kept in tests/unit
Valgrind
Valgrind is a popular and powerful tool for debugging programs and especially their use and abuse of memory.
runtests.pl automatically detects if valgrind is installed on your system
and by default runs tests using valgrind if found. You can pass -n to
runtests to disable the use of valgrind.
Valgrind makes execution much slower, but it is an excellent tool to find memory leaks and use of uninitialized memory.
Continuous Integration
For every pull request submitted to the curl project on GitHub and for every commit pushed to the master branch in the git repository, a vast amount of virtual machines fire up, check out that code from git, build it with different options and run the test suite and make sure that everything is working fine.
We run CI jobs on several different operating systems, including Linux, macOS, Windows, Solaris and FreeBSD.
We run jobs that build and test many different (combinations of) backends.
We have jobs that use different ways of building: autotools, cmake, Visual Studio, etc.
We verify that the distribution tarball works.
We run source code analyzers.
Failing builds
Unfortunately, due to the complexity of everything involved we often have one or two CI jobs that seemingly are stuck "permafailing", that seems to be failing the jobs on a permanent basis.
We work hard to make them not, but it is a tough job and we often see red builds even for changes that should otherwise be all green.
Autobuilds
Volunteering individuals run the autobuilds. This is a script that runs automatically that:
- checks out the latest code from the git repository
- builds everything
- runs the test suite
- sends the full log over email to the curl server
As they are then run on different platforms with different build options, they offer an extra dimension of feedback on curl build health.
Check status
All logs are parsed, managed and displayed on the curl site.
Legacy
We started the autobuild system in 2003, a decade before CI jobs started becoming a serious alternative.
Now, the autobuilds are more of a legacy system as we are moving more and more into a world with CI and more direct and earlier feedback.
Torture
When curl is built debug enabled, it offers a special kind of testing. The tests we call torture tests. Do not worry, it is not quite as grim as it may sound.
They verify that libcurl and curl exit paths work without any crash or memory leak happening,
The torture tests work like this:
- run the single test as-is first
- count the number of invoked fallible functions
- rerun the test once for every falling function call
- make each fallible function call return error, one by one
- verify that there is no leak or crash
- continue until all fallible functions have been made to fail
This way of testing can take a seriously long time. I advise you to switch off valgrind when trying this out.
Rerun a specific failure
If a single test fails, runtests.pl identifies exactly which "round" that
triggered the problem and by using the -t as shown, you can run a command
line that when invoked only fails that particular fallible function.
Shallow
To make this way of testing a little more practical, the test suite also
provides a --shallow option. This lets the user set a maximum number of
fallible functions to fail per test case. If there are more invokes to fail
than is set with this value, the script randomly selects which ones to fail.
As a special feature, as randomizing things in tests can be uncomfortable, the
script uses a random seed based on year + month, so it remains the same for
each calendar month. Convenient, as if you rerun the same test with the same
--shallow value it runs the same random tests.
You can force a different seed with runtests' --seed option.
Index
A
- Accept-Encoding: About content encodings, Conditional lines
- --alt-svc: Enable
- --anyauth: Authentication
- --append: trurl example command lines, FTP and SFTP uploads, Uploading with FTP
- apt: Ubuntu and Debian
- Arch Linux: Arch Linux
- AWS SigV4: AWS SigV4
- AWS-LC: TLS libraries, Restrictions, HTTP/3 backends
- --aws-sigv4: AWS sigv4
B
- -b: Cookie engine, Reading cookies from file, Writing cookies to file, New cookie session, Web logins and sessions
- --basic: Authentication
- BearSSL: lib/vtls, TLS libraries,
<features> - bindings: Confusions and mix-ups, libcurl, the library, In website backends, docs
- BoringSSL: TLS libraries, BoringSSL, Restrictions, HTTP/3 backends
- brotli: HTTP Compression, Version, Which libcurl version runs, About content encodings, Conditional lines
C
- -c: Writing cookies to file, Web logins and sessions
- c-ares: c-ares, Line 4: Features, Name resolve tricks with c-ares, Name resolver backends,
CURLRES_ARES,<features> - C89: Comments
- CA: Available exit codes, MITM proxy, Verifying server certificates, OCSP stapling, Built-in certificate store, Caches, CA store caching, Verification, All options, Available information, CA store cache
- CA cert cache: CA cert cache
- --ca-native: Native CA stores, Considerations
- Chrome: Copy as curl, SSLKEYLOGFILE
- clone: Building libcurl on MSYS2, git, Website, build boringssl
- code of conduct: Trust, Code of Conduct
- --compressed: Gzipped transfers, Compression, The curl interface
- --compressed-ssh: For SFTP/SCP
- configure: root, Handling build options, Platform dependent code, Autotools,
rpath, configure, set up the build tree to get detected by curl's configure, Ifdefs, Memory debugging, Debug builds - --connect-timeout: Connection timeout, Never spend more than this to connect
- --connect-to: Provide a replacement name
- connection cache: Connection reuse, Available --write-out variables, Connection cache, All options, Connection reuse, Multi handle, connection cache, connectdata
- connection pool: Connection reuse, Connection cache, pool size, Connection reuse, connection cache
- Connection reuse: Connection reuse, Connection cache, threads, Connection reuse
- Content-Disposition: Use the target filename from the server
- content-encoding: Transfer encoding, Compression, About content encodings
- contribute: Code of Conduct, Contributing, Everything curl
- Contributing: docs, Contributing
- Cookie engine: Cookie engine, Writing cookies to file, Cookie engine
- Cookies: docs, libpsl, Line 4: Features, Not perfect, Server differences, Change the Host: header, Session tracking, Authentication, Cookie engine, Reading cookies from file, Writing cookies to file, New cookie session, Cookie file format, Cookies, All options, Available information, Authentication, Cookies, Sharing between easy handles, Submit a login form over HTTP, Cookies, Curl_share,
<features> - copyright: License, Copyright
- curl-announce: curl-announce, Vulnerability handling
- curl-library: curl-users, Make a patch for the mailing list, Vulnerability handling
- curl-users: curl-users, Vulnerability handling
- <curl/curl.h>: include/curl, Header files, --libcurl, Stop slow transfers, Rate limit, Progress meter, Include files, Get a simple HTTP page, Get a response into memory, Submit a login form over HTTP, Get an FTP directory listing, Non-blocking HTTP form-post, WebSocket with CONNECT_ONLY, WebSocket using callback
- CURLE_ABORTED_BY_CALLBACK: Progress information
- CURLHSTS_ENABLE: Enable HSTS for a handle
- CURLHSTS_READONLYFILE: Enable HSTS for a handle
- CURLINFO_CERTINFO: Available information
- CURLINFO_CONN_ID: Transfer and connection identifiers, Available information
- CURLINFO_CONTENT_TYPE: Post transfer info
- CURLINFO_EFFECTIVE_URL: Available information
- CURLINFO_FILETIME: Available information
- CURLINFO_TOTAL_TIME_T: Available information
- CURLINFO_XFER_ID: Transfer and connection identifiers, Available information
- CURLMOPT_PIPELINING: Multiplexing
- CURLMOPT_SOCKETFUNCTION: socket_callback
- CURLMOPT_TIMERFUNCTION: timer_callback, Exposes a single timeout to apps
- CURLOPT_ALTSVC: All options, Enable
- CURLOPT_ALTSVC_CTRL: All options, Enable
- CURLOPT_CA_CACHE_TIMEOUT: CA cert cache, All options
- CURLOPT_CLOSESOCKETFUNCTION: All options, Socket close callback
- CURLOPT_CONNECTTIMEOUT: All options, easy API
- CURLOPT_COOKIE: All options, Setting custom cookies
- CURLOPT_COOKIEFILE: All options, Enable cookie engine with reading, Submit a login form over HTTP
- CURLOPT_COOKIEJAR: All options, Enable cookie engine with writing
- CURLOPT_COOKIELIST: All options, Add a cookie to the cookie store
- CURLOPT_CURLU: All options, CURLOPT_CURLU
- CURLOPT_CUSTOMREQUEST: All options, Request method
- CURLOPT_DEBUGDATA: Trace everything, All options, Debug
- CURLOPT_DEBUGFUNCTION: Trace everything, All options, Debug
- CURLOPT_DNS_CACHE_TIMEOUT: DNS cache, All options, Caching
- CURLOPT_DNS_INTERFACE: All options, Name server options
- CURLOPT_DNS_LOCAL_IP4: All options, Name server options
- CURLOPT_DNS_LOCAL_IP6: All options, Name server options
- CURLOPT_DNS_SERVERS: All options, Name server options
- CURLOPT_DNS_USE_GLOBAL_CACHE: All options, No global DNS cache
- CURLOPT_ERRORBUFFER: --libcurl, CURLcode return codes, All options
- CURLOPT_FAILONERROR: All options, About HTTP response code "errors"
- CURLOPT_HEADER: All options, Write data, Referrer, Download headers too
- CURLOPT_HEADERDATA: --libcurl, All options, Header data, Download headers too
- CURLOPT_HEADERFUNCTION: --libcurl, All options, Header data
- CURLOPT_HSTS: All options, Set a HSTS cache file
- CURLOPT_HSTS_CTRL: All options, Enable HSTS for a handle
- CURLOPT_HTTPGET: All options, Download, Submit a login form over HTTP
- CURLOPT_HTTPHEADER: All options, Add a header, HTTP PUT, Non-blocking HTTP form-post
- CURLOPT_HTTPPOST: All options
- CURLOPT_IPRESOLVE: All options, How libcurl connects, Name resolving
- CURLOPT_LOCALPORT: All options, Local port number
- CURLOPT_LOCALPORTRANGE: All options, Local port number
- CURLOPT_LOW_SPEED_LIMIT: All options, easy API, Stop slow transfers
- CURLOPT_LOW_SPEED_TIME: All options, easy API, Stop slow transfers
- CURLOPT_MAXFILESIZE_LARGE: Set numerical options, All options
- CURLOPT_MAXREDIRS: --libcurl, All options
- CURLOPT_MIMEPOST: All options, HTTP multipart formposts, Non-blocking HTTP form-post
- CURLOPT_NOBODY: All options, Request method
- CURLOPT_NOPROGRESS: --libcurl, All options, Progress information, Progress meter
- CURLOPT_OPENSOCKETDATA: All options, Provide a file descriptor
- CURLOPT_OPENSOCKETFUNCTION: All options, Provide a file descriptor
- CURLOPT_PIPEWAIT: All options, Multiplexing
- CURLOPT_POST: All options, HTTP POST
- CURLOPT_POSTFIELDS: Set string options, All options, Request method, HTTP POST, Submit a login form over HTTP
- CURLOPT_POSTFIELDSIZE:
CURLOPT_POSTFIELDS, All options, HTTP POST - CURLOPT_POSTREDIR: Decide what method to use in redirects, All options
- CURLOPT_PROGRESSFUNCTION: All options, Progress information
- CURLOPT_PROXY: All options, Proxy types
- CURLOPT_PROXYPORT: All options, Proxy types
- CURLOPT_PROXYTYPE: All options, Proxy types
- CURLOPT_READDATA: --libcurl, All options, Read data
- CURLOPT_READFUNCTION: --libcurl, All options, Read data, HTTP POST
- CURLOPT_RESOLVE: All options, Custom addresses for hosts
- CURLOPT_SEEKDATA: --libcurl, All options, Seek and ioctl
- CURLOPT_SEEKFUNCTION: --libcurl, All options, Seek and ioctl
- CURLOPT_SOCKOPTDATA: All options, sockopt
- CURLOPT_SOCKOPTFUNCTION: All options, sockopt
- CURLOPT_SSH_KNOWNHOSTS: --libcurl, All options, SSH key
- CURLOPT_SSLVERSION: Protocol version, All options
- CURLOPT_SSL_VERIFYHOST: Verification, All options
- CURLOPT_SSL_VERIFYPEER: Verification, All options, HTTPS proxy
- CURLOPT_STDERR: --libcurl, Verbose operations, All options
- CURLOPT_TCP_KEEPALIVE: --libcurl, All options, Enable keep alive
- CURLOPT_TCP_KEEPCNT: Probe count
- CURLOPT_TCP_KEEPIDLE: All options, Idle time
- CURLOPT_TCP_KEEPINTVL: All options, Probe interval
- CURLOPT_TIMEOUT: Set numerical options, All options, easy API
- CURLOPT_TLSAUTH_USERNAME: TLS auth, All options
- CURLOPT_UPLOAD: All options, Request method, HTTP PUT
- CURLOPT_URL: --libcurl, Strings are C strings, not C++ string objects, Easy handle, Set string options, All options, Example, Stop slow transfers, Rate limit, Progress meter, Request method, Bearer, Download, HTTP PUT, CURLOPT_CURLU, Get a simple HTTP page, Get a response into memory, Submit a login form over HTTP, Get an FTP directory listing, Non-blocking HTTP form-post, WebSocket with CONNECT_ONLY, WebSocket using callback
- CURLOPT_USERAGENT: --libcurl, All options, Get a response into memory
- CURLOPT_VERBOSE: Verbose operations, All options, Find a specific option by name, When connections are not reused as you want, Download headers too, Non-blocking HTTP form-post
- CURLOPT_WRITEDATA: --libcurl, Callback considerations, All options, Write data, Get a response into memory, WebSocket using callback
- CURLOPT_WRITEFUNCTION: --libcurl, Callback considerations, All options, Write data, Get a response into memory, WebSocket using callback
- CURLOPT_XFERINFODATA: All options, Progress information
- CURLOPT_XFERINFOFUNCTION: All options, Progress information
- CURLUPART_FRAGMENT: Get URL parts, Set URL parts
- CURLUPART_HOST:
CURLU_PUNYCODE, Get URL parts, Set URL parts - CURLUPART_PASSWORD: Get URL parts, Set URL parts
- CURLUPART_PATH: Get URL parts, Set URL parts
- CURLUPART_PORT: Get URL parts, Set URL parts
- CURLUPART_QUERY: Get URL parts, Set URL parts, Append to the query
- CURLUPART_USER: Get URL parts, Set URL parts
- curl_easy_cleanup: --libcurl, Stop slow transfers, Rate limit, Progress meter, easy handle, Bearer, Enable cookie engine with writing, Header struct, Get a simple HTTP page, Get a response into memory, Submit a login form over HTTP, Get an FTP directory listing, Non-blocking HTTP form-post, WebSocket with CONNECT_ONLY, WebSocket using callback
- curl_easy_getinfo: docs/libcurl/opts, Transfer and connection identifiers, Post transfer info, Response meta-data, Get all cookies from the cookie store
- curl_easy_init: --libcurl, Easy handle, Example, Stop slow transfers, Rate limit, Progress meter, Bearer, Download, CURLOPT_CURLU, Get a simple HTTP page, Get a response into memory, Submit a login form over HTTP, Get an FTP directory listing, Non-blocking HTTP form-post, WebSocket with CONNECT_ONLY, WebSocket using callback
- curl_easy_option_by_id: Find a specific option by ID
- curl_easy_option_by_next: Iterate over all options
- curl_easy_perform: --libcurl, Drive with easy, Easy API pool, Example, Caching, easy API, Stop slow transfers, Rate limit, Progress meter, Add a header, Bearer, Download, Get a simple HTTP page, Get a response into memory, Submit a login form over HTTP, Get an FTP directory listing, WebSocket with CONNECT_ONLY, WebSocket using callback, Everything is multi
- curl_easy_reset: Reuse
- curl_easy_setopt: docs/libcurl/opts, --libcurl, CURLcode return codes, Verbose operations, Strings are C strings, not C++ string objects, Easy handle, Set numerical options, Set string options, TLS options, All options, Write data, Read data, Progress information, Header data, Debug, sockopt, Provide a file descriptor, Example, Name resolving, Stop slow transfers, Rate limit, Progress meter, Request method, Ranges, Username and password, Enable cookie engine with reading, Download, HTTP POST, Multiplexing, Enable HSTS for a handle, Enable, Sharing between easy handles, CURLOPT_CURLU, Get a simple HTTP page, Get a response into memory, Submit a login form over HTTP, Get an FTP directory listing, Non-blocking HTTP form-post, WebSocket with CONNECT_ONLY, WebSocket using callback, The libcurl interface
- curl_global_cleanup: Global initialization, Get a response into memory, Get an FTP directory listing, WebSocket with CONNECT_ONLY, WebSocket using callback
- curl_global_init: Global initialization, Get a response into memory, Get an FTP directory listing, WebSocket with CONNECT_ONLY, WebSocket using callback, Init calls
- curl_global_trace: Trace more
- CURL_IPRESOLVE_V6: Name resolving
- CURL_MAX_WRITE_SIZE: Write data
- curl_mime_addpart: HTTP multipart formposts, Non-blocking HTTP form-post
- curl_mime_filedata: HTTP multipart formposts, Non-blocking HTTP form-post
- curl_mime_init: HTTP multipart formposts, Non-blocking HTTP form-post
- curl_mime_name: HTTP multipart formposts, Non-blocking HTTP form-post
- curl_multi_add_handle: Drive with multi, Many easy handles, Non-blocking HTTP form-post, Curl_multi
- curl_multi_cleanup: Multi API, Non-blocking HTTP form-post
- curl_multi_fdset: Drive with multi, Curl_easy
- curl_multi_info_read: When is a single transfer done?, When is it done?, Multi API, Curl_multi
- curl_multi_init: Drive with multi, Non-blocking HTTP form-post
- curl_multi_remove_handle: Drive with multi, Many easy handles, multi API, Multi API
- curl_multi_setopt: docs/libcurl/opts, Drive with multi, socket_callback, Multiplexing
- curl_multi_socket_action:
curl_multi_socket_action, socket_callback - curl_multi_timeout: Drive with multi, Exposes a single timeout to apps
- curl_multi_wait: Drive with multi
- curl_off_t: Transfer and connection identifiers, Set numerical options, Progress information, Seek and ioctl, Rate limit, Available information, Response meta-data, HTTP PUT, Meta,
curl_ws_send() - CURL_SOCKET_TIMEOUT: timer_callback
- CURL_SSL_BACKEND: Line 1: TLS versions, Multiple TLS backends
- curl_url: Include files, Create, cleanup, duplicate, Parse a URL, Redirect to URL, Update parts, CURLOPT_CURLU
- curl_url_cleanup: Create, cleanup, duplicate
- curl_url_dup: Create, cleanup, duplicate
- curl_url_get:
CURLU_ALLOW_SPACE, Get a URL, Get URL parts - curl_url_set: Include files, Parse a URL, Redirect to URL, Set URL parts, Append to the query, CURLOPT_CURLU
- curl_version_info: Which libcurl version runs, Support
- --curves:
--curves
D
- -d: Arguments to options, Separate options per URL, POST, MQTT, Method, Simple POST, Content-Type, Posting binary, Convert to GET, Expect 100-continue, Chunked encoded POSTs, Hidden form fields, -d vs -F, HTTP PUT, Web logins and sessions
- --data: Arguments to options, Separate options per URL, POST, Simple POST, URL encode data
- --data-binary: Not perfect, Simple POST, Posting binary, JSON, URL encode data
- --data-urlencode: Query, URL encode data, Convert to GET
- debian: Ubuntu and Debian, Version
- Debug callback: Verbose operations, All options, Debug
- development: Project communication, curl-users, Reporting bugs, Commercial support, Development, The development team, Future, Ubuntu and Debian, Get libcurl for macOS, Who decides what goes in?, From Safari, Figure out what a browser sends, Converting a web form, Which libcurl version runs, Verification, Debug builds
- DICT: What protocols does curl support?, DICT, Without scheme, Version, DICT,
CURLU_GUESS_SCHEME - --dump-ca-embed: Built-in certificate store
E
- --ech: ECH
- ECH: TLS, ECH
- Edge: Copy as curl, Ifdefs
- environment variables: Environment variables, Windows, Proxy environment variables, Proxy environment variables,
<setenv> - ephemeral port: Local port number
- ETag: Conditionals
- --etag-compare: Check by modification of content
- --etag-save: Check by modification of content
- /etc/hosts: Run a local clone, Host, Edit the hosts file
- etiquette: Mailing list etiquette
- event-driven: Drive with multi_socket, Everything is multi
F
- -F: Not perfect, multipart formpost, Method, Sending such a form with curl, -d vs -F
- --fail: Available exit codes, HTTP response codes
- --fail-with-body: HTTP response codes
- Firefox: Copy as curl, Discover your proxy, SSLKEYLOGFILE, User-agent
- Fragment: Query, Fragment, Available --write-out variables, Fragment, Write callback, Meta,
curl_ws_send() - --ftp-method: multicwd
- --ftp-pasv: Passive connections
- --ftp-port: Available exit codes, Active connections
- --ftp-skip-pasv-ip: Passive connections
- FTPS: What protocols does curl support?, FTPS, TLS libraries, Supported schemes, Network leakage, Version, Trace options, Protocols allowing upload, Enable TLS, FTPS, Variables
- future: Project communication, Future, What other protocols are there?, docs, curl-security@haxx.se, "Not used", More data, TLS session cache, API compatibility, Trace more, Network data conversion, HSTS,
age, Set a timeout
G
- --get: trurl example command lines, Convert to GET
- git: Daily snapshots, Backdoors and supply chain risks, Building libcurl on MSYS2, root, git, Website, build boringssl, Continuous Integration, Autobuilds
- Globbing: URL globbing, Reading URLs from a file, Globbing, Skip download if already done, Uploading with FTP
- GnuTLS: lib/vtls, Select TLS backend, TLS libraries, Native CA stores, OCSP stapling, Restrictions, HTTP/3 backends,
<features> - GOPHER: How it started, What protocols does curl support?, GOPHER, Supported schemes, Version, Variables
- GOPHERS: What protocols does curl support?, GOPHERS, Supported schemes, Variables
H
- Happy Eyeballs: Happy Eyeballs, All options, Happy Eyeballs
- --happy-eyeballs-timeout-ms: Tweak
- haproxy: haproxy, All options
- --haproxy-clientip: curl and haproxy
- --haproxy-protocol: curl and haproxy
- --header: Server differences, Proxy headers, JSON, Customize headers
- Header callback: All options, Header data, Response body, Download headers too
- homebrew: macOS
- Host:: HTTP basics, Trace options, Change the Host: header, The HTTP this generates, Customize headers, Customize HTTP request headers
- --hostpubmd5: Public key verification
- --hostpubsha256: Public key verification
- --hsts: HSTS cache
- HSTS: HTTPS, HSTS, All options, HSTS, HSTS, What to share, HSTS,
<features> - HTTP proxy: How it started, Proxy type, HTTP proxy, Proxy headers, Authentication, All options, HTTP proxy, Available information,
<proxy [nonewline="yes"]> - HTTP redirects: Short options, Long options, Available exit codes, Tell curl to follow redirects, Submit a login form over HTTP
- HTTP Strict Transport Security: HSTS, HSTS, HSTS
- HTTP/1.1: HTTP, HTTP basics, Trace options, HTTP/2, Debugging with TELNET, HTTP/2, Caveats, The HTTP this generates, GET or POST?, Request method, Request target, Customize HTTP request headers, Versions, About content encodings
- HTTP/2: HTTP, docs, nghttp2, Line 4: Features, Available exit codes, More data, HTTP/2, HTTP/2, HTTP/3, HTTP/2 and later, GET or POST?, HTTP headers, HTTP/3, Trace more, When connections are not reused as you want, QUIC and HTTP/2, DNS over HTTPS, HTTPS proxy, Versions, Expect: headers, Multiplexing, HTTP/3, Curl_easy, Variables
- HTTP/3: HTTP, Select HTTP/3 backend, QUIC and HTTP/3, TCP vs UDP, Line 4: Features, Available exit codes, More data, HTTP/3 racing, HTTP/3, HTTP headers, HTTP/3, Which libcurl version runs, Trace more, HTTP/3, When connections are not reused as you want, Versions, Expect: headers, Multiplexing, HTTP/3, Different backends
- HTTP/3 backend: Select HTTP/3 backend, HTTP/3 backends
- --http0.9: HTTP/0.9
- --http2: HTTP/2
- --http2-prior-knowledge: HTTP/2
- --http3: HTTP/3 racing, Enable
- --http3-only: When QUIC is denied
- HttpGet: How it started
- HTTPS proxy: Line 4: Features, HTTPS proxy, All options, Local or proxy name lookup
I
- IDN: libidn2, International Domain Names (IDN), Version,
CURLU_URLENCODE, Different backends,<features> - IETF: Protocols, TLS versions
- Indentation: Indentation
- International Domain Names: libidn2, International Domain Names (IDN), Line 4: Features
- --ip-tos: Type of Service
- IPFS: IPFS
- --ipfs-gateway: Gateway
- IPv4: Host, Port number, Available --write-out variables, Type of Service, Happy Eyeballs, curl and haproxy, All options, How libcurl connects, Name resolving,
host*.csources, Variables - IPv6: Host, Port number, URL globbing, Version, Available --write-out variables, Type of Service, Happy Eyeballs, SOCKS proxy, curl and haproxy, All options, How libcurl connects, Name resolving, Zone ID,
CURLRES_IPV6, Variables - IRC: How it started, Project communication
J
- JavaScript: Client differences, PAC, JavaScript and forms, JavaScript redirects, Figure out what the browser does
- --json: trurl example command lines, JSON
- json: Arguments with spaces, Expand functions, Available --write-out variables, Content-Type, JSON, POST outside of HTML
K
- -K: Command lines, quotes and aliases, Specify the config file to use
- keep-alive: All options, Example
- --keepalive-cnt: Keep alive
- --keepalive-time: Keep alive
L
- -L: Short options, Available --write-out variables, Location: too, Tell curl to follow redirects, Request method, Cookie engine, Reading cookies from file, Redirects
- LD_LIBRARY_PATH:
LD_LIBRARY_PATH - --libcurl: --libcurl
- libcurl version: Line 1: curl, Available exit codes, Which libcurl version, Network data conversion
- libidn2: libidn2
- libpsl: libpsl
- LibreSSL: TLS libraries, Restrictions, HTTP/3 backends
- libssh: SSH libraries,
<features> - libssh2: SSH libraries,
<features> - license: Finding users, License, root, License
- --limit-rate: Rate limiting
- --location: Long options, Separate options per URL, Syntax, Tell curl to follow redirects
- Location: docs, Command line options, Options
M
- --max-filesize: Maximum filesize
- --max-time: Tweak your retries, Maximum time allowed to spend
- mbedTLS: lib/vtls, TLS libraries, All options, SSL context
- MIT: License
- --mptcp: Multipath TCP
- MQTT: What protocols does curl support?, MQTT, Supported schemes, Line 3: Protocols, MQTT, Variables, Test servers
- mTLS: Client certificates
- multi-threading: multi-threading
- Multipath TCP: Multipath TCP
N
- name resolving: Hostname resolving, Handling build options, Available --write-out variables, Name resolve tricks with c-ares, SOCKS proxy, Connection reuse, Name resolving, Proxy types, Available information, Different backends
- --negotiate: Network leakage, Authentication
- .netrc: Command line leakage, .netrc, All options,
.netrc,<features> - --netrc-file: Enable netrc
- --netrc-optional: Enable netrc
- nghttp2: nghttp2, Which libcurl version runs
- nix: nix
- --no-clobber: Overwriting
- --no-eprt: Active connections
- --no-epsv: Passive connections
- --no-keepalive: Keep alive
- NPN: All options
- --ntlm: Network leakage, Authentication
O
- -O: Many options and URLs, Numerical ranges, Download to a file named by the URL, Use the target filename from the server, Shell redirects, Multiple downloads, Resuming and ranges, Request rate limiting, For SFTP/SCP, Skip download if already done, Authentication, Download, Check by modification date
- openldap: openldap
- OpenSSL: Get curl and libcurl on MSYS2, lib/vtls, Select TLS backend, TLS libraries, Available exit codes, Native CA stores, OCSP stapling, Restrictions, All options, SSL context, Available information, HTTP/3 backends,
<features> - --out-null: Discard received data
- --output-dir: Store in another directory, Use the target filename from the server
P
- PAC: PAC, Which proxy?
- --parallel: Reading URLs from a file, Parallel transfers, Parallel progress meter, Parallel, Request rate limiting
- --parallel-immediate: Connection before multiplex
- --parallel-max: Parallel transfers
- --parallel-max-host: Reduce load on individual hosts
- --path-as-is: --path-as-is
- Percent-encoding: URL encode data
- pop3: What protocols does curl support?, POP3, Without scheme, Version, Available exit codes, Enable TLS, IMAP, POP3, Secure mail transfer, STARTTLS,
CURLU_GUESS_SCHEME, Variables, Test servers - port number: Connect to port numbers, The URL converted to a request, Port number, Reduce load on individual hosts, trurl example command lines, Available exit codes, Available --write-out variables, Provide a custom IP address for a name, Local port number, HTTP proxy, Historic TELNET, Enable, Converting a web form, Implicit FTPS, All options, Prereq, Local address and port number, Connection reuse, Custom addresses for hosts, Proxies, Post transfer info,
CURLU_DEFAULT_PORT, Set URL parts, Alt-Svc, Base64 Encoding - Post-quantum: TLS, Post-quantum
- --post301: Decide what method to use in redirects
- --post302: Decide what method to use in redirects
- --post303: Decide what method to use in redirects
- PQC: Post-quantum
- Progress callback: All options, timer_callback, Progress information, easy API, Progress callback
- pronunciation: Pronunciation
- --proxy: HTTP proxy, Authentication
- proxy: How it started, Line 4: Features, Available exit codes, Available --write-out variables, Intermediaries' fiddlings, Discover your proxy, PAC, Proxy type, HTTP proxy, SOCKS proxy, MITM proxy, Proxy authentication, HTTPS proxy, Proxy environment variables, Proxy headers, haproxy, CONNECT response codes, Authentication, Verification, All options, Proxies, Available information, Variables
- --proxy-ca-native: Native CA stores
- --proxy-http2: HTTP/2
- --proxy-user: Proxy authentication, Authentication
- --proxy1.0: HTTP proxy tunneling
- --proxytunnel: HTTP proxy tunneling
Q
- -Q: Quote
- QUIC: Establish a connection, HTTPS, QUIC and HTTP/3, Available exit codes, Multipath TCP, HTTP/3 racing, Never spend more than this to connect, QUIC, Which libcurl version runs, HTTP/3, Enable keep alive, Authentication, Version 3 can be mandatory, HTTP/3 backends
- --quote: Quote
R
- ranges: Numerical ranges, Resuming and ranges, Skip download if already done, A range trick, Ranges, Provide a file descriptor, HTTP response code, Ranges
- --rate: Request rate limiting
- Read callback: make callbacks as fast as possible, All options, Read data, HTTP POST
- redhat: Redhat and CentOS
- redirects: Long options, Separate options per URL, Syntax, Available exit codes, Available --write-out variables, Download to a file named by the URL, Location: too, Shell redirects, Provide a custom IP address for a name, Captive portals, Redirects, Request method, Redirects, All options, Custom addresses for hosts, Available information, Automatic referrer, Submit a login form over HTTP
- RELEASE-NOTES: scripts
- releases: curl-announce, Releases, Backdoors and supply chain risks, scripts, Which libcurl version
- --remote-name-all: One output for each given URL, Use the URL's filename part for all URLs
- --remove-on-error: Leftovers on errors
- repository: Releases, Backdoors and supply chain risks, Source code on GitHub, The development team, Arch Linux, Building libcurl on MSYS2, root, What to add, Website, Continuous Integration, Autobuilds, Content
- --resolve: Provide a custom IP address for a name
- --retry: Available --write-out variables, Retry, Request rate limiting
- --retry-all-errors: Retry on any and all errors
- --retry-connrefused: Connection refused
- --retry-delay: Tweak your retries
- --retry-max-time: Tweak your retries
- RFC 1436: GOPHER
- RFC 1738: FILE, multicwd
- RFC 1939: POP3
- RFC 1945: Redirects
- RFC 2229: DICT
- RFC 2246: TLS versions
- RFC 2326: RTSP
- RFC 2595: IMAP
- RFC 2616: About content encodings
- RFC 2818: HTTPS
- RFC 3207: SMTP
- RFC 3501: IMAP
- RFC 3986: Browsers
- RFC 4217: FTPS
- RFC 4511: LDAP
- RFC 5321: SMTP
- RFC 7838: Alternative Services
- RFC 8314: IMAPS
- RFC 8446: TLS versions
- RFC 854: TELNET
- RFC 8999: HTTPS
- RFC 9110: HTTP
- RFC 9112: HTTP
- RFC 9113: HTTP
- RFC 9114: HTTP
- RFC 959: FTP, Quote
- roadmap: Future
- rpath:
rpath - RTSP: What protocols does curl support?, RTSP, Supported schemes, Version, All options, RTSP interleaved data, Available information, Variables
- rustls: TLS libraries,
<features> - rustls-ffi: Select TLS backend, Rustls
S
- Safari: Copy as curl
- Schannel: TLS libraries, Native CA stores, HTTP/3 backends,
<features> - Scheme: Connect to port numbers, FILE, Naming, Scheme, Name and password, TCP vs UDP, Browsers, Available exit codes, Available --write-out variables, Proxy type, SOCKS proxy, Proxy authentication, TLS for IMAP, TLS for POP3, Which libcurl version, Proxy types, Available information, Authentication,
CURLU_NON_SUPPORT_SCHEME,CURLU_DEFAULT_PORT, URLs, Get a response into memory, Protocol handler, Curl_handler - SCP: What protocols does curl support?, SCP, SSH libraries, Supported schemes, Version, Available exit codes, Protocols allowing upload, Compression, URLs, Authentication, Known hosts, Protocol, All options, Authentication, Curl_handler,
<server> - security: trurl, a URL tool, curl-announce, Commercial support, Security, Trust, Security, How much do protocols change?, FTPS, docs, Reporting vulnerabilities,
http_proxyin lower case only, TLS, Ciphers, Enable TLS, TLS versions, Requirements and Dependencies, How to use early data, Public key verification, HTTP/0.9, HSTS, Protocol version, All options, HSTS, Authentication, What to share, URLs, HSTS - SFTP: What protocols does curl support?, SFTP, SSH libraries, Supported schemes, Version, Available exit codes, Trace options, Protocols allowing upload, Compression, URLs, Authentication, Known hosts, Protocol, All options, Authentication, Curl_handler,
<server>, Run a range of tests - --silent: Progress meter, Error message
- --skip-existing: Reading URLs from a file, Skip download if already done
- SMTP: What protocols does curl support?, SMTP, Without scheme, Version, Available exit codes, Protocols allowing upload, Enable TLS, SMTP, STARTTLS, All options,
CURLU_GUESS_SCHEME, Variables, Test servers - SMTPS: What protocols does curl support?, SMTPS, TLS libraries, Supported schemes, Version, Protocols allowing upload, Enable TLS
- snapshots: Daily snapshots, root
- SNI: Change the Host: header, ECH
- --socks4: SOCKS proxy
- --socks4a: SOCKS proxy
- --socks5: SOCKS proxy
- --socks5-hostname: SOCKS proxy
- --speed-limit: Stop slow transfers
- --speed-time: Stop slow transfers
- SSH: SCP, Select SSH backend, SSH libraries, Available exit codes, Authentication, Known hosts, Why Use It?, Historic TELNET, Trace everything, All options, SSH key, Authentication, Different backends, Curl_handler, Variables
- SSH backend: Select SSH backend
- SSL context callback: All options
- --ssl-sessions: TLS session cache
- SSLKEYLOGFILE: TLS, SSLKEYLOGFILE, Figure out what a browser sends
- STARTTLS: IMAP, TLS for IMAP, TLS for POP3, STARTTLS
T
- -T: PUT, Upload, Method, HTTP PUT, Uploading with FTP
- TCP: Establish a connection, How much do protocols change?, DICT, TCP vs UDP, Available exit codes, Available --write-out variables, Multipath TCP, Connection timeout, HTTP/3 racing, Local port number, Keep alive, Timeouts, HTTP proxy tunneling, MITM proxy, haproxy, TLS, Debugging with TELNET, TFTP, QUIC, HTTPS, Two connections, Connection cache, All options, HTTP/3, Keep alive, connectdata
- TELNET: What protocols does curl support?, TELNET, Supported schemes, Version, Available exit codes, TELNET, All options, Variables
- testing: What does curl do?, Reporting bugs, Release candidates, Handling build options, Contributing, Run a local clone, Separate install, About HTTP response code "errors", Debug builds, Test servers, Torture
- TFTP: What protocols does curl support?, TFTP, Supported schemes, TCP vs UDP, Version, Available exit codes, Protocols allowing upload, TFTP, All options, Variables, Test servers
- --tftp-blksize: TFTP options
- --tftp-no-options: TFTP options
- --time-cond: Check by modification date
- TLS: Security, How much do protocols change?, GOPHERS, The URL converted to a request, Ubuntu and Debian, lib/vtls, Handling build options, Select TLS backend, TLS libraries, TLS libraries, Line 1: curl, Available exit codes, More data, Available --write-out variables, Change the Host: header, Never spend more than this to connect, MITM proxy, TLS, Ciphers, Enable TLS, TLS versions, Verifying server certificates, Certificate pinning, OCSP stapling, Client certificates, TLS auth, TLS backends, SSLKEYLOGFILE, ECH, Built-in certificate store, TLS sessions and early data, Post-quantum, Known hosts, TLS for IMAP, Caveats, TLS for POP3, HTTPS only, Figure out what a browser sends, HTTPS, TLS fingerprinting, FTPS, Trace everything, Caches, reuse handles, TLS options, All options, SSL context, HTTP proxy, Authentication, Available information, URLs, Different backends, connection cache, Variables
- TLS backend: Ubuntu and Debian, lib/vtls, Select TLS backend, Line 1: curl, Available exit codes, TLS, Native CA stores, Certificate pinning, OCSP stapling, Client certificates, TLS backends, CA cert cache, CA store caching, SSL context
- --tls-earlydata: Available --write-out variables, TLS session cache
- TODO: Future, Suggestions
- --tr-encoding: Transfer encoding, Compression
- --trace: Trace options,
<command [option="no-output/no-include/force-output/binary-trace"] [timeout="secs"][delay="secs"][type="perl/shell"]> - --trace-ascii: Trace options, Server differences,
<command [option="no-output/no-include/force-output/binary-trace"] [timeout="secs"][delay="secs"][type="perl/shell"]> - --trace-config: More data
- --trace-ids: Identify transfers and connections
- --trace-time: Time stamps
- Traffic Class: Type of Service
- transfer-encoding: Pass on transfer encoding, Chunked encoded POSTs
- trurl: What does curl do?, trurl
- Type of Service: Type of Service
U
- -U: Building libcurl on MSYS2, Help with a specific option, Proxy authentication
- -u: Building libcurl on MSYS2, Passwords, URLs, Authentication, Basics, Authentication
- Ubuntu: Ubuntu and Debian
- URL Globbing: URL globbing
- URL parser: trurl, a URL tool, Browsers, trurl,
CURLU_ALLOW_SPACE - --url-query: Query
V
- --variable: Setting variables, Expand variables, Environment variables, Expand
--variable,b64 - variables: No assignments in conditions, Output variables for globbing, Config file, Assign variables, Expand variables, Environment variables, Expand
--variable, Expand functions, Error message, Write out, Available --write-out variables, Proxy environment variables, Ciphers, Proxy environment variables, Preprocessed - --verbose: Long options, Time stamps
- --version: Version, TLS backends, Memory debugging
- --vlan-priority: VLAN
- Vulnerability: Backdoors and supply chain risks, Vulnerability handling
W
- wcurl: What does curl do?
- Wireshark: Available exit codes, Trace options, SSLKEYLOGFILE, Figure out what a browser sends
- wolfSSL: Commercial support, lib/vtls, TLS libraries, Native CA stores, Restrictions, All options, SSL context, HTTP/3 backends,
<features> - Write callback: make callbacks as fast as possible, Callback considerations, All options, Write data, Response body, 1. The callback approach, Raw mode, Write callback, Get a simple HTTP page, Get a response into memory, WebSocket using callback
- --write-out: Error message, Write out, Available --write-out variables, Time specifiers, Overwriting, HTTP response codes
X
- -X: HTTP PUT, Request method, Request target
- -x: HTTP proxy, SOCKS proxy, Proxy authentication, Proxy environment variables, Proxy headers, Proxy environment variables
Y
- yum: Redhat and CentOS